


Travis Offenberger's Barack F-16
Kit: Tamiya 1:32 Block 50 F-16C
Aftermarket: Isracast Block 40 resin conversion set, Isracast Block 40 decals, Aires cockpit set and engine nozzle, Eduard exterior PE set.
Primary Paints Used:
Testors Model Master 4709 Dark Tan
Testors Model Master 4720 Sand
Testors Model Master 4840 RAF Sky Type 'S'Ana <---This is the green color
Testors Model Master 4762 Light Ghost Gray
Build Time: 39 days
I have had this kit in my stash for about 6 months and the time has arrived! I have been collecting bits and pieces for it over the months and am ready to rock this baby out! Like my last big project, Academy's 1:32 F/A-18C, I am pretty nervous about starting just because of the sheer cost of the kit and the scope of the build. However, I am chomping at the bit to do this.
I THINK I am going to do it up in the Miswa markings, but if anyone knows of any more...interesting color schemes please sound off. I have looked high and low and there just isn't much available for the Block 50 in this scale. I had thought about getting Isradecal's Block 40 conversion kit and doing it up as a Barack but I just couldn't justify another $70 outlay for the kit.
OK...here it goes!!


VERY pretty pit....unfortunately...the fit is a bit wonky. The front end is going to be the worst to fill. I am thinking the best way to attack it is to use superglue and talc to start and then take it from there. I'm afraid though that I'm going to lose some detail from the resin. If anyone has any experience with this pit can you give me any pointers? It should come out OK in the end though.
I haven't bothered doing much detail work at the back of the cockpit yet. Where the seat will cover I'm not going to do much beyond what you see, but the back black section will get a dry brushing once it is glued in place.


It took some work, but I got the pit in place and in pretty good shape. I had to redo some of the wiring at the back but no big deal.

It took three tries to get the tip and swirl method to work right. I tried three different types of Gloss White. Tamiya, Vallejo Model Air and Testors Model Master Acrylic. I got cracking and rippling with the first two types of paint. The Testors is what you see here and came out almost perfect. I have a nice, glossy, plasticy looking intake and I haven't even applied any future yet (I will get to that once everything has dried 100%.)
I got the wheel bay set in place as well. That was my day....how was yours? 


Stop the presses folks! I had to strip and redo the intake due to some rippling issues. So, looking around the old paint rack I spotted my Citadel Skull White. I thought "why not" and poured it in. I know that this isn't the best pic, but this is with ONE COAT! It is perfectly smooth and looks even better than the Model Master paint.
Other than that, I got the top fuselage together (that was a two person job in all honesty.)
Anyway...back to the show...

Not much progress....it is the busy season at work and I have been putting in a lot of overtime. Maybe I will treat myself to one of those lovely new 1:32 Trumpeter beasts that are coming out.
Anyway, got the tail extension added. I still have some rescribing to do but it looks pretty good. A coat of camo paint will make me fell much better, but a coating of primer revealed no real issues other than a slightly misshapen port side from over sanding. Nothing that the camo won't fix though.
Fun side note...the manager of my friendly local hobby store if doing the new Sufa conversion for the Thunderbirds version of this kit. He is having serious gap issues with the spine just like about every review I have read says. 
Making gradual progress. I have most of the main body together and am starting on attaching the resin bits that make it a Block 40. Its a bit more work than I thought but no biggie. Only had one call for filler on the side aft of one of the wings. For some reason I got a HUGE gap there. I even had to mount some plasticard on the inside to give the filler something to back onto. Otherwise, its been a seamless build.


Its the end of week 2 and I am about 70% of the way through the build portion of the kit. I still have to do the weapons, engine and landing gear, but those will probably be done after the bulk of the painting. I have all of the resin goodies and conversion stuff attached from the Isradecal set and most of it went on with no fuss. I do have to say though that the quality of their casting and detail is not as great as I had hoped. Not bad, but not nearly as good as some other resin vendors. Otherwise, its been a fun build so far.


Guess what I spent the day doing???
First pass of paint is done. I will go over with the fill layer on Sunday (stupid wedding to go to tomorrow for someone I don't even like in CLEVELAND on less).


Still have some cleanup to do, but you get the gist...

Here are the paints I used for the exterior...all are Testors Model master Acrylics...
4709 Dark Tan
4720 Sand
4840 RAF Sky Type 'S'Ana <---This is the green color
4762 Light Ghost Gray
Got the coat of Future on this morning...time to sit for 24 hours then I can decal.
All this just to mask off a part that should have been painted metal BEFORE it got attached...sheesh....
Otherwise....quite glossy!!!!

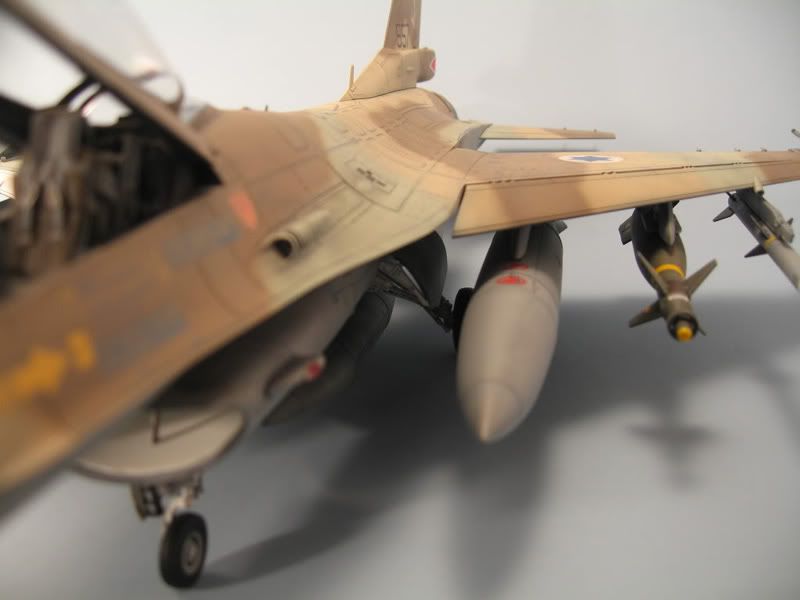
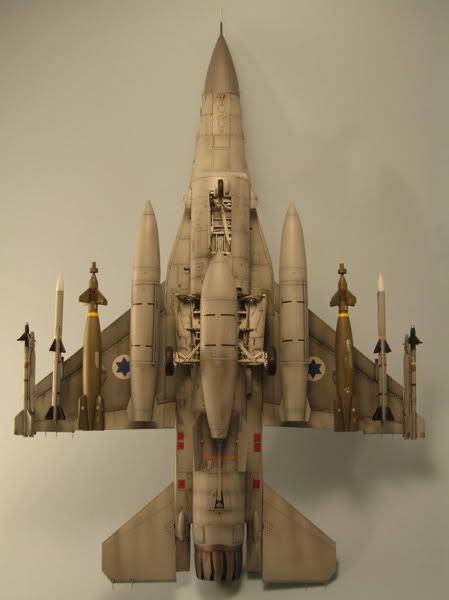
Spent some time today working on the boom sticks and gas bags. The GBUs are from the spares box. I THOUGHT they would come in handy some day!
Not much progress....I obliterated some raised detail on the missile rails trying to get the light posts set so I sanded the whole thing flush and replaced the detail with plasticard. Other than that, haven't done much in the last few days.
__________________
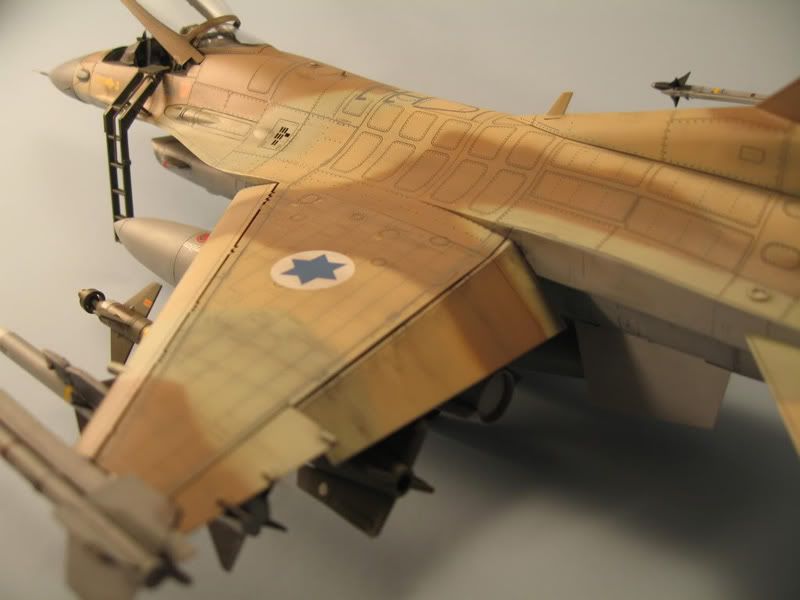
Finally made some progress! Got the decaling done. I need to do some touch up paint on the underside, get the parapack and nose antennas painted, but the main part is done. I decided not to fool with the radar and have added some plasticard to the interior of the nose to give the radome something to rest on. Its nice to get some forward movement here.


Wash on...wash off....
Do you people have ANY idea of how long it takes to get that much wash off a build this size? 
Anyway...started the bare beginnings of a bit of weathering. I don't expect to dirty this bird up too much and will probably knock back what I do have done just a bit.
Hoping to get some work in on the landing gear tomorrow. I would REALLY like to get this thing on its feet....for me that's usually where I can see the beginning of the end. I also need to start SOMETHING on the resin engine.


She's on her feet!!!
Plenty left to do. I need to finish up the engine nozzle, do a ton of work on the undercarriage, get the ordinance decaled and straightened out, get the ejection seat done, attach the antennas and flat coat it.
Yeah....homestretch...


My last official act of the build was to glue in place the nose pitot tube...

Abbie would like to take a moment to thank everyone on my behalf for their kind words and encouragement over the course of the build. Of course, now that its done she will have to sit on the kit at least once....to try it out.
This was a fun project from beginning to end. I have done the 1:48 version of this kit twice and the experience carries over well to her bigger cousin. The Isracast conversion parts went on with plenty of elbow grease and I'm not really impressed with the quality of their work. The detail seems soft in places but do a good job where need be. Their decals also seemed a bit thick and never really responded well to Solva Set. The Aires cockpit looks good thanks to a ton of filling, grinding and sanding...not for the faint of heart. However, the engine dropped in perfectly and was a great addition to the kit.


Travis 