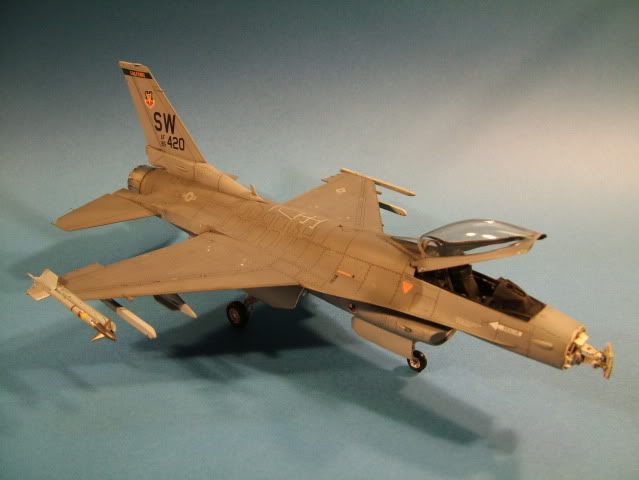
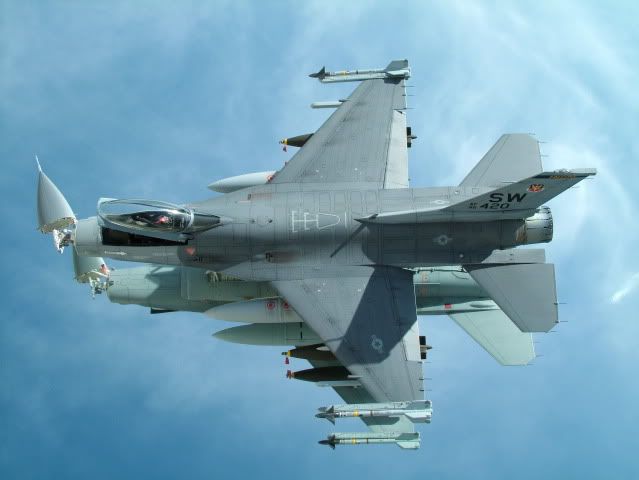
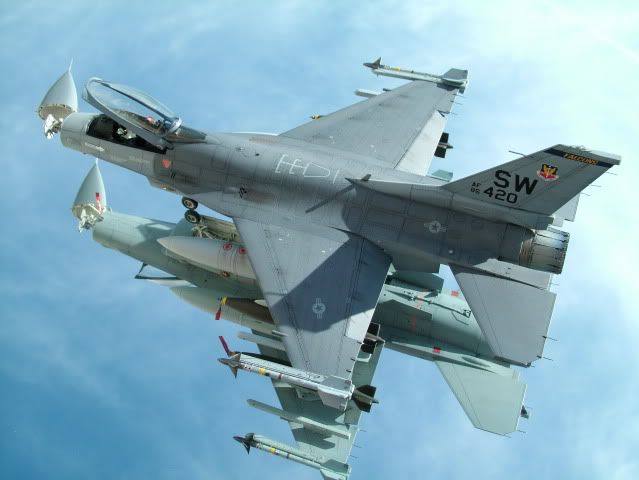
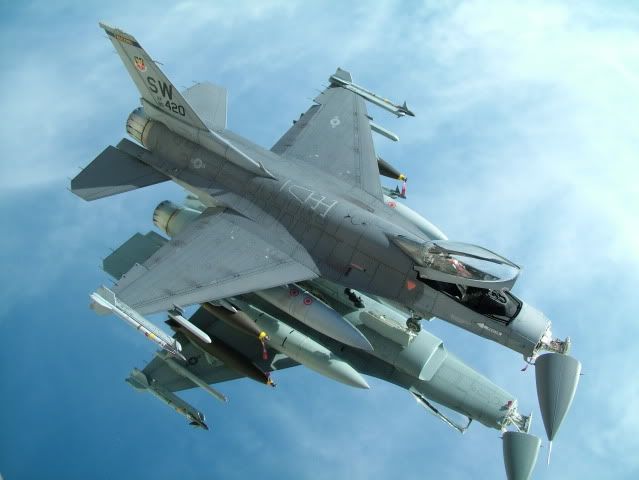
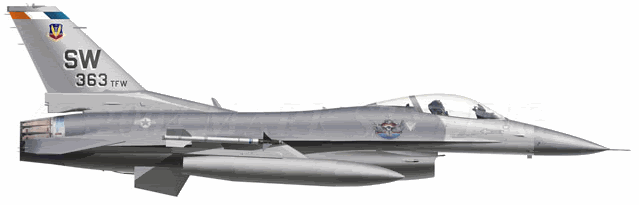
F-16C Block 25F Fighting Falcon
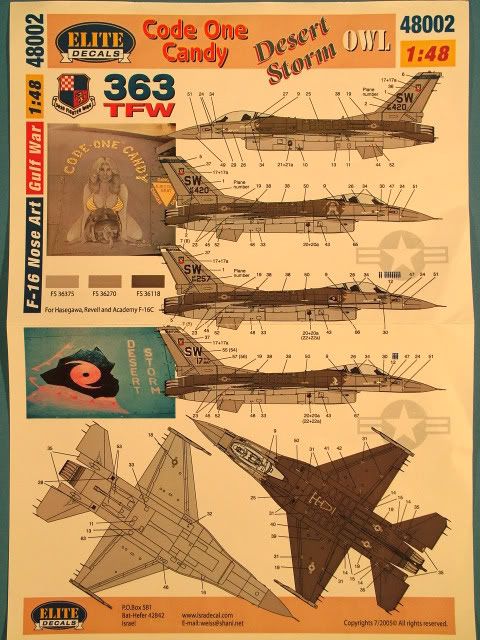
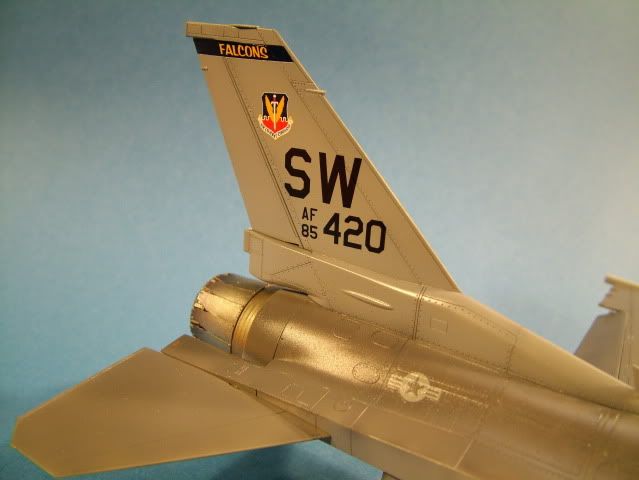
363 TFW Al Dhafra Air Base UAE “Code One Candy”
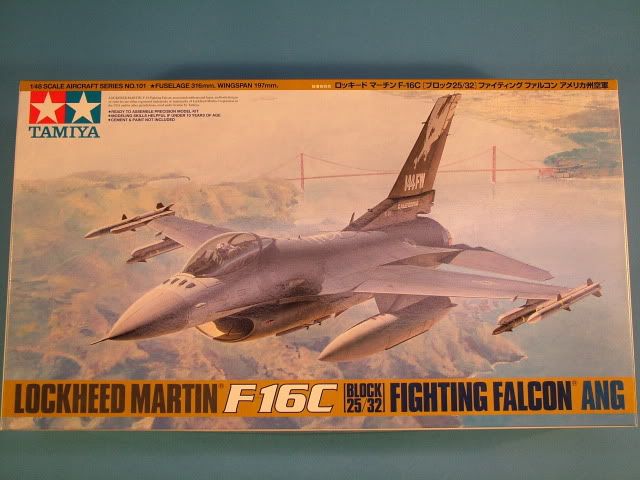
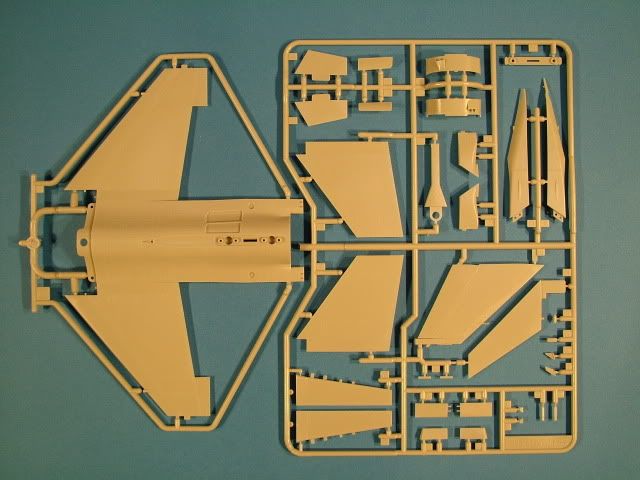
1:48 scale release from Tamiya Models of an F-16 C, kit number 101. I will be modeling the scheme of the 363 TFW stationed in Al Dhafra AFB, UAE which is included on the Isra decal sheet #48002.
Short History:
This aircraft flew 56 missions during Desert Storm Operations. When the 363rd TFW returned home from Desert Storm in March of 1991 four aircraft kept their nose art for the Shaw AFB open house. The other three aircraft were with nose art: "Desert Shield", "Sweet . . . But Deadly", and "Hammer Time" which Warren Trask touched up before the show. All nose art but "Hammer Time" was removed right after the air show.
Comments about the planned build:
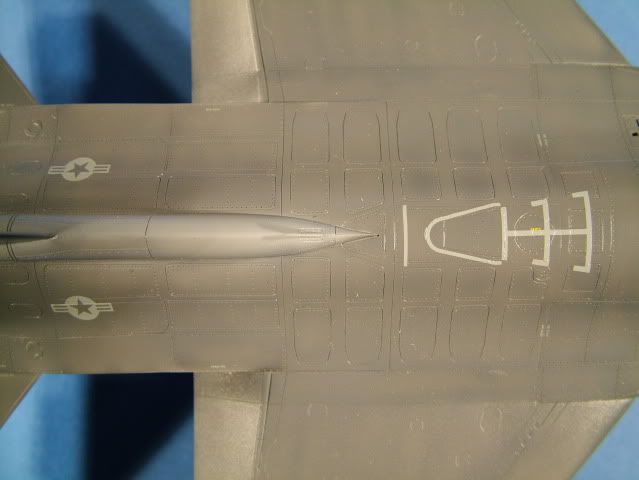
Pre-shading to be performed utilizing Mr. Color Paint Line of Sky Gray primer coat and Flat Black. The camouflage scheme consists of FS36375 Light Ghost Grey (Mr Color #308) and FS36118 Dark Ghost Grey (Mr Color #305) for the upper/lower surfaces. Interior wheel wells, doors, and engine intake are Gloss White using Tamiya XF-2, and then over-sprayed with a gloss cote of Testors Gloss Clear lacquer.
The engine nozzle will be detail painted to simulate heat distortions by using various shades of Alclad II and Alclad II Clear Blue.
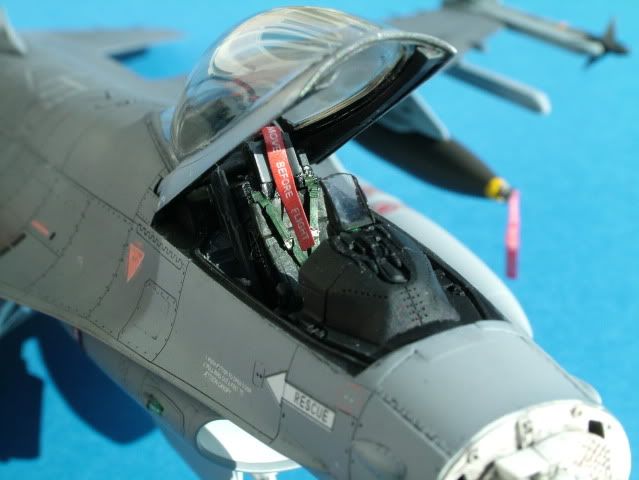
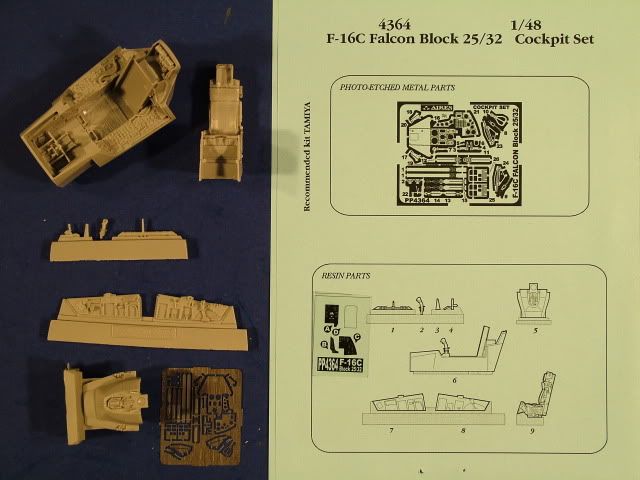
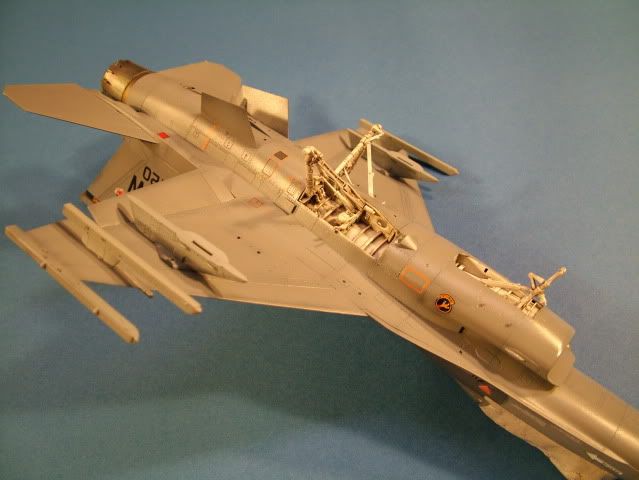
The engine nozzle will be upgraded with an Aires unit and the Pitot tube will be upgraded with a metal version from Master Model.pl. The kit cockpit will be replaced with the excellent offering from Aires.
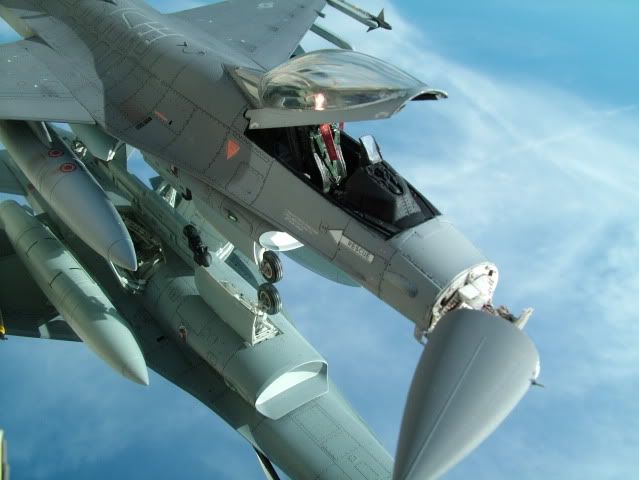
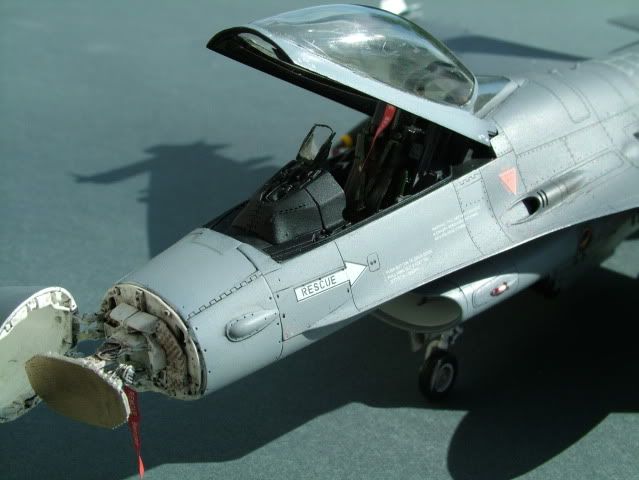
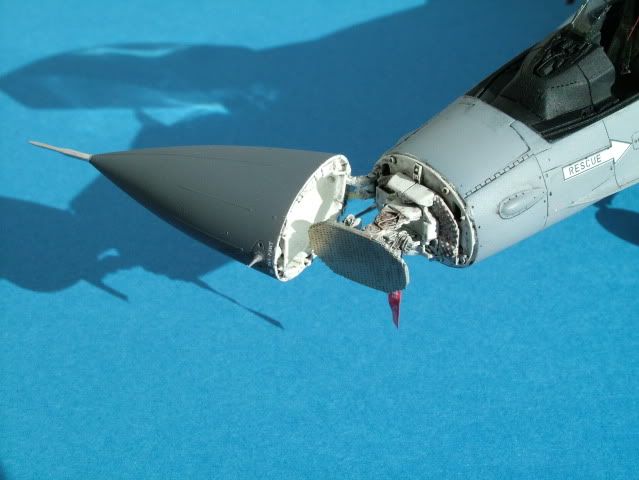
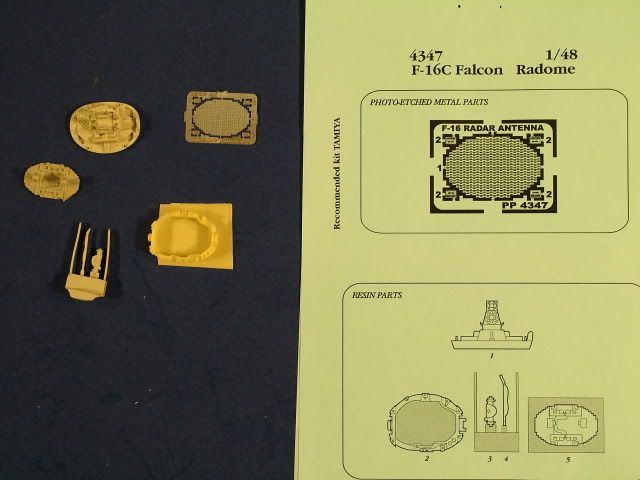
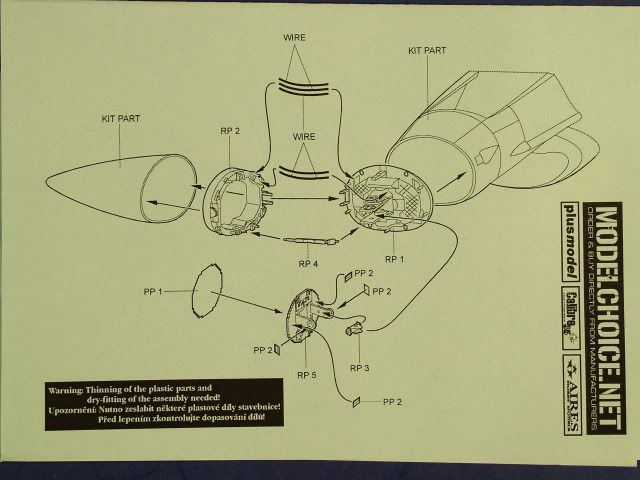
The nose cone will be opened up and the radar/fire control module will be exposed using the Aires upgrade for that particular detail.
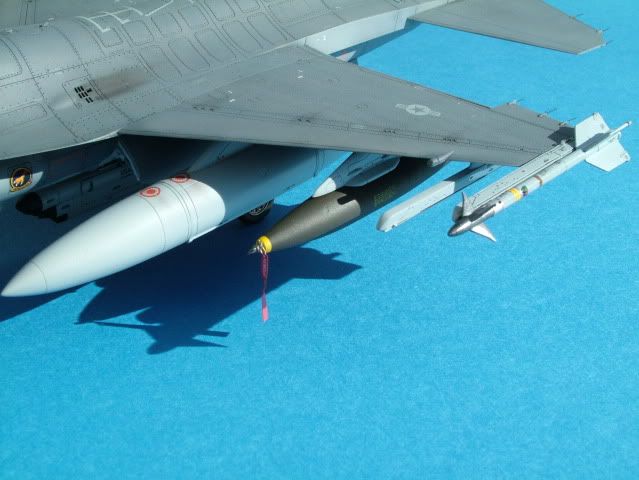
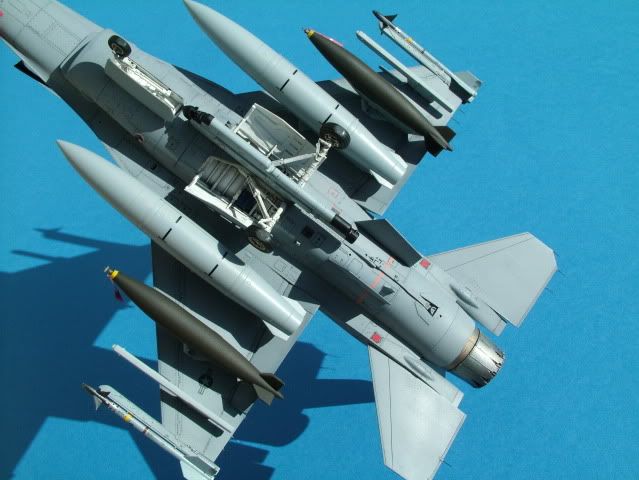
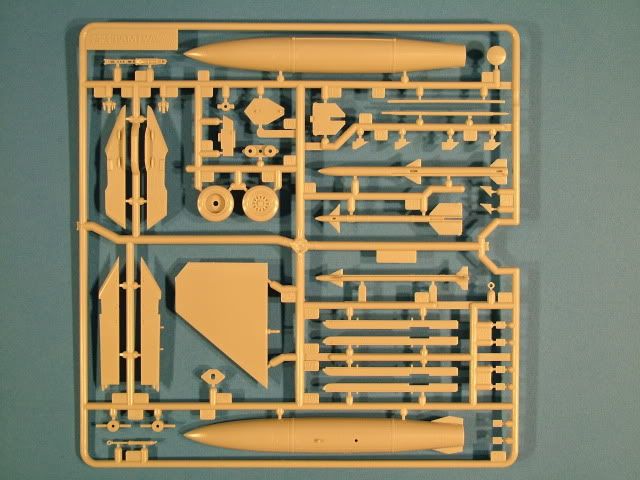
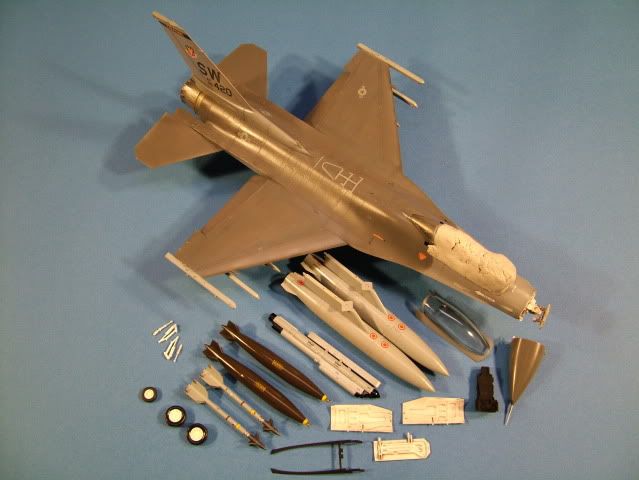
She will be loaded out with a weapons set combination from the included kit parts in the following schema:
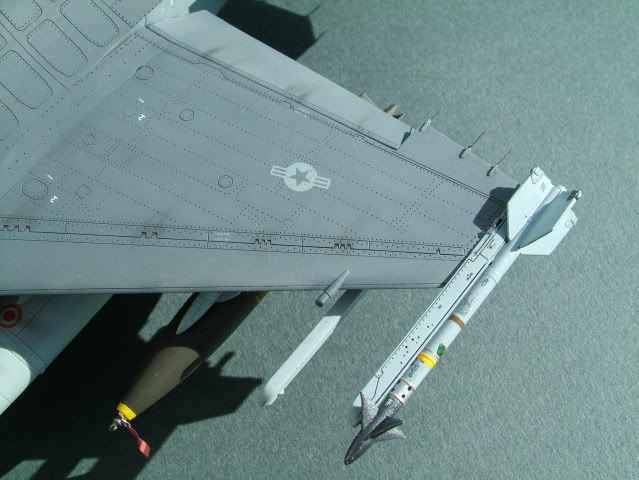
· Two 370 Gallon Wing Tanks
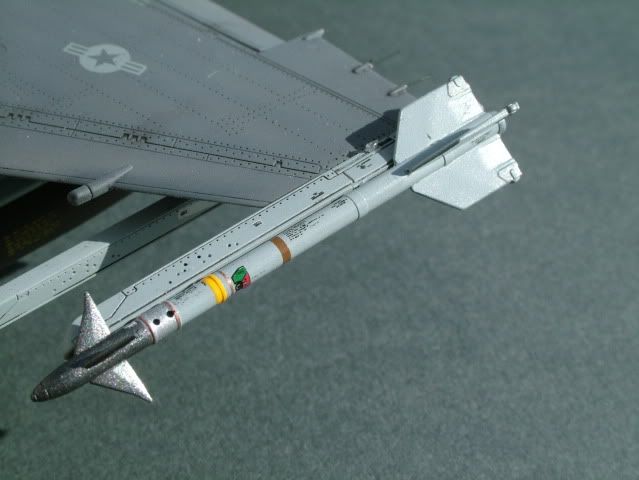
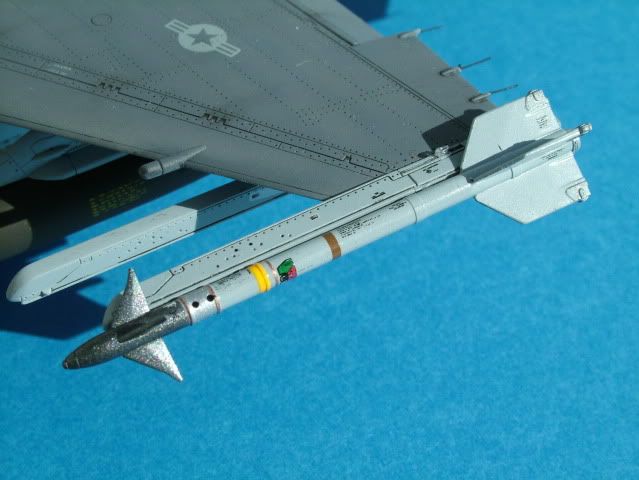
· Two AIM-9M Sidewinder missiles on the outboard wing station
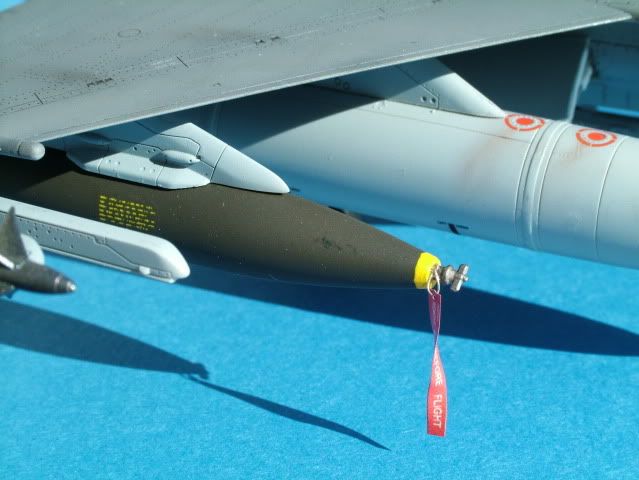
· Two Mk-84 iron bombs on left/right- inner station
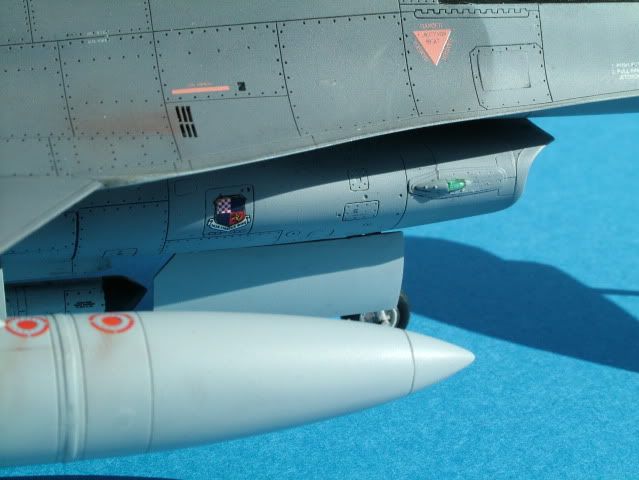
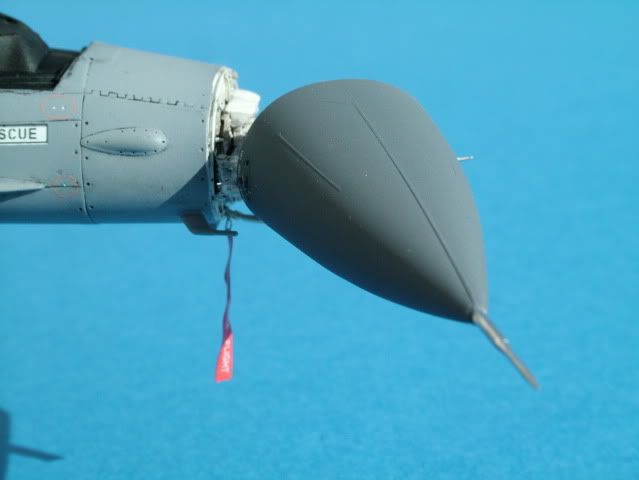
· One 184 AN/ALQECM pod (long version) on center station
The missiles will be super detailed by drilling out the rocket motors and color coded with decals from the TwoBobs.com missile markings. Wheels will be replaced with bulged /weighted resin parts from Royale.resin.com.
Bits of worn surfaces to be picked out with a silver artist pencil, some boot scuffs on the walk ways will be simulated with a black artist pastel stick, fuel stains on the external drop tanks and wings will be simulated with weathering powders from bragdonent.
A clear gloss coat of Testors Model Masters will be applied in preparation for the decals and snuggled down with solve- a-set if need be. Once dried then another layer of Model Master Gloss clear to seal all details and decals in.
The next step will be to apply ProModeller clay based washes (Dark Dirt, Sand and Black) to accentuate the various panel lines and general weathering of the two tone grey camouflage. Some additional dirt streaking effects will be applied over the airframe utilizing bragadoon.net weathering powders. A final semi-gloss coat will be applied overall to finish out the build.
Kit used:
- Tamiya Models of an F-16 C Viper kit number 101
Paint Used:
- Gunze Mr. Color, Tamiya acrylic, Alclad II and Model Master enamels
References & aftermarket products used:
- Original Kit review: Kit Review
- Federal Standards Guide: Color Guide
- Color variations of the F-16C: Viper colors
- Isra Decals F-16 Nose Art of the Gulf War #48002: Isra Decals
- Aires Cockpit tub replacement #4364: Cockpit Review
- Aires Nose Cone & Radar Detail:
- Aires Exhaust Nozzle: Exhaust Nozzle
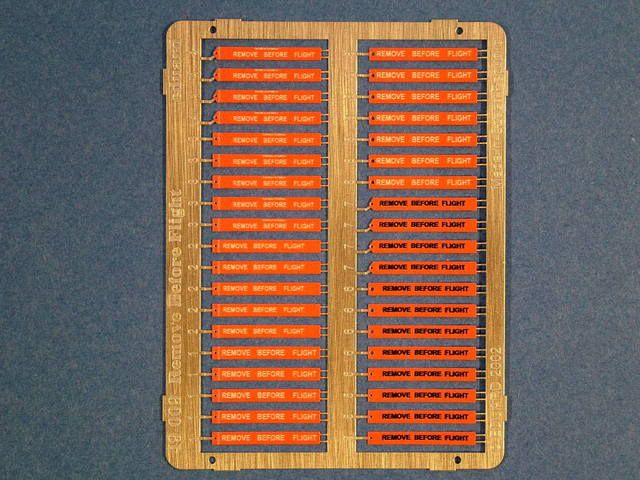
- Eduard: Remove Before Flight tags: 49 009
- Royale Resin: Bulged Wheels
- Two Bobs USA Missle Markings: Two Bobs Review
- Pitot Tube (48-008) from : Master Model
- How to build various Blocks from Tamiya kits: Block Specific Builds of the F-16
- Weathering Powders by: bragdonent
- Photo Walk Around: F-16 Walk Around
- FOD Cover: TBD
A special thank you to Doug Smith of Royale Resin, Mike Smith & Fred at Colpar Hobbies for their kind and endless support.
Tools used:
- Dental Tools for scribing panel lines
- P Cutter
- JLC Razor Saw
- Xuron Sprue Cutter
- Delta Electric variable speed Disk Sander – used to remove casting blocks for Resin
- Small curved scissors
- Scalpel blade
- Pin Vise
- Pin drill bitts
- Cocktail sticks
- Scribing Templates
- Tamiya Masking Tape various sizes
- Various sanding sponges from MDC & ProModeller.com
- 1200 Grit Wet & Dry Sand Paper
Glues & Putties used:
- Zap Super Glue
- Zap Super Glue Kicker
- Tamiya Extra Thin and Thick Cement
- Mr. Surfacer 500 and 1000
- Polly Scale – Plastic Prep
Paints Used:
- Mr. Color # 308 - FS36375 Light Ghost Grey
- Mr .Color #305 - FS36118 Dark Ghost Grey
- Mr. Color Thinner (100)
- Tamiya XA-20 Thinners
- Tamiya XF-1 Flat Black
- Tamiya X-1 Gloss Black
- Tamiya XF-2 Flat White
- Tamiya XF-3 Flat Yellow
- Tamiya XF-7 Flat Red
- Tamiya XF7 – Gloss Red
- Tamiya XF-10 - Flat Brown
- Tamiya XF-19 - Flat Light Grey
- Tamiya X-19 - Smoke
- Tamiya X-23 - Clear Blue
- Tamiya X-26 - Clear Orange
- Tamiya X-27 - Clear Red
- Tamiya XF-53 - Neutral Grey
- Tamiya XF-57 - Buff for the radome parts
- Tamiya XF-69 - NATO Black (Rubber on wheels and cockpit panels)
- Alcad II Aircraft Aluminum
- Alclad II Aircraft Steel
- Alclad II Clear Blue
- Alclad II light Yellow/Gold
- Model Master Lacquer Thinner
- Model Master Semi Gloss Lacquer
- Model Master Gloss Lacquer
- Micro Sol & Set decal solutions
- Micro Mask
- Future - for cockpit glass
Final detailing:
- Promodellers Dark Dirt Weathering Wash
- Promodellers Light Dirt Weathering Wash
- Promodellers Sand Weathering Wash
- Bragdonent.net weathering powders
- Gallery “artists” soft Pastels
- Novus Plastic Polish
Kit Box Art:
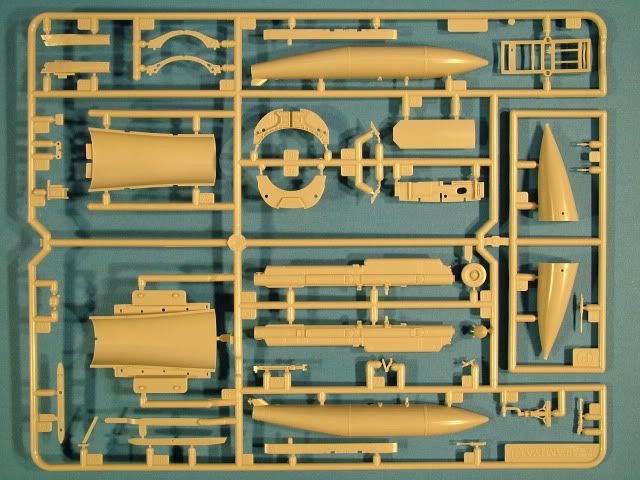
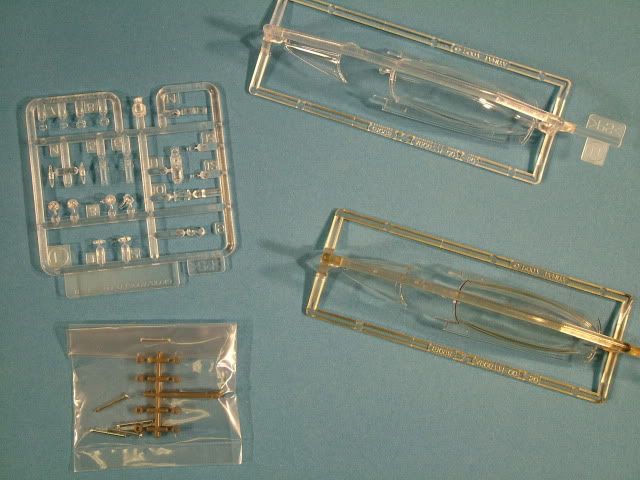
Sprue Shots:
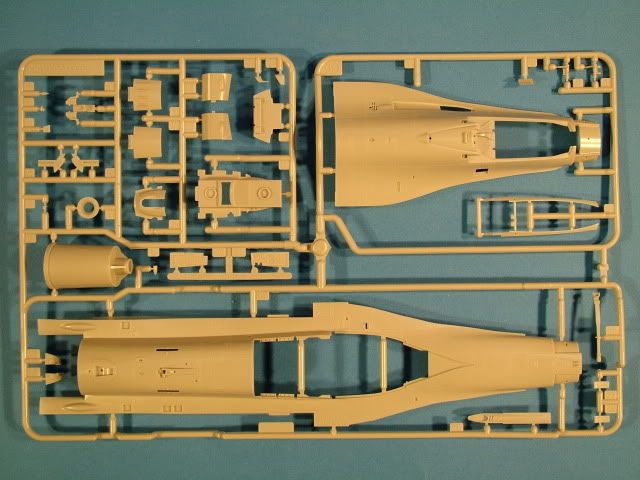
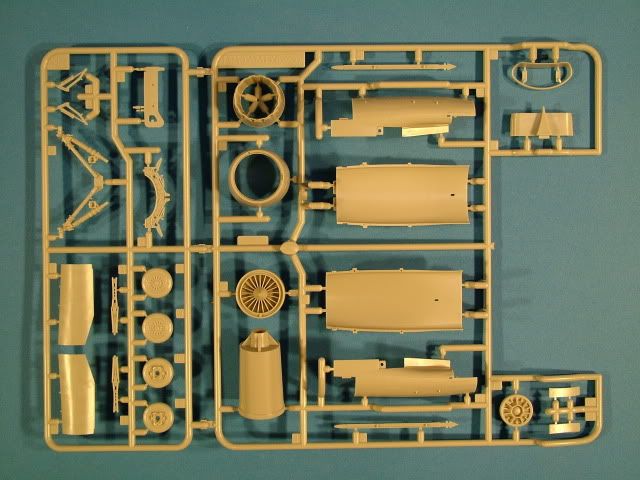


Clear sprues, one in smoke color
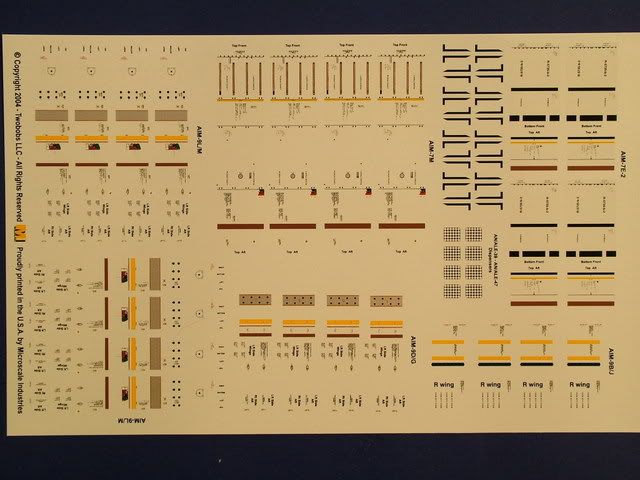
Isra Decal set with the needed "Nose Art"

Aires replacement Nozzle

Aires Fire Control and Radar
Aires replacement cockpit
Model Master - Metal Pitot Tube and AOA probes

Eduard RBF tags
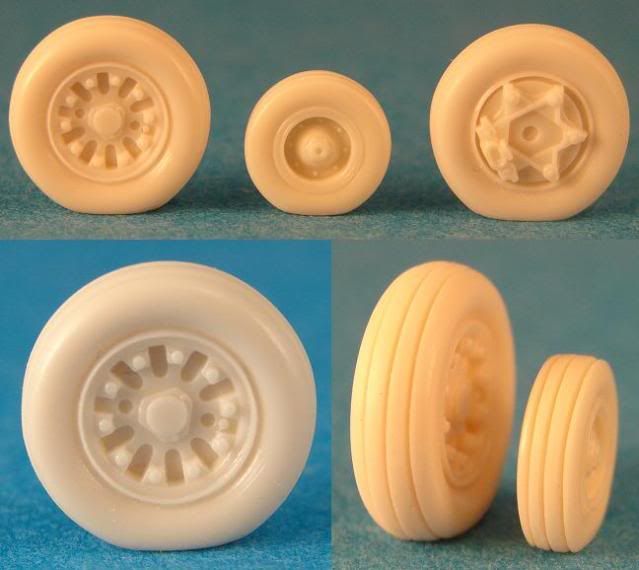
Royale Resin Weighted Tires
Two Bobs Missle Decal set
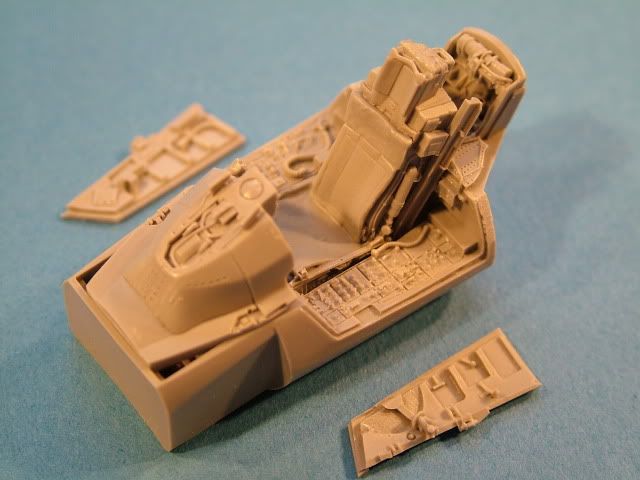
Aires resin tub all sorted out and fitted.
A variable speed disk sander makes quick work for removing the casting block on the bottom.
Carefully checking from time to time as not to sand a hole into the cockpit floor.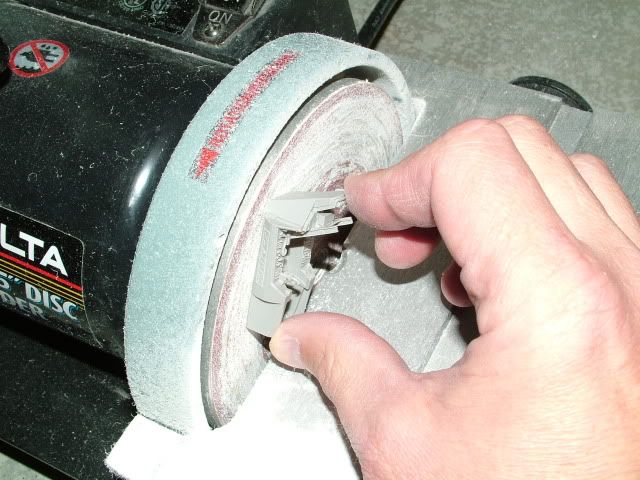
Glued the front and rear top sections together, very little sanding or adjusting to get a crisp join without any visible or felt step.
Aires tub ready for dry fitting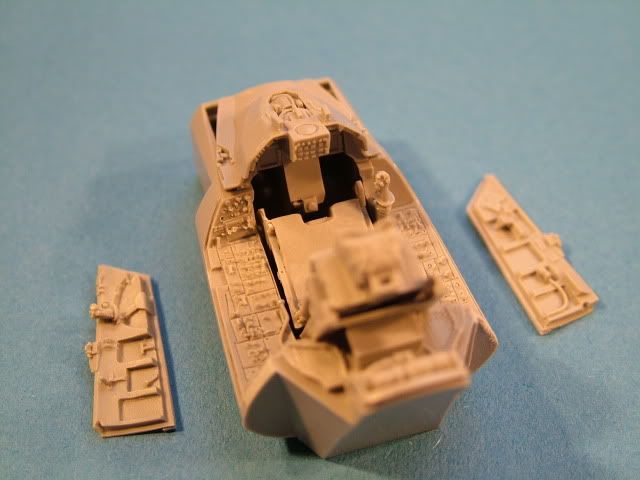
With the JLC razor saw removal of the kit plastic marked in Red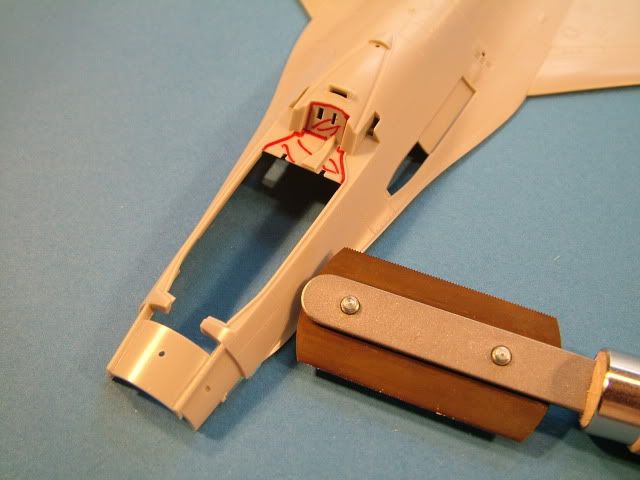
Be conservative on your cuts and do quite a few dry fittings.
After removing the main plastic, everything else is carefully sanded chipped away at with a knife.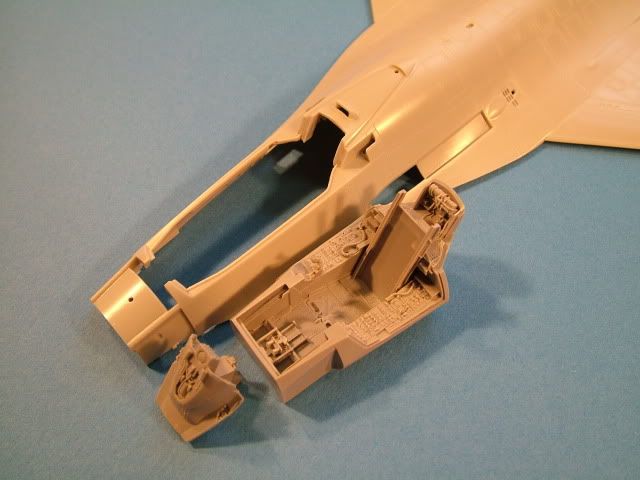
There is a small lip on the inside that will need to be removed, marked in Red 
Another dry fit check, reveals a need to remove a little on the top edge where the canopy joins the fuse.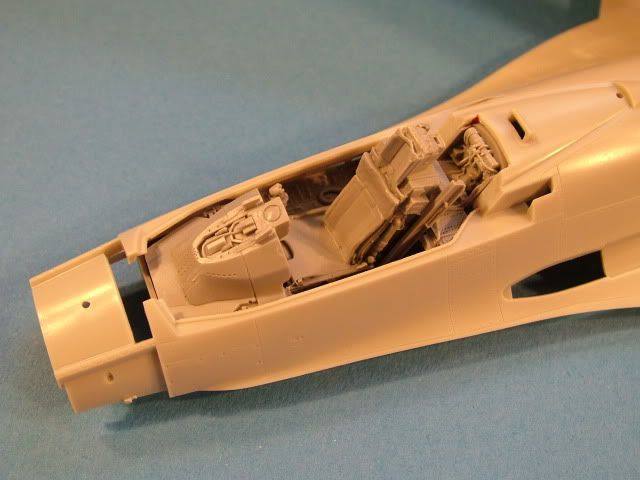
Removal of the original kit sidewall detail marked in Red with a curved blade that roughly fit the contour of the fuselage
Very close now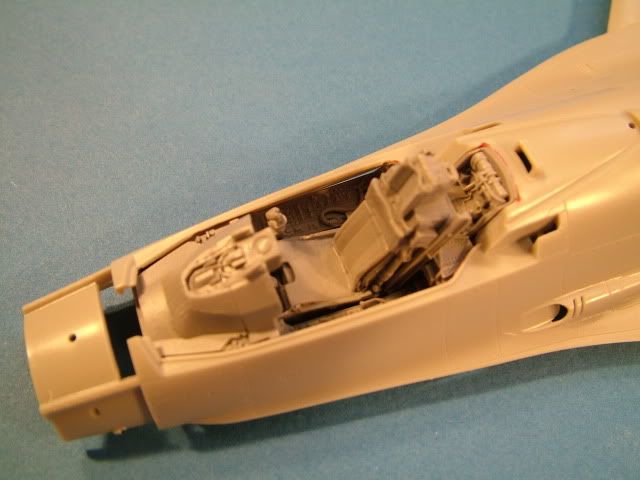
Dropped into place, you will notice a little more trim was needed where the canopy joins the fuselage to ensure a full fit of the cockpit innards.
You will notice very little filler is needed as the gaps are so small and the tub fits like a glove.
Cockpit being finalized.
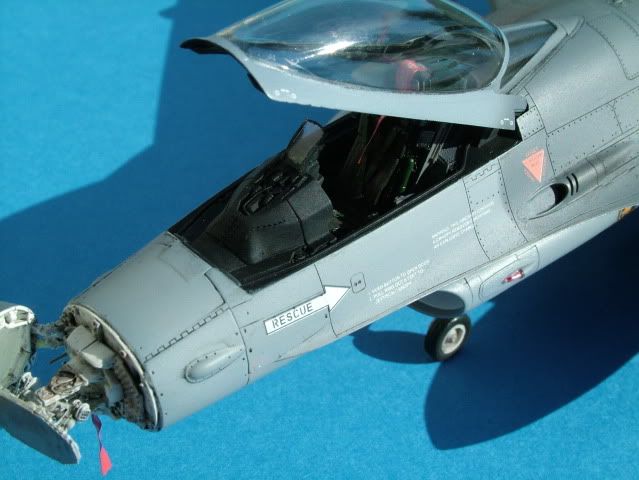
The cockpit interior areas where airbrushed with Tamiya Dark Grey XF-24 and lightened up just a bit with some flat White XF-2.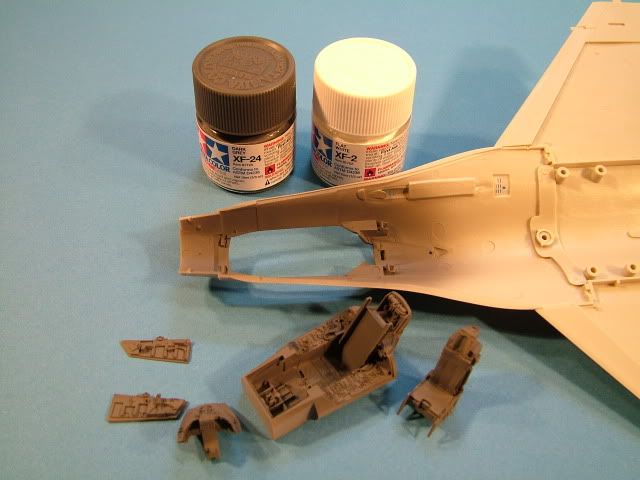
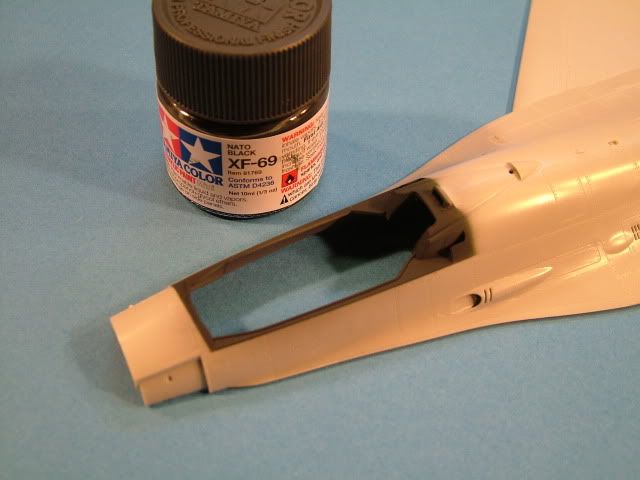
Then the Instrument panels, HUD area and cockpit coming were painted with Tamiya XF-69 NATO Black
The EJ seat was painted Tamiya XF-1 Flat Black.
All the side panels where picked out with Flat Black and some of the buttons dry brushed with some XF-19 Sky Grey
A couple were picked out with Red, Yellow and Green, just to break it up a little and provide some interest.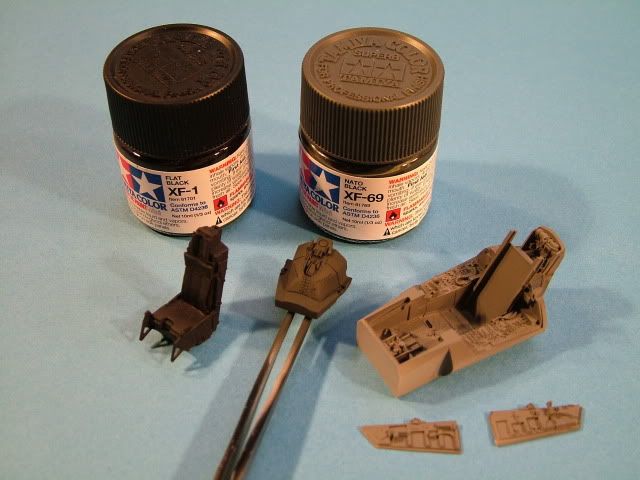
The included clear styrene gauge panels, where painted with a little flat White on the back area as to highlight the gauges.
Cockpit tub all snuggled into the the fuse and glued with some super glue and a shot of kicker once she aligned perfectly.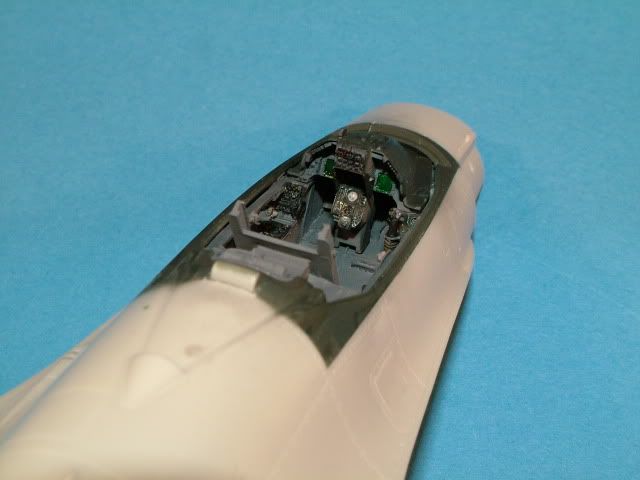
Building of the intake trunking. Using Tamiya Thin for the outside join and a quick grip and alignment.
Carefully pushed together in order to get the best possible join.
Once the outside join was hardened drop a dollop of Thick Tamiya Weld on each side and let it run along the inside seam.
This is similar to the method Phil uses with cellulose thinners and basically melting the plastic.
The nice thing with the Thick weld is that it not only melts some of the plastic but also fills at the same time.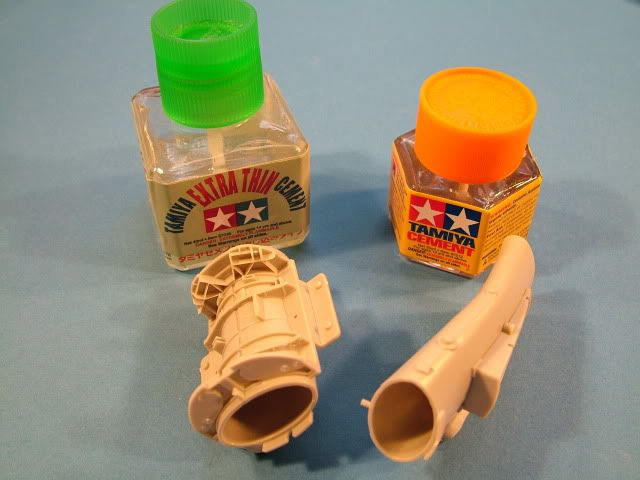
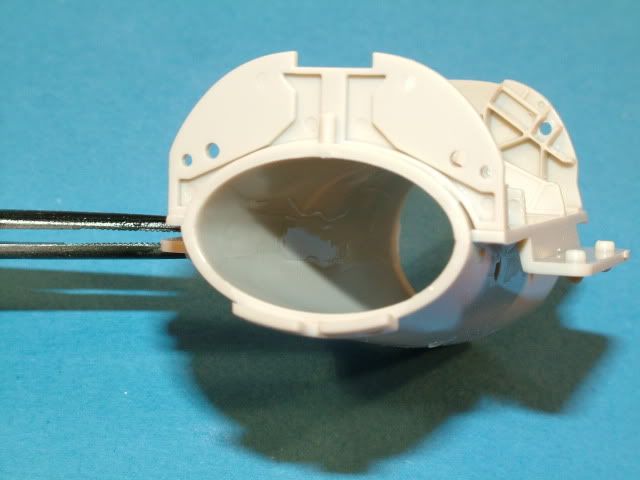
After drying overnight a light sanding with a rolled up piece of flexi grit removes any small bumps.
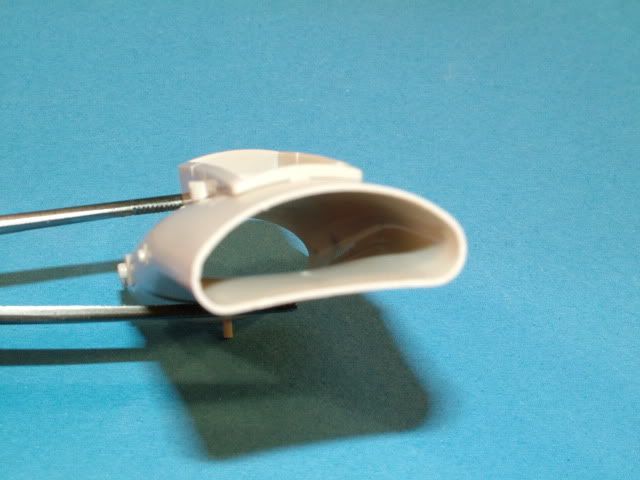
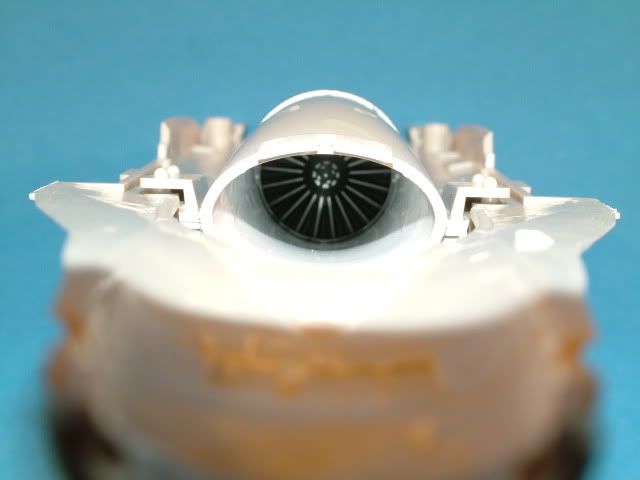
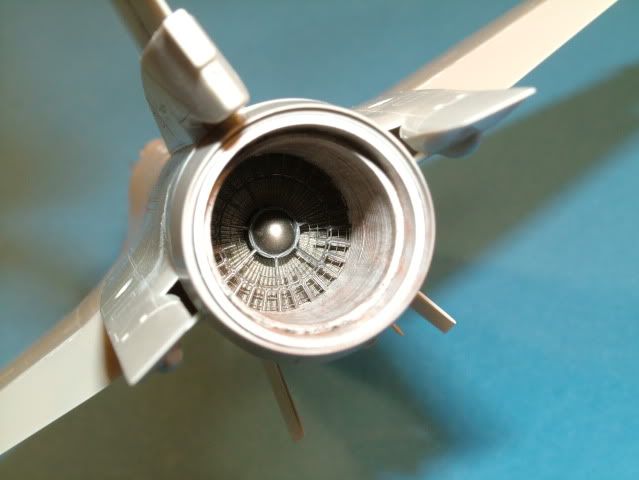
Engine intake channel was airbrushed a nice Tamiya Gloss White X-2.
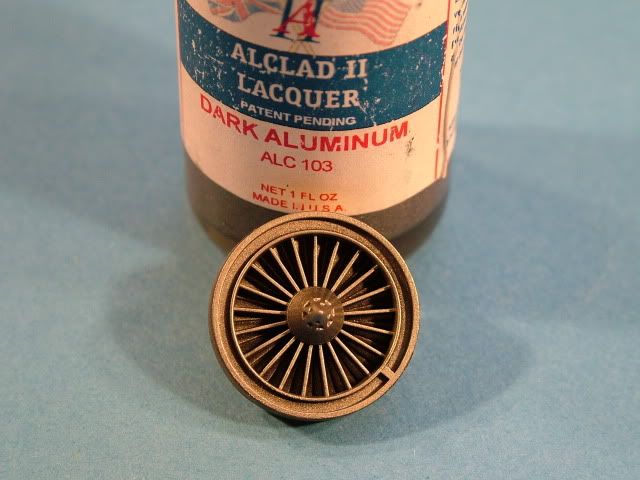
The engine blades where airbrushed with a base coat of Tamiya Flat Black XF-1 to provide some depth, then a light dusting with Alclad Dark Aluminum.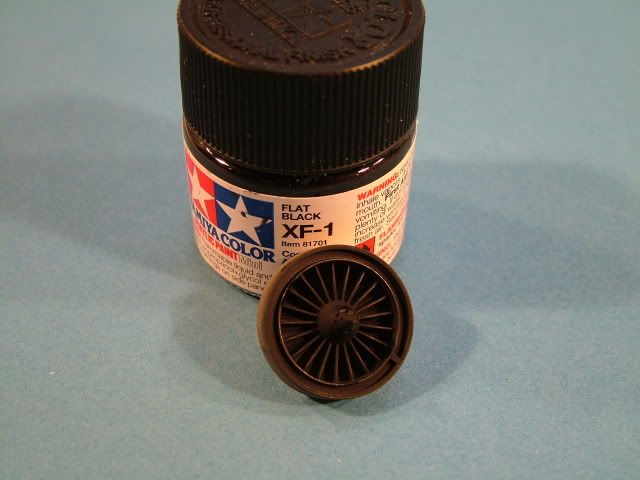

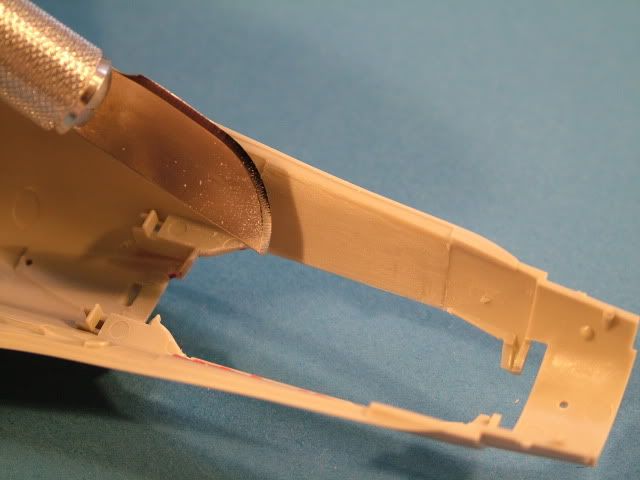
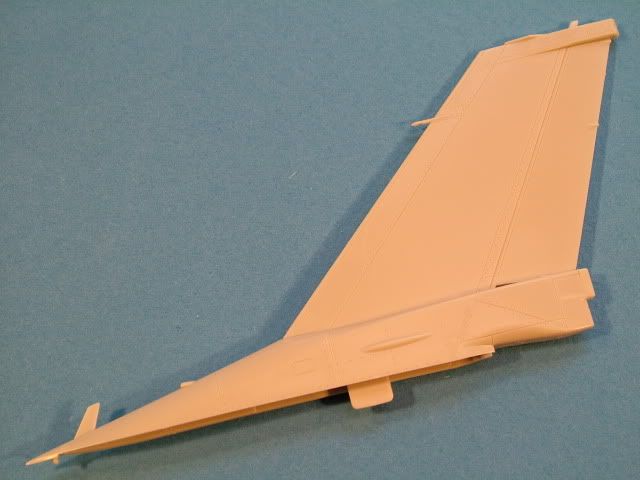
Building the vertical stabilizer section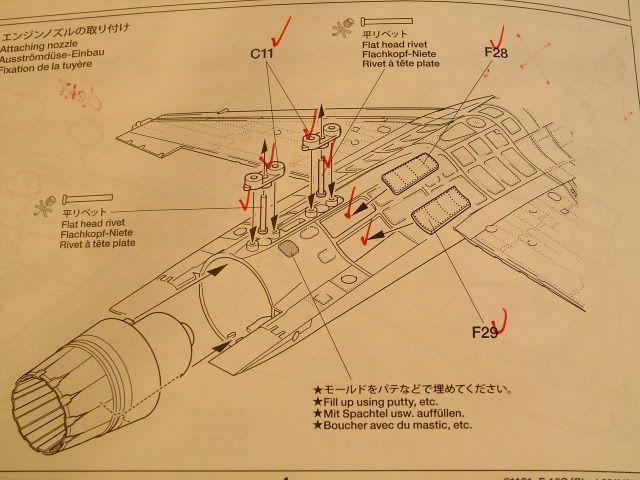

Canopy and seams
Remove the center seam from the main canopy and the rear glass.
Using various sanding sticks the seam was removed, some final steps were to polish it up with some plastic polish (Novus) until it squeaks.
Once completed, clean off all the residue with an old t-shirt, making sure there are no dust particles anywhere and then dip into a Future bath.
Then the canopy pieces were placed onto a paper towel to let the Future pull away (via capillary action)
Left to dry for the next 24 hours under an old backing pan as to avoid any dust particles settling into the soft Future.
This little bump/intake? on the center spine of the fin needs to be removed as that is only on later block variants.
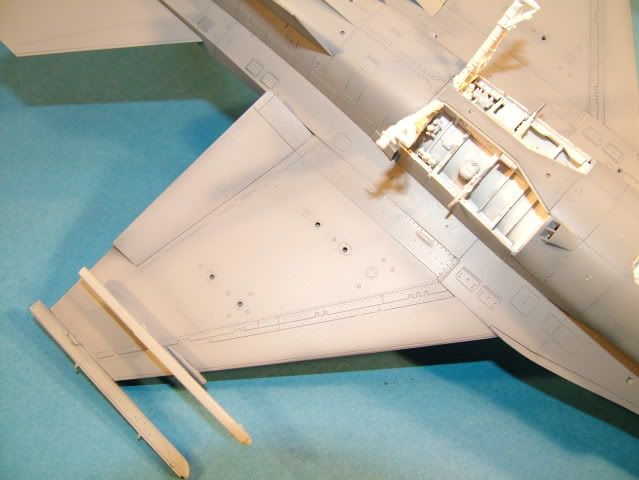
Installation of the landing flaps in the down position, just for some breakup of the super smooth lines of the F-16 and a little visual interest.
the small bump is now removed.
The front intake was then mated up and get as best possible fit on the inner side of the intake.
A couple swipes with sand paper and super glue on the outside of where those two tubes join, make a near perfect join
There are a couple more small bumps on the top of the fuse and on the bottom fuse/wing join area that need to be removed and will do so in a later stage.
Build up the fuel tanks
Glued those together, let them harden, then sanded the seams with the flexi file Bow Sander as not to sand in a flat spot, then polished up the surface. 
Some minor re-scribing had to be accomplished. then re-polish with MDC sponges.
The re-scribed seams were then touched lightly with a little Thin Tamiya as to melt any dust and/or scratch.
The detail plate was sanded down and the nose area was sanded slightly to get a perfect square surface.
The parts were mated with super glue and allowed to harden.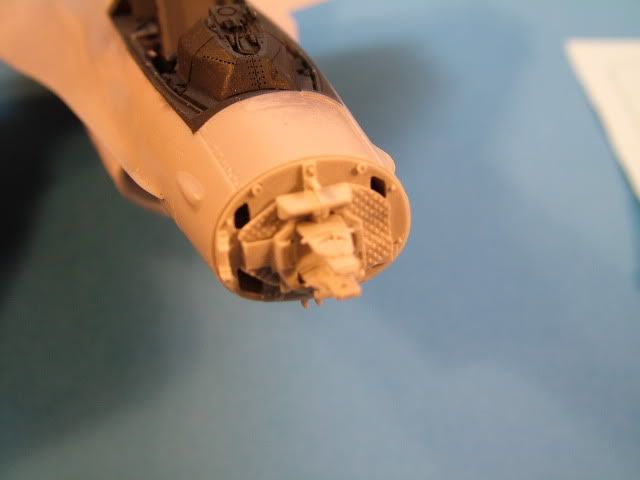
The nose cone was sanded carefully on the inside to remove the glue seam and polished up with a sponge.
Resin detail was mated up and glued with some super glue.
The radar dish resin bit was sanded down a little more to scale and then the PE radar detail was glued on.


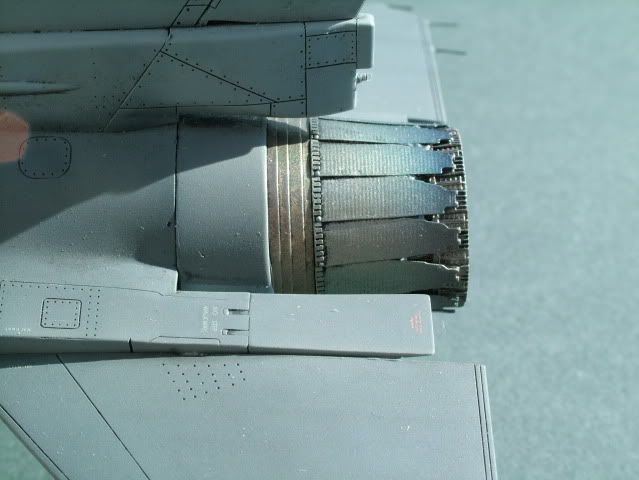
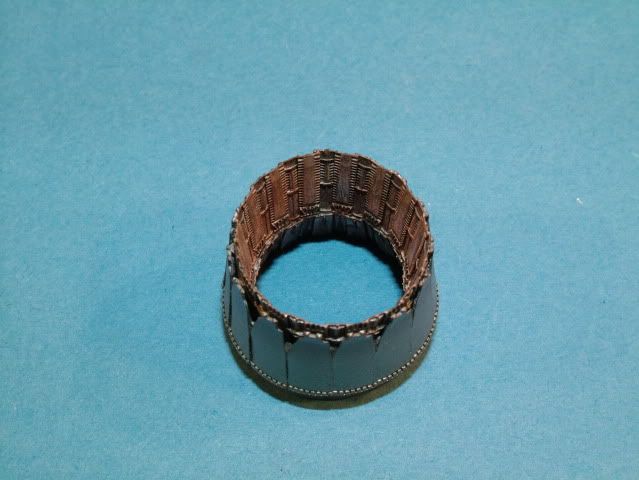
Aires Resin parts for the Exhaust. 
removal of those large casting block. Using the JLC razor saw, cut through, then lightly sanded all the mating surfaces on some sandpaper taped to a glass plate, which will ensure a perfect join.
Before 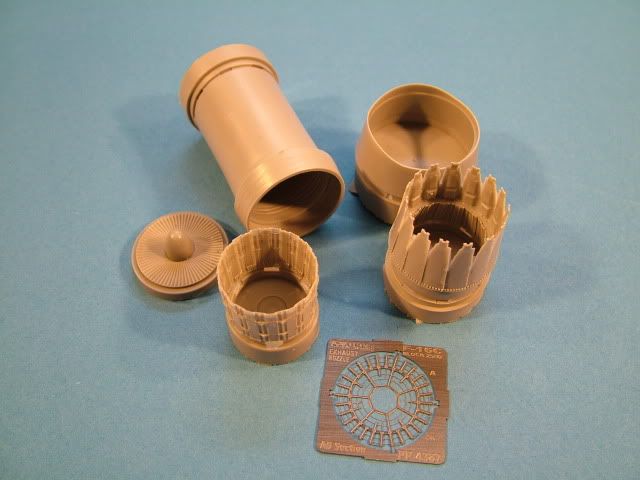
After some minor surgery
Detailing out the exhaust detail. Painted with Tamiya Gloss White X-2, then gloss coated with some Model Master Gloss clear.
Dirtied up the insides with some 90/10 thinner to Winston Oil Lamp Black.
This was allowed to slightly dry and was then dry brushed in the direction of flow, giving some nice depth and streaking inside.
Finishing off the effect with some dark Grey, Brown, Rust mixed together of weathering powders from Bragdonent.com.
The resin cone was glued to the main body with some thick super glue applied with a cocktail stick ensuring not to apply too much
and not allowing any oozing when applying pressure.
A light sand/polish was required to get a nice transition from Plastic to Resin.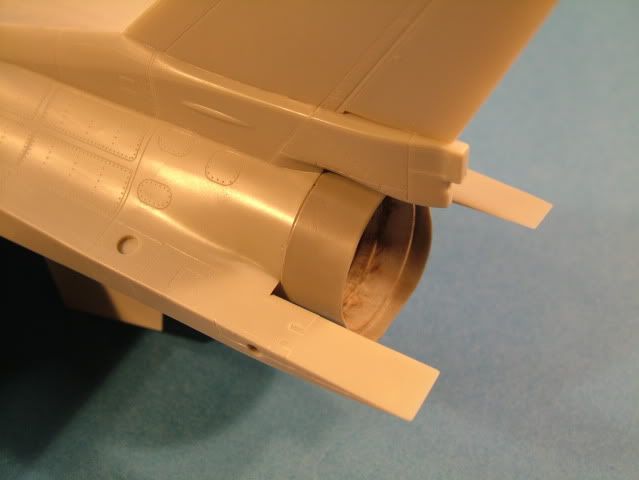

The petal cone is just posed on and will be installed once the final painting has been finished.
finished up assembling the wing tip missile rails and then installed the clear navigation lights
(protected with a small blob of Micro Mask for the final paint stage)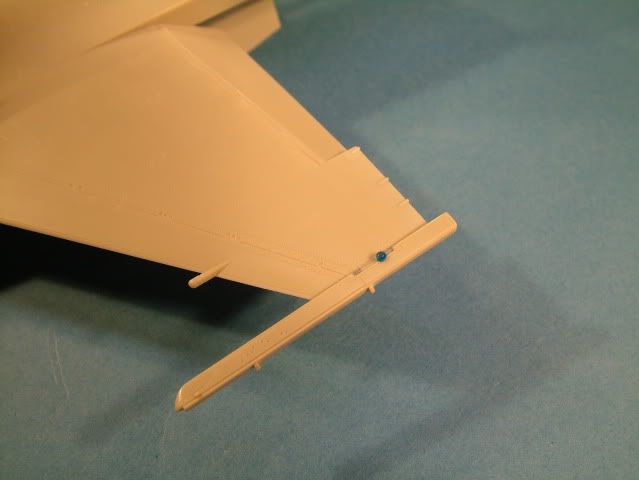
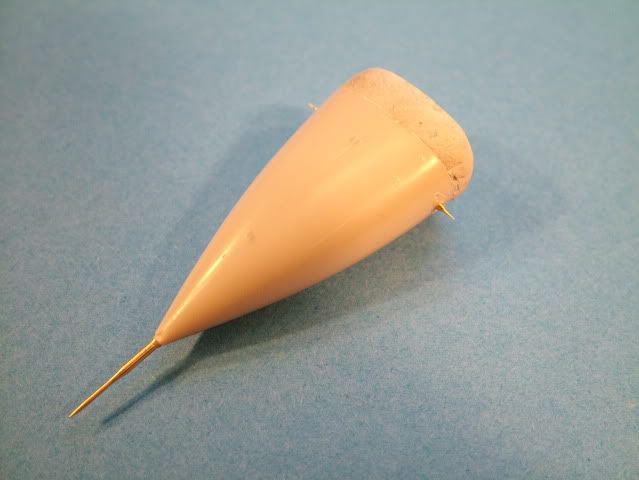
Metal pitot and AOA's on the nose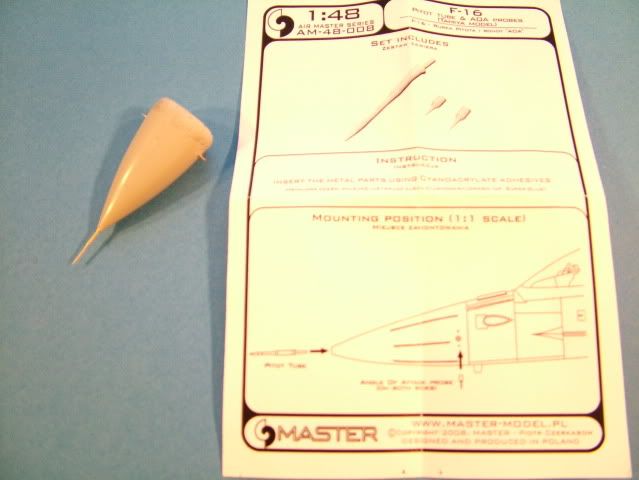
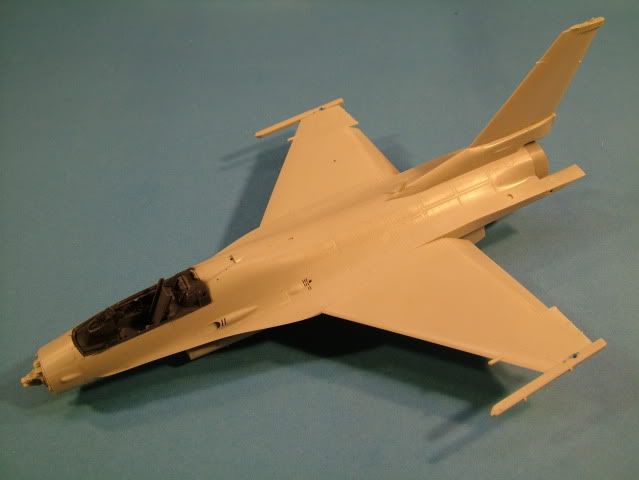
All painted up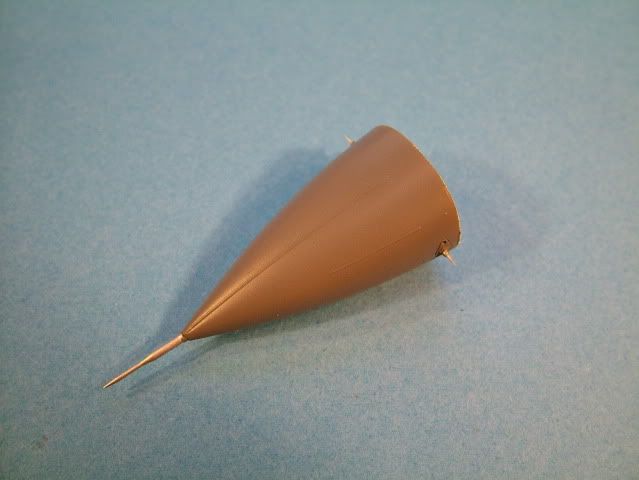
All the small parts and some detail painting plus the primer stage for the fuse.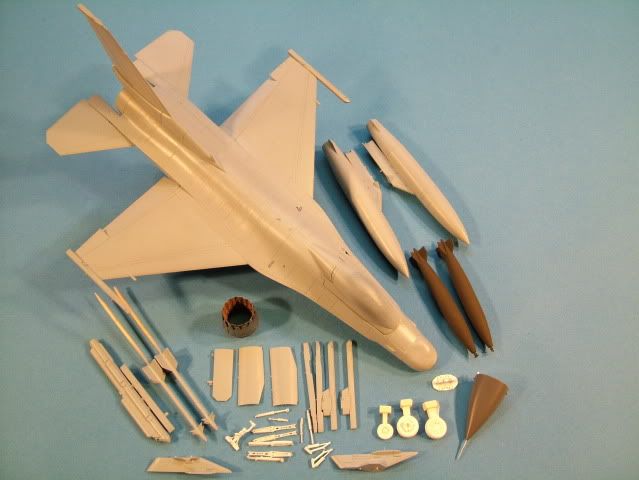
Top of the fuse all primered up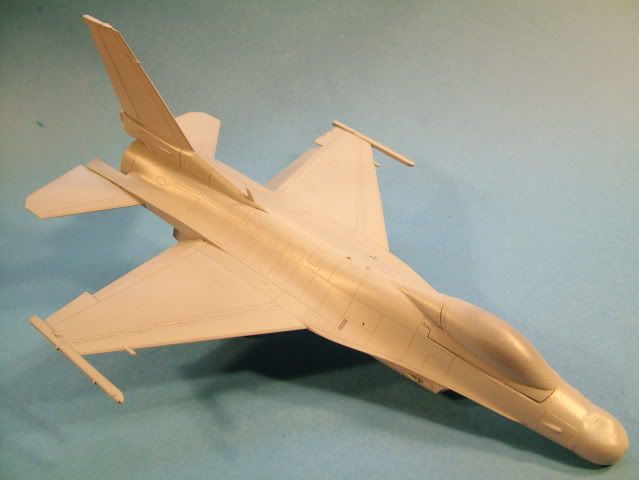
And the bottom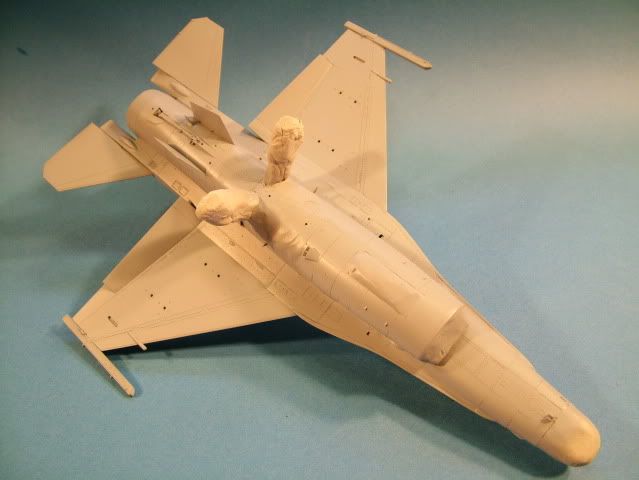
On to the pre-shading stage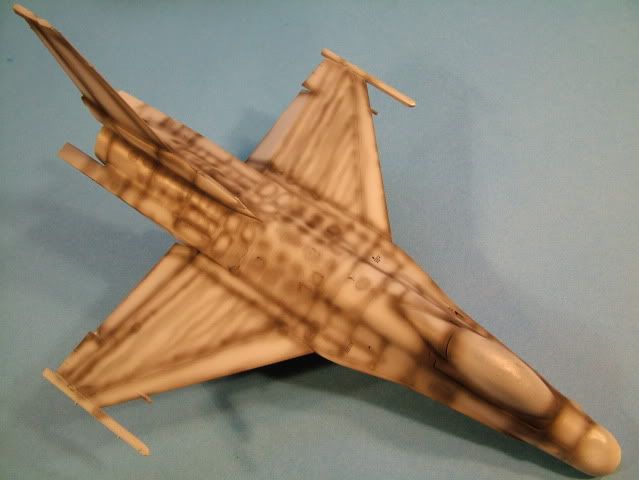
And the bottom
Stepped approach to that Painted on Look of Decals:
-
Prep plastic with Squadron's "Plastic prep" or wash model with dish washing soap. This will assist with removing dust - finger prints and makes plastic anti - static
-
Start using a rubber "doctors glove" when handling the model from this point forward as not to induce greasy finger prints "again". Apply Primer Coat
-
Apply Pre-shading
-
Top Coat of whichever camo. Note: When working with an NMF paint job, now is the time to switch to using your "white" Cotton glove, instead of the rubber glove.
-
Post Shading
-
Gloss Clear Coat (paint or Future) - let Future dry for 24 hrs
-
Apply Decals, (use luke warm distilled water) remove excess with a kitchen towel and press down with cotton bud (rolling motion) - let dry for 4 hrs
-
Then apply Micro sol/set pending the need and decals had a chance to adhere a little - let dry for 8 hrs
-
If needed go back and re-apply Micro Set to any stubborn decals.
-
Also use a brand new blade and cut carefully through the decals where they cross over panel lines, then apply a little Micro Set. This will assist in making it look even more painted on as in real life an insignia etc. would most likely not "span" across a hinged area or panel, rather "disappear" to the eye into the two adjoining surfaces.
-
Another trick at this stage is to prick any small trapped air bubbles that are visible (silvering) with a needle and let some Micro Set or Sol work into the small pricked hole. This is an especially critical step when large areas of the decal you are applying has a "clear" section, like the center of a zero or the "holes" of an "8" for instance.
-
-
Remove any hard water spots with some distilled water and a cotton bud
-
Gloss Clear coat (paint or Future) - let Future dry for 24 hrs (this step literally seals-in the decals and protects them from any harm on the following detailing steps, and makes the colorless carrying film on the outer edges disappear into the prior applied gloss coat.
-
Promodeller wash and weathering powders, pin washes and stains are now applied depending on the effect you want to achieve
-
Gloss Clear coat Paint or Future - let Future dry for 24 hrs OR
-
Final Clear coat, (Flat or Semi Gloss) pending the requirement
So right now we just completed paint stage #4 here are the results: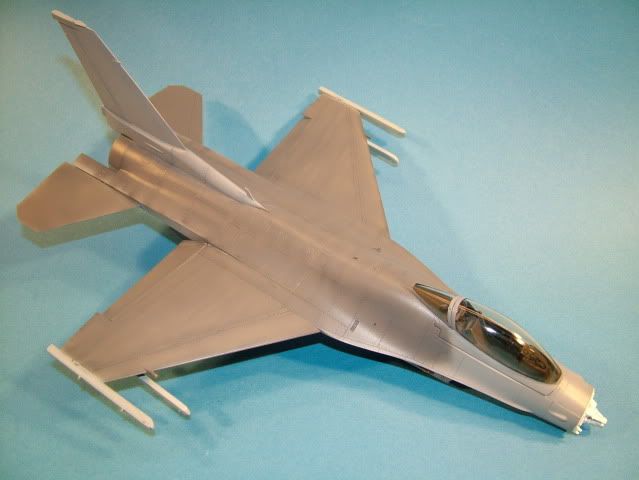


The Paint line is Mr Hobby Color. Top is #305 FS 36118, bottom is #306 FS 36270 and the missile rails are #308 FS 36375.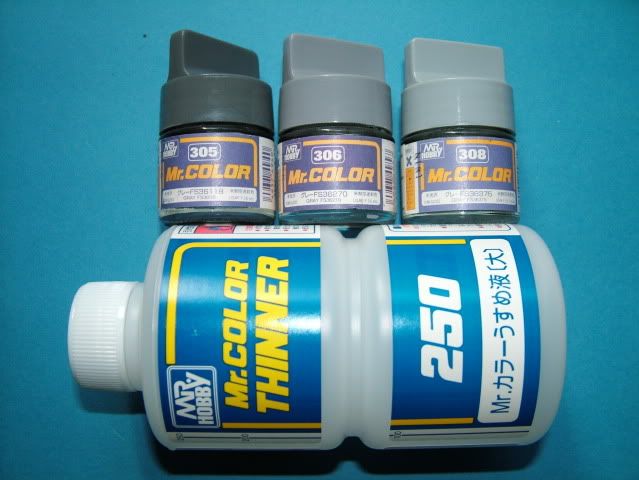
This was sprayed on with an H&S 2 in 1 at approx 20 PSI at a 65/35 Thinner to paint ratio.
Closely monitoring the paint flow and having the trigger back only 1/4 of the way at 2 inches distance from the subject.
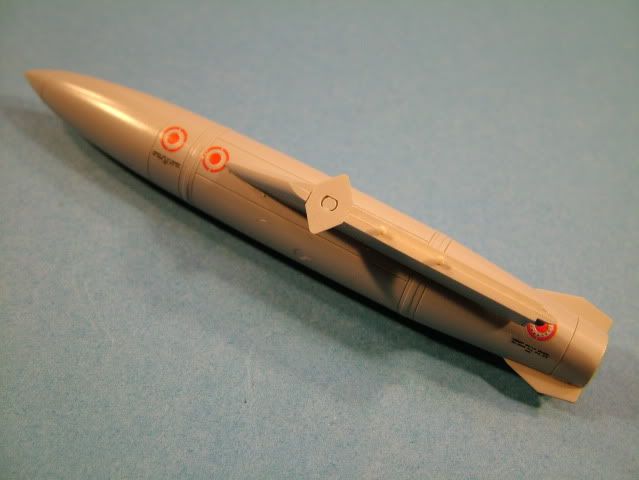
We have almost finished off the decals (approx 180 of them) 8 per missile alone !
Missiles all decaled up with Two Bobs decal set: 8 little tiny ones x 2 missiles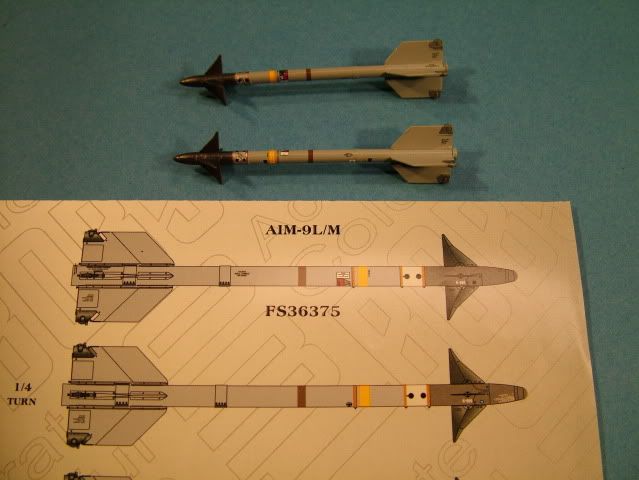

In addition to the detail painting and the decal sets I also drilled out the rocket motor to simulate a little depth.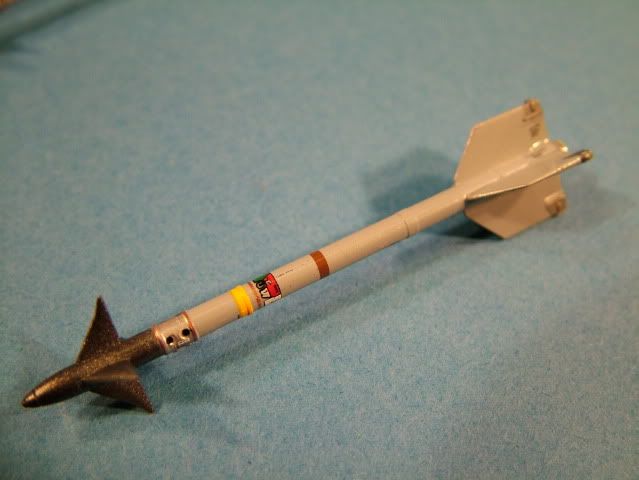
Two mark 84 bombs from the Hasegawa weapons set all finished up and decaled out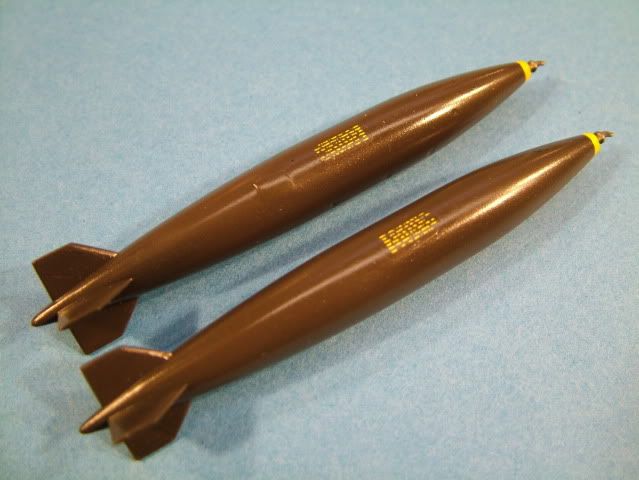
Center targeting pod all decaled out (6 on each side, a total of 12 just for this piece) and ready for pin wash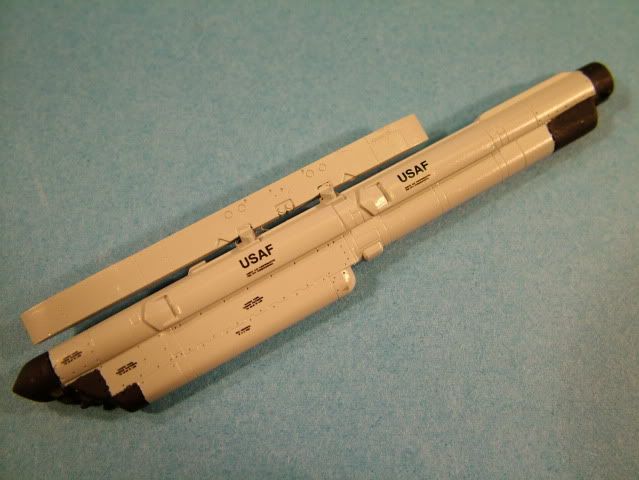
Wing tanks decaled out, no preshading on these as reference pictures seem to indicate for this bird they where in pretty good shape.
Just need to apply a pin wash to get some definition.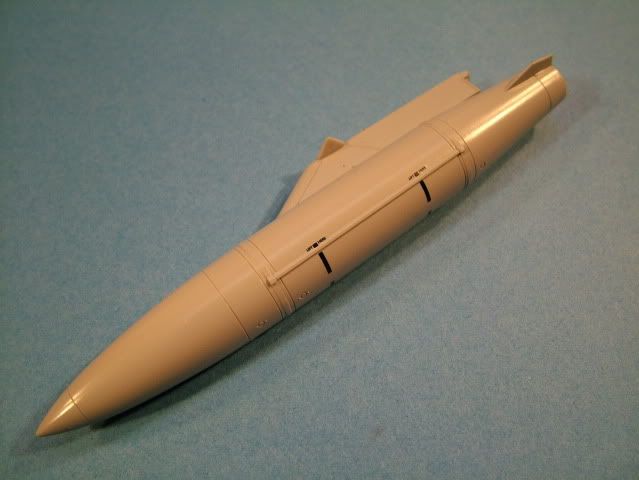
Nose detail starting to come together with a black artist oil pin wash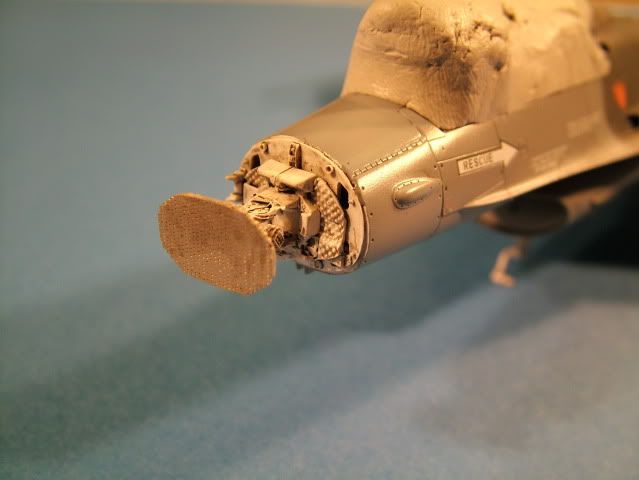
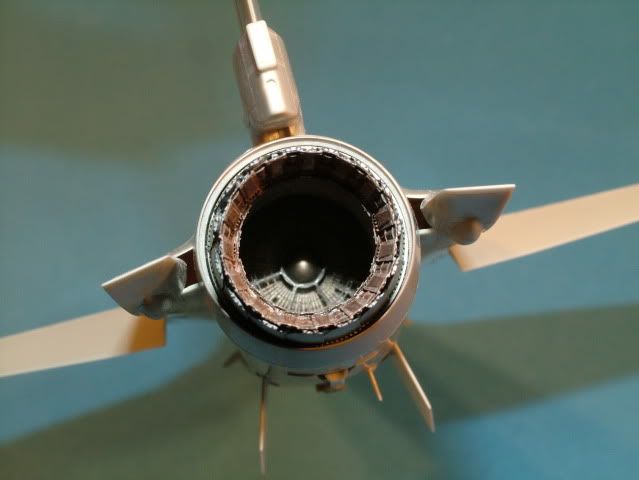
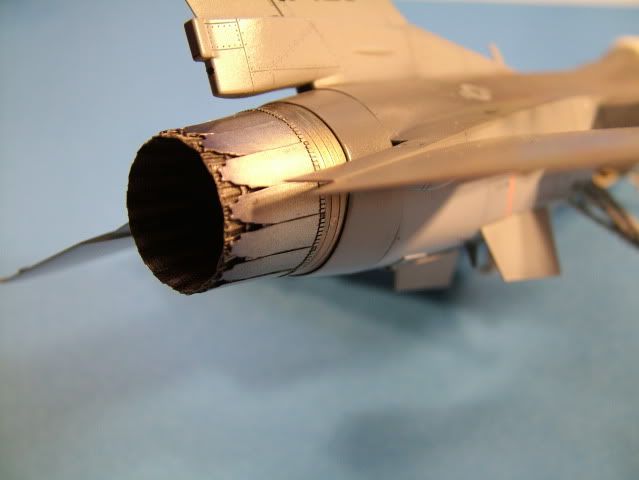
The petals are Model Metalizer Titanium with pale burnt metal Aclad then over-sprayed with Alclad Clear Blue, Hot Red and Clear Violet.
The Metal rings close to the fuse are sprayed with Model Master Burnt Metal then the whole thing was sprayed with Model Master Gloss Clear.
The interior as prior described , Tamiya Flat White with Model Master Gloss coat then treated with various pin washes and weathering powders from Bragdonent.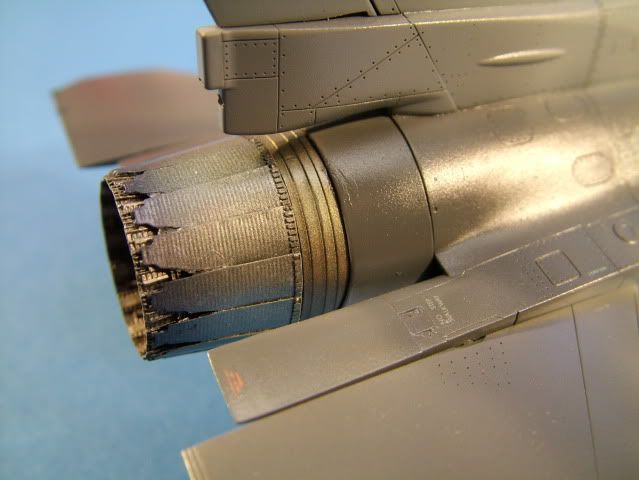
There are 3 tiny decals on the missile rails (x top and bottom) x 4 rails on the plane, look closely you might spot them.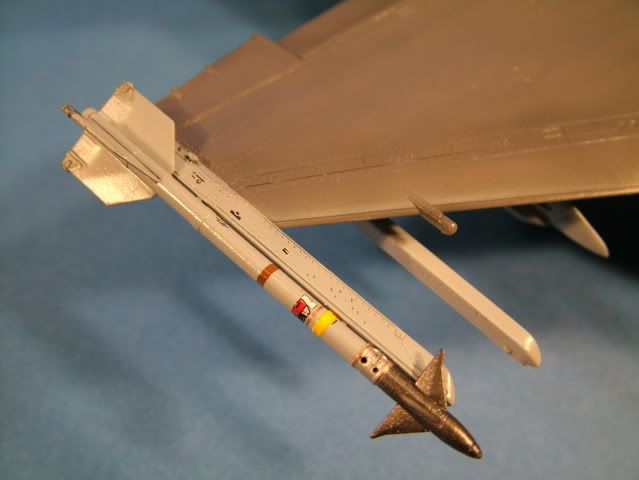
Rocket motor detail (Drilled out with a pin vise): AIM 9L is painted with Mr Hobby Color #308 FS 36375.
Rocket motor is Flat Black Tamiya XF-1, head and fins is Model Master Dark Adonic metalizer Grey
The fin stabilizer rear ends are Model Master silver, then over-sprayed with Model Master Gloss Clear.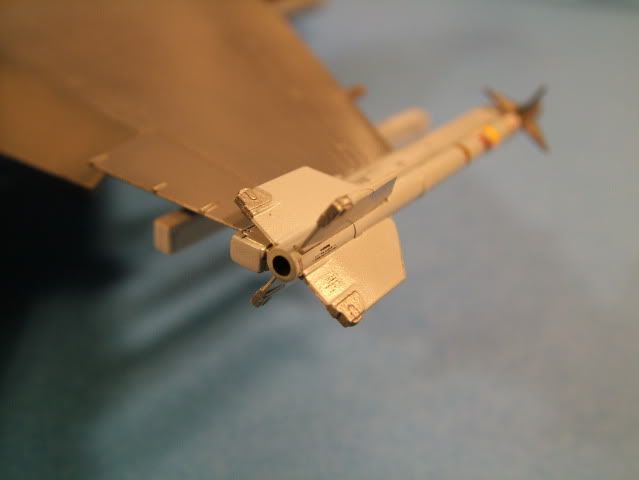
The Royal Resin Wheel set is starting to come to life.
Paint is Tamiya Flat White XF-2 and Tamiya NATO Black for the rubber XF-69.
Then over-sprayed with Model Master Gloss clear.
then given a pin wash with Artist Oils Lamp Black/Burnt Sienna mixed 50/50 from Winston diluted to 90% with orderless thinners. 
Steps 12/13 and 14 are now complete.
The next stage was to apply the wash top and bottom. Black and the Dark dirt for this rendition.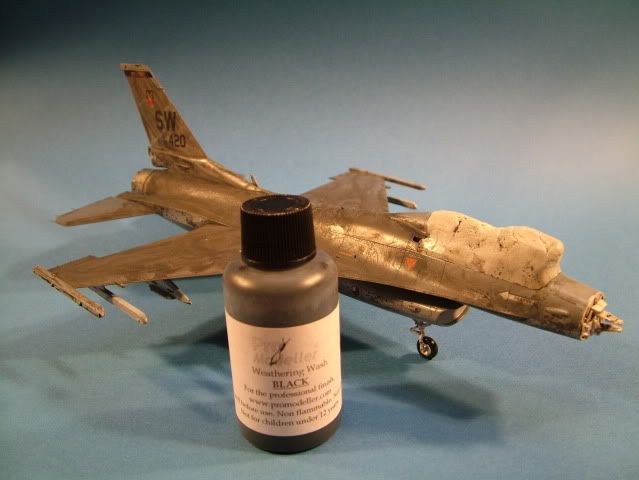
And the bottom
The wash was removed and applied a Model Masters flat coat at a 60/40 thinner to paint ratio at an approximate pressure of 12 PSI all over.
Carefully avoiding the gloss white undercarriage and the wheelwells and the exchaust area was "masked off".
Started adding the static electrical discharge "feelers" on the trailing edges of the elevator and the rudder as well.
In the next stage we will apply some subtle weathering on the flat coat with some weathering powders from Bragdonent.com ( bragdonent  and install the armament.
Installation of the seat belts, some decals on the bang seat, install the nose cone and some final wiring for the radar.