


Revell 1:350 Bismark
by Jan-Willem Kluën.
Building the Bismarck
Part 1: Background
Hi fellow modelers,
This is my first post on the forum about my own work. Feeling a bit apprehensive, I nevertheless decided to put up some information on the build I am currently working on, together with some pictures of my progress. But let me start off by telling you all how I got to be where I am now.
I am returning to the hobby after a break of over 25 years; in my teens I did only aircraft in 1:72 scale, mostly kits by Matchbox. My modeling skills were self-taught and quite limited. I used only one glue, painted my models with unthinned enamels and with a brush. I learned as I went along and the later builds that I did came out a lot nicer than what I produced in the beginning.
My return to modeling was triggered by my uncle-in-law, who is a connoisseur on the subject DKM Bismarck, the German Battleship that was sunk on her first operational mission in the Atlantic in May 1941. My uncle-in-law, Rob Peters, is an artist and much of his work is inspired by the Bismarck or contains references to its history (see http://www.bismarck.nl for some impressions of his work). Rob even went on to win the quiz-show the “65.000 guilder question” on Dutch National television, flawlessly answering all of the detailed questions on the DKM Bismarck and her history, up to the complete curriculum of the ship’s cat, named Oskar. He knew it all. So, what better person to oversee my return to modeling, with my first maritime build: the new Revell 1:350 kit.
Rob and I agreed that I could work in his workshop. Lot’s of space, lot’s of books on the subject and a more than knowledgable person to turn to in case of doubt. I knew that modeling had developed a lot and that those who had continued to hone their skills in my 25 years of absence had reached unbelievable heights in the quality, detail and realism of their builds. So I decided to approach this kit in far more serious manner than my teen-builds. I bought new equipment and decided to make this build into a learning experience using al sorts of new techniques and materials. I knew from the start that this complex kit was going to be somewhat of an uphill experience, but up to this moment I have thoroughly enjoyed every bit of building so far. One back-draw is that it has not always been possible for me to work at the model, since I have to travel a bit back and forth to Rob’s workshop and the workshop is not always available to me. So my progress has been a bit patchy. Together with the fact that I am unexperienced, this makes me into a slow modeler. I intend to get a lot quicker and better in time, when I am going to get back to building aircraft .
I started this kit before I became a member of this forum, so can’t present any pictures of the box, sprues, decals and instructions, like many of you have done here on this forum. Rest assured that master builder Stefan Carlsson is planning to build the Revell Bismarck also, so I expect him to make amends for this. Also, this isn’t a real time journal; I will make a few posts on what I have done so far. After that it becomes real-time.
This is my current setup:
Kit: Revell DKM Bismarck, 1:350 (#05040)
Add-ons: Eduard PE sets (#53035 and #53036, railings and turrets)
Glues: Revell Professional, CA (thin, medium and thick)
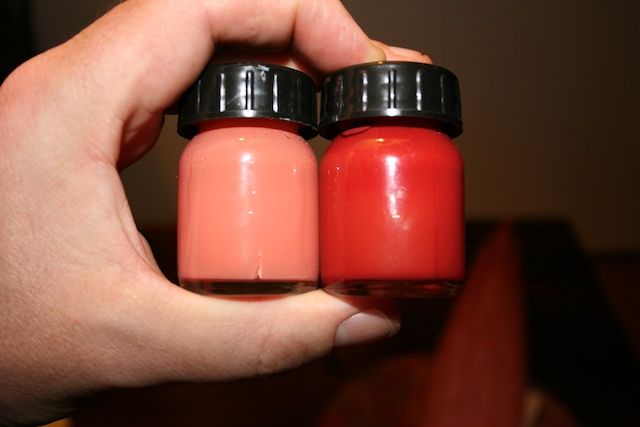
Paint: enamels by Revell (colournumbers according to Revell’s intructions, but some have been altered for better results)
Weathering: MIG pigments and Abteilung oilpaints
Airbrush: Revell Dual action airbrush (#39109) and Revell Compressor (#39138)
In the next part I will start with the building-process and will put up some photos.
Here is part two of my building experience.
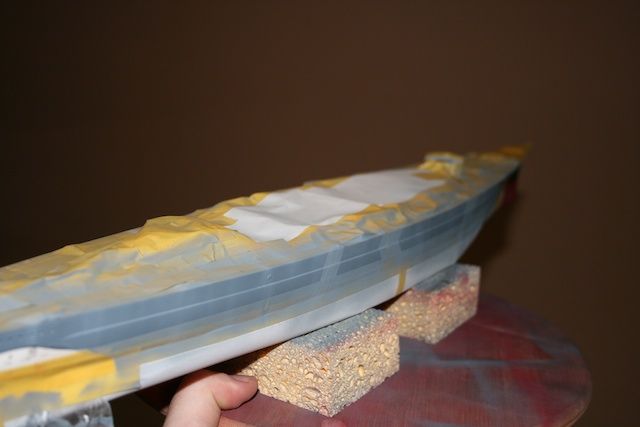
I started off with putting the two halves together of the hull. In this I also decided not to bother with the 3 propellers being able to rotate and just have them attached later on in a fixed position. Furthermore, I filled the open hull with casting plaster to make the hull more rigid; it also adds to the feel when you handle a 50+ ton battleship and I expect it to sit more stable in its case when it is finished. Prior to pouring the casting plaster in, I coated the inside with bookbinders glue and placed 4 tubes in the braces to reinforce the plaster and keep it from coming loose.

I reworked the seam line at the bow and stern with putty and completely removed the beveled centre-line on the hull-bottom; I recreated that with a strip of styrene. Next, I closed the hull by glueing the main deck on to the hull and giving it a coat of primer. I must say that I was quite intimidated to do my very first real airbrushing on the model itself! I had not got quite the feel for the right pressure and spraying distance, and it turned out too gritty and coarse. Many of the videos on airbrushing give different advice on air pressure and I presume it varies from what kind of paint you are using (enamels or acrylics). Anyway, I had to redo the priming coat.
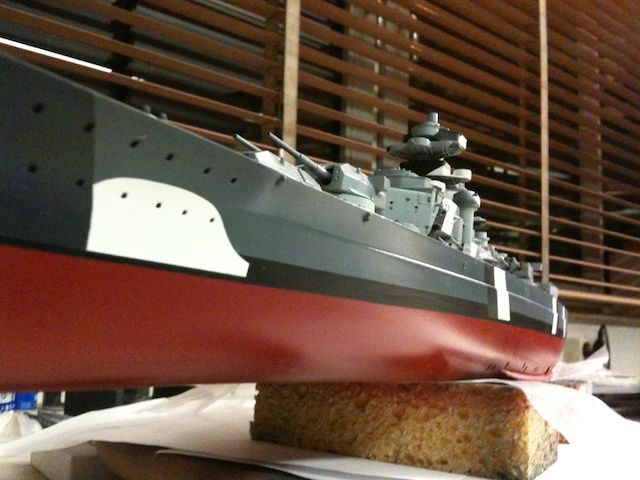
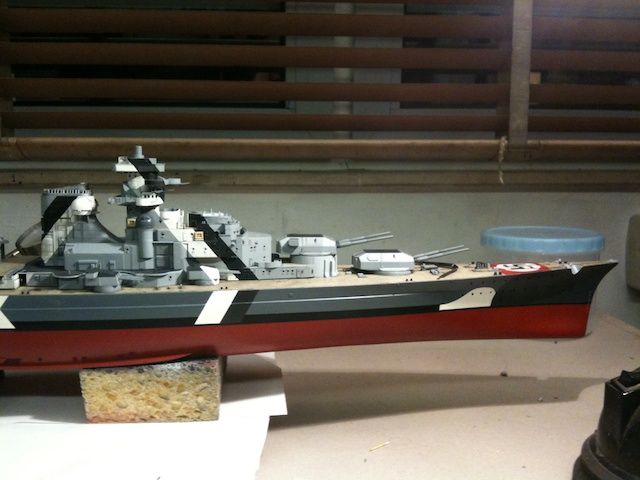
I started painting the hull in two halves, masking in the exact middle of the waterline. This ensured me of a guide for masking the waterline. With a few coats of paint the guide in the hull parts would be lost, so I expected. With that new guide I masked the waterline and carefully sanded down the paint where the red and grey met. I then sprayed the waterline black, unmasked and put down a coat of varnish. BTW, did I mention that in my first attempt the waterline came out too high? Well, it did, and I had to redo the entire hull again. Here is the final result.
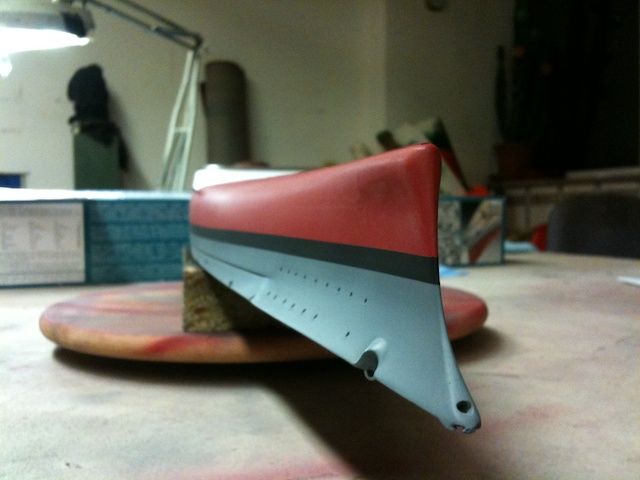
Next I used the Revell decals of the fake bow waves to make my own masks with the use of a light-table (thanks Rob!). After masking, spraying it white, I removed the masking of the bow waves, but kept the raised masking on the waterline because I needed it for the alignment of the dark color of the bow and stern afterwards.
I then remasked to airbrush on the dark-grey (bow and stern).
As I had decided not to use any of the decals for the hull (waterline and fake bow waves), I also measured and masked the hull for the camouflage stripes (i.e. ‘Tarnstreifen’).
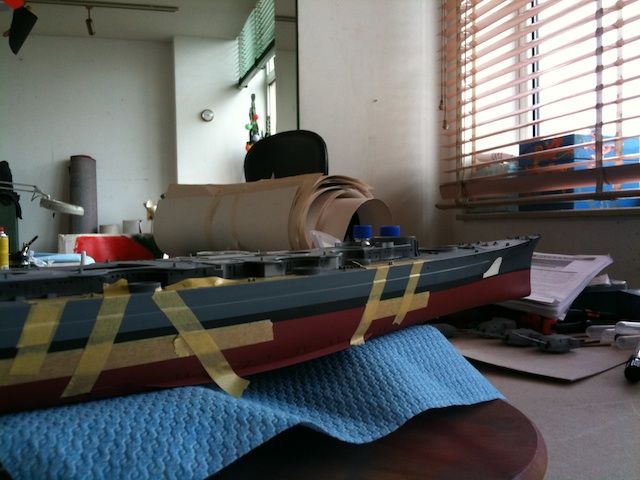
In my first attempt I had some bleeding of the paint, so had to repair that. After that it all came out nice.
Part 3: proceeding with interesting stuff
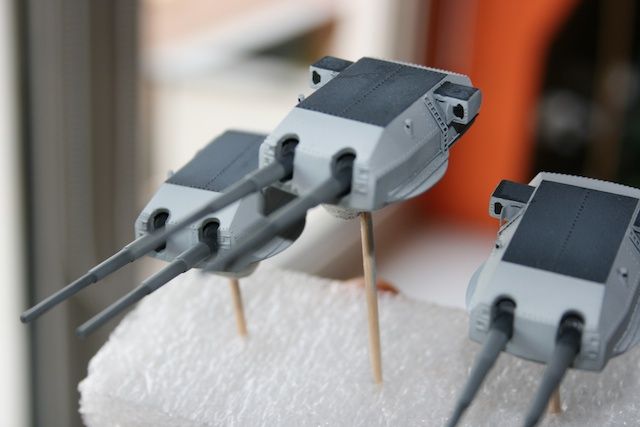
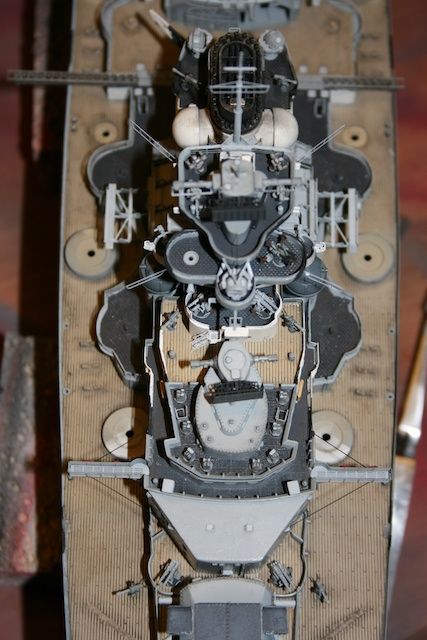
While working on the hull, I did some work on other stuff like the main turrets. I drilled out the barrels with a very small hand-drill (after centering it with a needle) and dry fitted the assembly. Here is turret A (‘Anton’).

In painting the main turrets, I used some colour-modulation to accentuate the steps in diameter of the barrels using masking and a very thinned paint-mix darkened with dark grey.
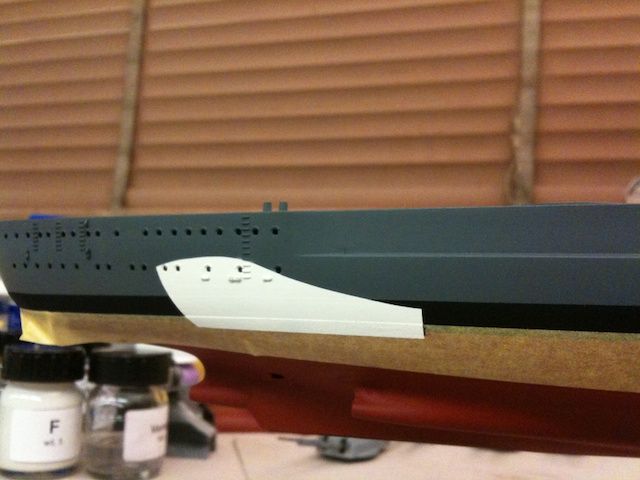
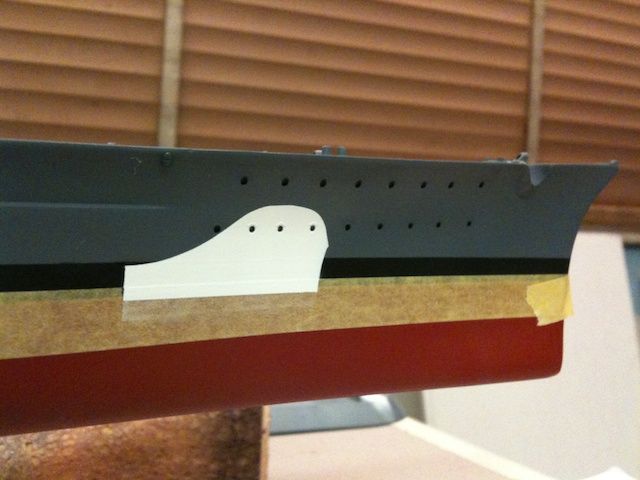
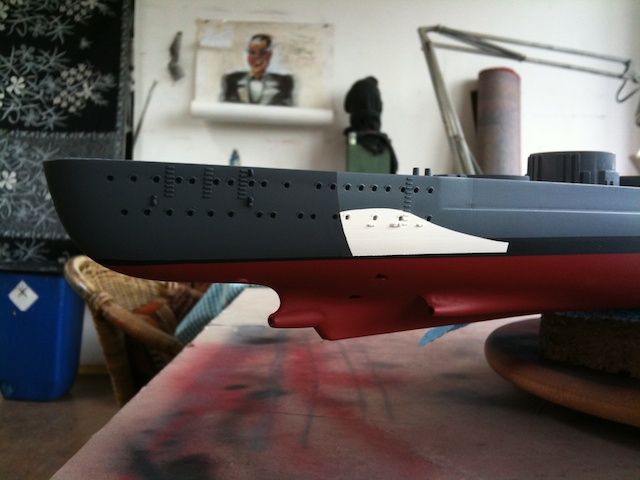
Next was the wooden deck. The detail of the decks in this Revell kit is quite excellent and there is no need for wooden add-ons, in my humble opinion. The proposed colour by Revell is not right in my view: too much ocre (yellow-ish) and it looks artificial. The original teak wood on these decks faded back to a far lighter colour with grey-ish tones, so I mixed my own deck colour, using ocre, white, grey and a little brown. The result is still bit artificial, but that will change after giving it a wash and weathering. I hand painted some of the lids and ammunition boxes light grey.

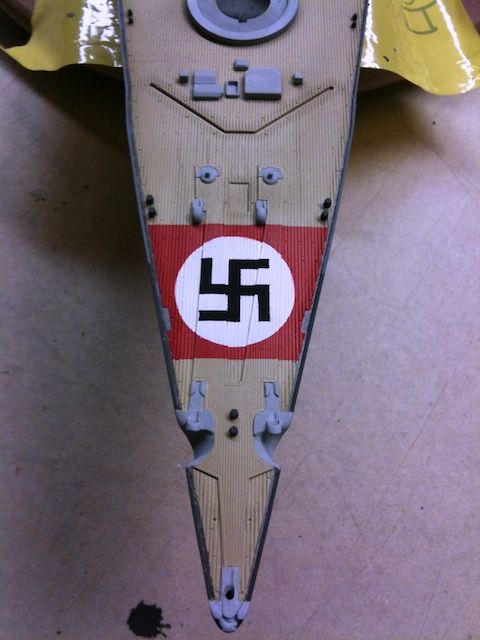
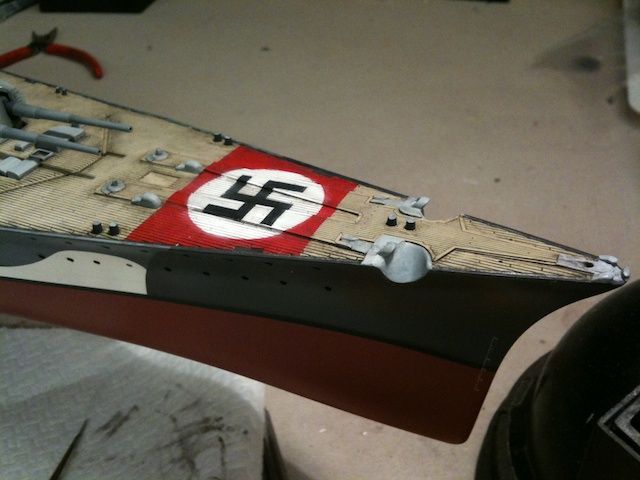
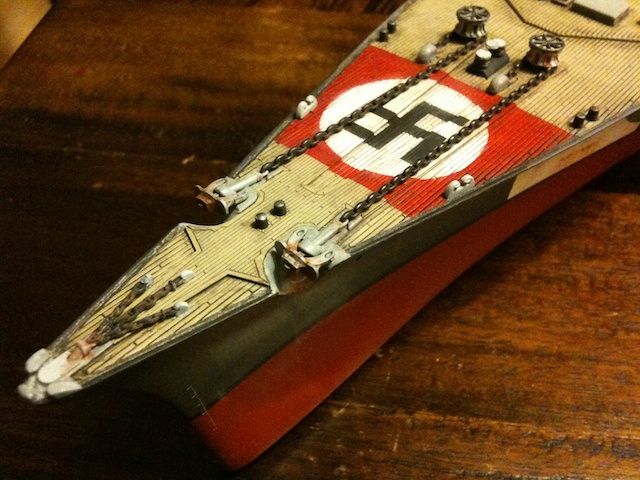
After this I hand painted the ‘gutter’ between the wood deck and the rim of the hull with a dark metallic colour. Next were the German war colours on the deck. I made my own masks, again using a light table: first I printed a swastika in the right scale and with the right line thickness and secondly I made the mask with Tamiya tapes on a transparent sheet of plastic which was stapled to the printed swastika. Then I could carefully lift of the mask and place it on the deck. I used some Tamiya tape as a guide to get the swastika centered in the white circle. This is how it came out…
In the next part I will start describing my work on the superstructure and the weathering process…
Part 4: heavy weather
The different parts of the upper deck levels came together rather nicely with just a few welds of CA. I decided to leave some of the seam lines untouched as they were to near some of the very fragile details. As these details are raised (like the ‘eyebrows’ above the portholes), there is no option on re-scribing them afterwards.
I ran into some trouble in getting the PE porthole-lids on. These porthole-lids are as small as needle-points and I did not have enough knowledge on the various glueing options (like PVA) at that time, so I messed around with very thin CA. Most of them got on nicely, but some were almost drowned in CA and looked a bit messy. I found glueing these minuscule parts quite taxing and was not looking forward to redoing them. Moreover, I was a bit overzealous in glueing the porthole-lids on, as I got a few more on than the real thing. However, I decided to let it be, for what it was: a learning experience…
As I am doing the paint scheme of the Bismarck during its Baltic Trials, I had to work out the placing of the camouflage stripes onto the various deck levels of the superstructure. Later on, I will post a few pictures where you can see the result of this effort.
At times I found myself meandering through my initial building plan, because my re-learning of the hobby took real effort to overcome some of the problems with this kit: sometimes I needed the distraction of doing something new and the enjoyment of a good result. So I started to experiment with weathering the superstructure, starting with the chimney. In this next picture you can see the difference of the weathered chimney next to an unweathered part of the superstructure after dry-fitting:

Still, there is a lot of PE to be attached to the chimney and I will revisit the weathering in a later stage, to put some finishing touches. I will have to make sure that it doesn’t go over the top, especially in this small scale.
In preparation of the weathering of the wooden deck, I applied a few gloss coats before proceeding. I fabricated my own enamel-based wash of Revell Color Mix with anthracite and brown to make a dark and dirty wash. I brushed it on, using the capillary action: my aim was to create a lively result and not a clean panel-line wash. I also wanted to enforce the impression where a lot of traffic (i.e. sailors walking with equipment etc) would occur. At the time when the wash had not completely dried off, I used cotton buds wetted in thinners to clean up the deck. The result is this slightly irregular, dirty and bleached look. Just what I hoped for…

Part 5: Super? Structure?
Again, I had trouble keeping the right track. There is so much planning and troubleshooting to do with this kit, that it makes my learning curve as steep as the south-face ascent to Mt. Everest!
I worked on the (dry) assembly of the various parts of the main tower and the correct masking for the camouflage stripes (i.e. ‘Tarnstreifen’). I also put together the secondary turrets; the front ones (both starboard and port) are partly covered with these stripes. Fiddly masking job.
As an intermezzo, I did the rudders and hand painted the metallic anodes:
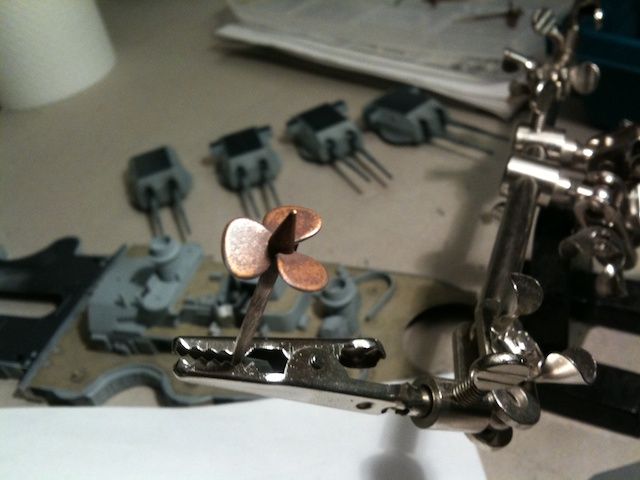
I also painted and weathered the propellers. After an unthinned coat of yellow brass I sprayed on a few thick coats of varnish to ‘weapon’ the base coat. Then I made up a quite thin mixture of rusty brown with a little dark grey and sprayed it on top. Then I carefully polished through that weathering coat with a polishing sponge, leaving the weathering more intact towards the middle. Lastly an anthracite wash at the centre and job ‘s done.
In preparation of the much dreaded weathering and fading of the hull, I gloss coated the hull. For my viewing pleasure, I dry-assembled the whole thing. Here is where I’m at…
Part 6: PE, proceeding erroneously…
In this part I will update you on a new fase of my build. The use of stand-alone PE (like railings and stuff). I must say the detail of the Eduard PE set is quite something. Lovely detail, with nice prepared folding dents and very thin. But boy, do they require the steady hand of a surgeon! In my opinion they have gone over the top on some of the detail, as it is a mystery to me how to handle them or glue them on to the model itself. For instance, Eduard expects you to somehow attach the U-shaped gripping irons, used by the crew to climb the turrets. Like having to glue the individual steps of a ladder in 1:350 scale! Ridiculous in my view.
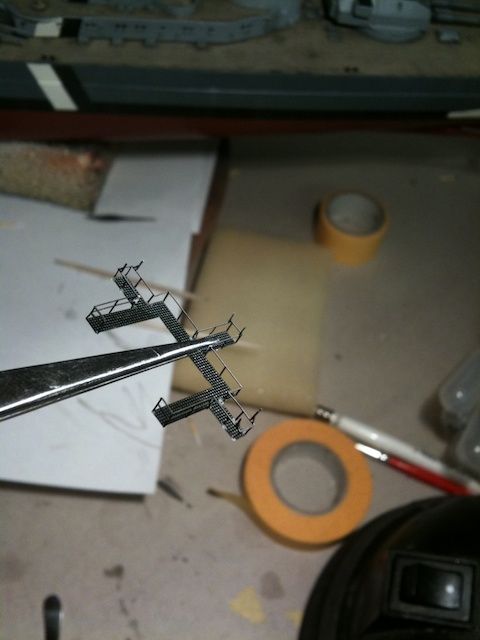
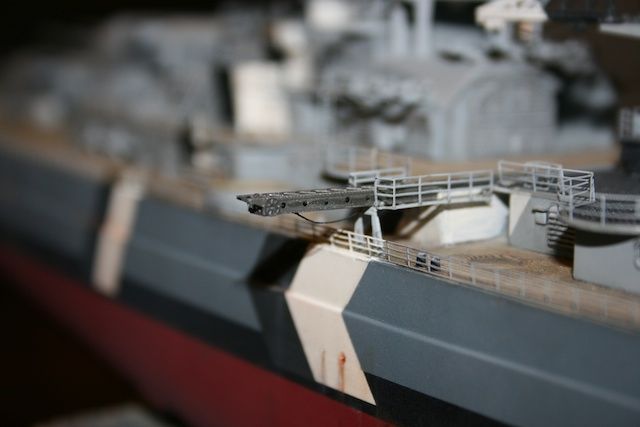
Anyway, other PE is outstanding. At this moment, I am using thin CA-glue that’s gone off a little and cocktailsticks to glue some of the PE. However, I am seriously thinking about giving white glue (PVA) a go. Here is a small walking bridge that goes on top of the admiral’s deck and under one of the gunnery-platforms (Dutch: ‘klaverblad’).
Here is another picture of some PE attached to the tower and mast deck:
Lastly, two more pictures: a side view of the middle to from portion of the ship with most of the parts dry-fitted for this picture. Here you can check how the alignment of the camouflage striping on the various deck levels has come together. A historical inaccuracy is the colour of the emergency rafts (very faded, weathered light-yellow), as that colour was not yet in use at that time, but would be some time after that. I found it visually more interesting to have these little light-yellow accents on the superstructure…
…and a view on the starboard-front of the Bismarck, with some more added PE-detail.

So, this is the status quo. From now on, my building journal is real-time. For anyone who is slightly interested in my build, please bear with me. I am not only a somewhat pensive builder, but also I don’t have my workshop at home. Nevertheless, I look forward to getting this kit a little further down the road. I am also very interested in your feedback, advice, tips and whatever you would like to add. Especially if someone has experience and good tips on weathering and fading the hull, I would be much obliged. Now that I have let go of making a completely historically correct Bismarck, I would like to make a version that is a little more battle-worn than the original. Remember the original was only 26 days in active service; my version would have seen a little more action.
Part 7: new materials and some small scale work
Another update on my build. Today I have been using Tamiya Extra Thin for the first time and it is really as great as everyone says. Quick, clean and very precise.
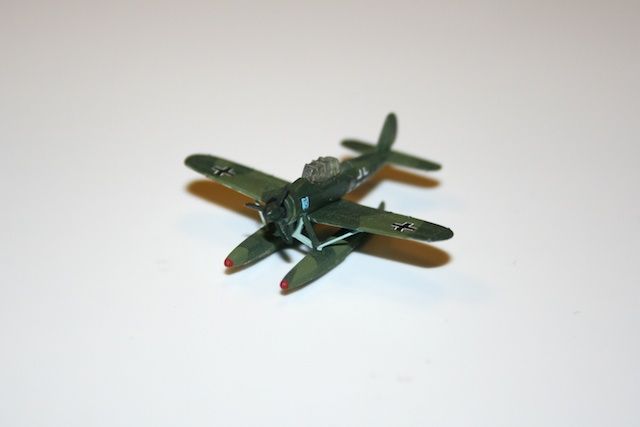
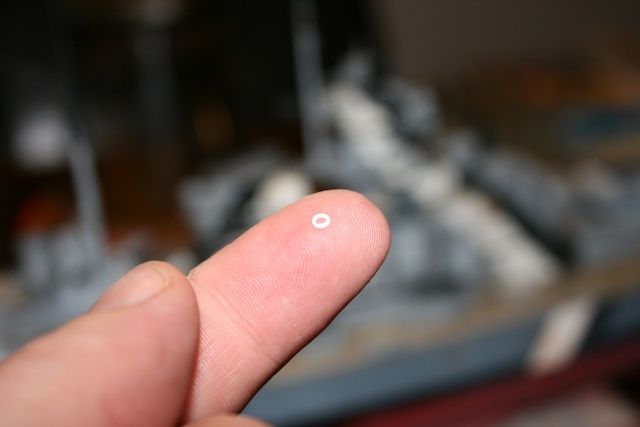
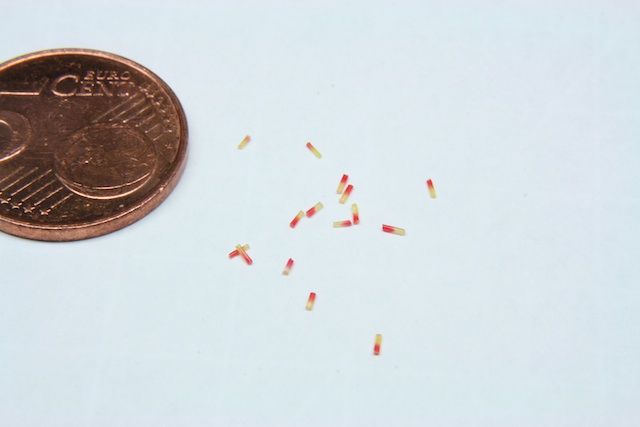
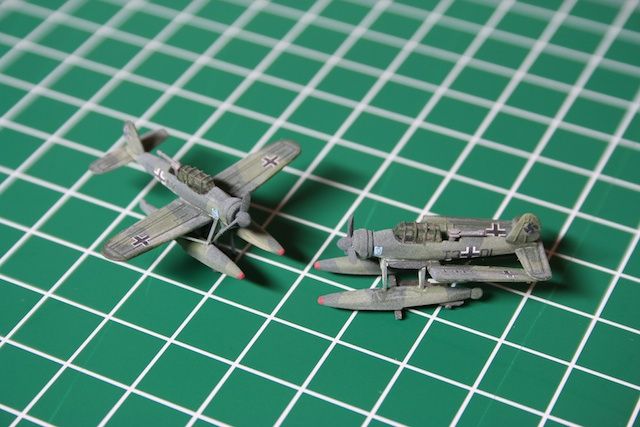
As a treat for myself (I am after all a fan of aircraft), I decided to decal up the Arrado 196’s. Here are two pictures of the one with the unfolded wings. The one-euro piece is to give you a sense of scale…

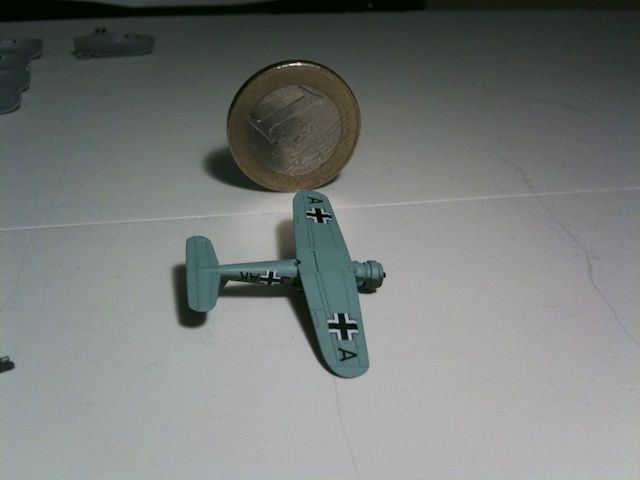
The undercarriage with the floaters are not attached, because the PE that I got for the struts are way too high, so I have to find a way to shorten them or maybe scratch build the whole thing by my self. We’ll see.
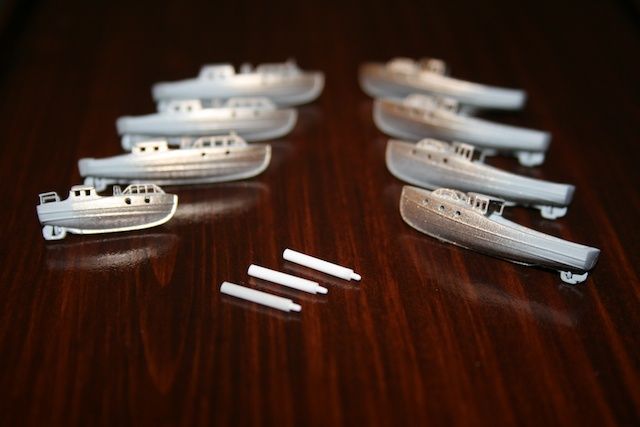
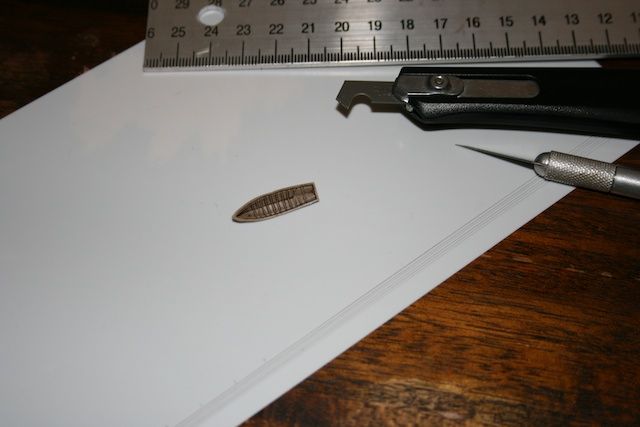
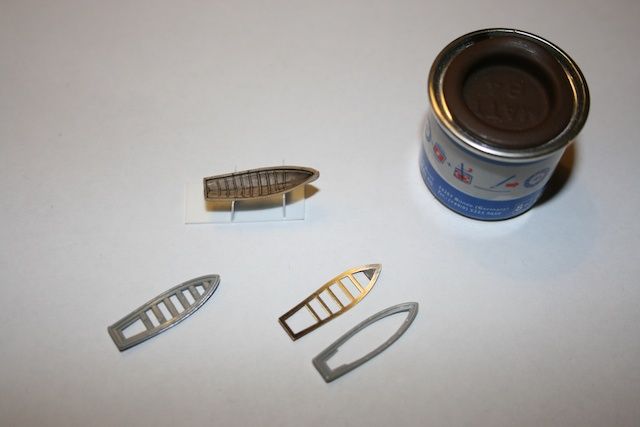
Furthermore, I did some groundwork on some of the smaller pieces: de-sprue them, clean up and polish. And I got to test my newly arrived shipment of Tamiya Extra Thin with the assembly of the lifeboats. In one word: superstuff. The tips and tricks that I pick up here at FM really helped me out and have speeded up things. CA with kicker as a filler for seam lines? Went through preparing those lifeboats like a hot knife through butter. Of course, I drilled out the port holes in the life-boats; so much more realistic than putting in a blob of dark-grey or black paint…
All in all, prepared all sorts of bits and pieces: lifeboats, containers for spare gun-barrels, rangefinders, funnel-cranes etc. Not very exciting stuff for you guys, but hey, all in a days work…


I postponed glueing any PE because first I have to get hold of some PVA glue like Gator Grip. I don’t want to spoil those polished lifeboats and precious PE with anymore CA-accidents. Does anyone have a good resource for buying Gator Grip within Europe and at a reasonable price? Again, thanks for reading and happy modeling!
Part 8: Sub-builds
It has been a while since my last update. I had been waiting for my order Gator Grip PVA and some other building materials to arrive. As I said before: I am a slow and pensive builder, so all went on with small baby steps.
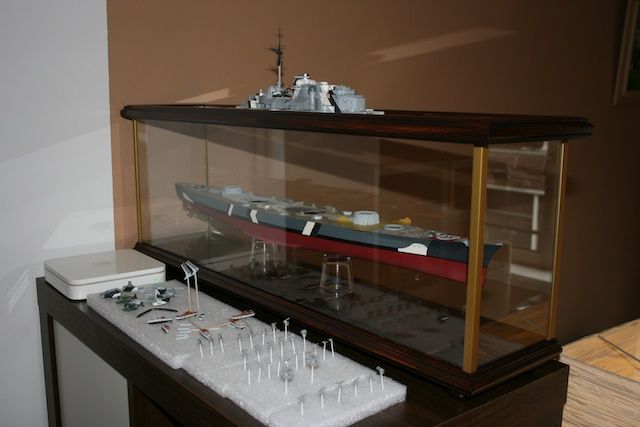
Because I am getting to the stage that al the detail on my build makes it harder to remove dust from the model without the risk of breaking bits off, I decided to work on my display case. It is not entirely finished, but later on I will give a sneak peek of where I’m at.
I will go on where I left of: I continued working on the lifeboats, which are miniature build on their own. In my eagerness to use Tamiya’s Extra Thin I glued the lifeboats together in a blink of an eye, without thinking about emulation and planning the removal of ejector pin marks. So I had to come up with a remedy after all that. I discovered that I love scratch building! I recreated the hatches on the lifeboats, which were lost during polishing, from sheets of styrene. I also used the styrene to cover up some of the ejector pin marks; very handy.
I also started glueing some PE to the lifeboats. NOT using Gator Grip but just plain Bison PVA Wood Glue (extra strong) from the hardware store. A few drops of water and you’re ready to go. It is much cheaper, much stronger (bite) and has a shorter curing time. Gator Grip PVA is more refined and a little bit easier to clean with a wet brush, but those advantages do not weigh up to the qualities of plain Bison glue. A small pointer for other modelers maybe…
After the assembly of the lifeboats and adding of the PE, I did an experiment to add the brass rims around the portholes of the lifeboats. First spray a light coat of paint around the portholes (50/50 gold, silver). Then made custom-made ‘masking-plugs’ that will cover just enough around the portholes to keep a small rim of paint around them. BTW, the pic gives a peek of the new base of my display case…
I also made lifebuoys with the straps made from stretched sprue. A little bit over the top maybe, but hey…modellers delight!

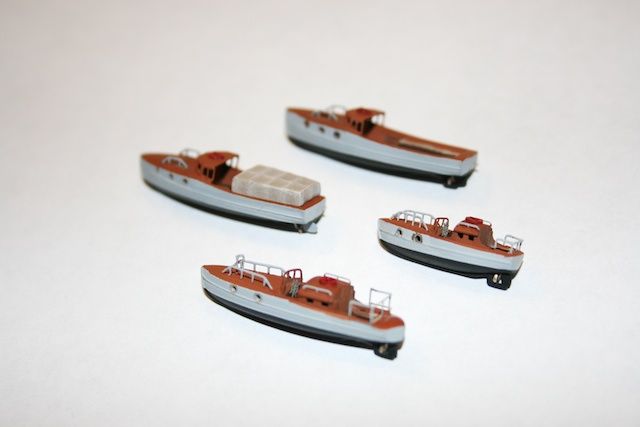
This is how the main set of 8 lifeboats came out. Still some touchups to do, but pretty pleased how they came out. Did some very restrained weathering and color modulation, and dry-brushed the canvas covers of two of the lifeboats.
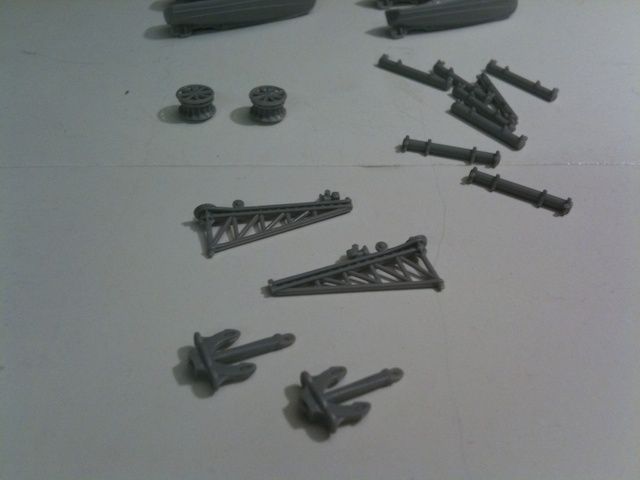
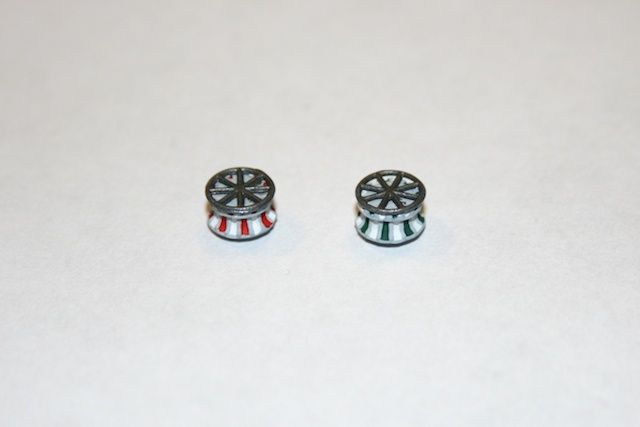
I continued with some other small stuff. The two anchor spindles. Simple bits from three parts each, but also four colors and very small!
As I wrote earlier, the struts for the two Arado 196’s where way too high. I decided to scratch build them from tiny styrene strips and stretched sprue. I used the PE that I tore of the floaters as a guide for the angles, glue, cut to proper size, install…

Here is a pic of one of the Arado’s (nearly done). Does anyone have tail-swastikas in 1:350 scale? ;-)
Back to the ship…
I worked on the signaling deck above the main hangar: PE struts for the lifeboats, ship’s bell, scratch build some exhausts and tubing on the mainmast, PE ladders and antennas on the mainmast. Here’s an impression…

I continued to work on the ‘Funkmeßgeräte’, which are - again - builds in their own right: 7 parts of the smallest, fragile PE, with real construction going on. Here Gator Grip is useless. Too weak. A tiny round blob of diluted Bison PVA shrinks back to what looks like a strong weld. And importantly, it holds!
I also decided to scratch build the ribbing in the smaller lifeboats. I saw someone do this with leftover PE, but I decided to do it with stretched sprue and Extra Thin…

As I said before, I started working on the display case to keep it in a dust free environment during the later stages of the build. I made a base of plain pine tree wood (inspired by Stefan Carlson’s DIY), cut 4 mm thick glass to size, and assembled using silicone kit, lots of Tamiya tape, anodized steel braces (brass look) and of course my trusted Bison PVA Wood Glue. At first I was planing to make an upside-down-aquarium to cover the model and rest on its base. But the fit was so tight that I decided to go with a design with a removable lid. Probably also a much safer solution when removing the cover and possibly damaging the model. Here are a few pics…

So, this is it for now. I hope that you all are not too bored with the detail of my descriptions, but I am learning and experimenting a lot as I go along. It may benefit some among you. Besides this kit contains 659 pieces OOB, and I haven’t even a clue of how many PE pieces there are on the 5 PE-sprues from Eduard; must be nearing the 1000. So there is some logic in describing this in detail. If you want a more outlined impression, just wait for the final reveal…
I am currently working on the heavy flak cannons (lots of nerve-wrecking PE) and re-doing the main turrets. Still stalling the weathering and fading of the main hull (scary stuff). Well, thank you all for reading. Keep you posted!
Part 9: weathering the storms…
Some progress to report: the display case is practically finished. I am on the lookout for some pedestals for the ship to be placed on in its case. Haven’t found anything satisfactory yet. If anyone has ideas or pointers: much appreciated!
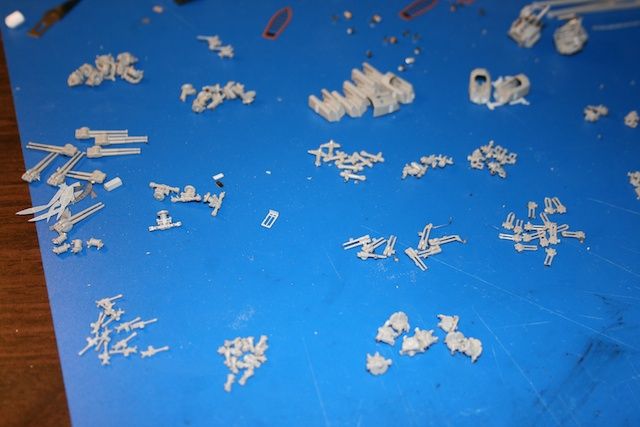
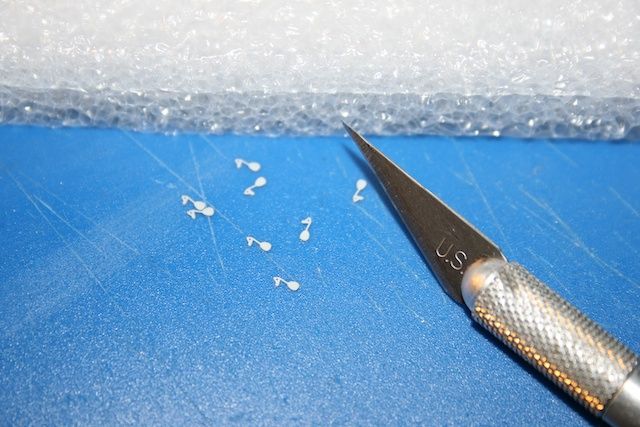
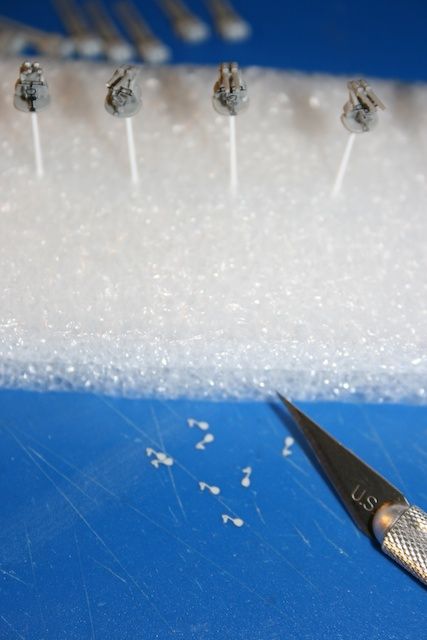
Working on the smaller parts and details of the ship, I desprued all of the small parts to be cleaned up, polished and so forth. Some of these smaller bits had really delicate connections to the sprue: for instance, the fragile barrels of the flak where easily damaged when removing them from the sprue. I used the point of my hobby-blade heated over a candle flame to cut/melt them of. Note: cut some distance away from the part as not to damage the parts with the heat of the blade. Then afterwards it is quite easy to clean them up. Anyway, with the amount of similar pieces to be done, it feels a bit industrious…
Assembled the cranes that lift the Arado 196’s onto the catapult and out of the water. I did some reconstruction of the details with the use of polystyrene…

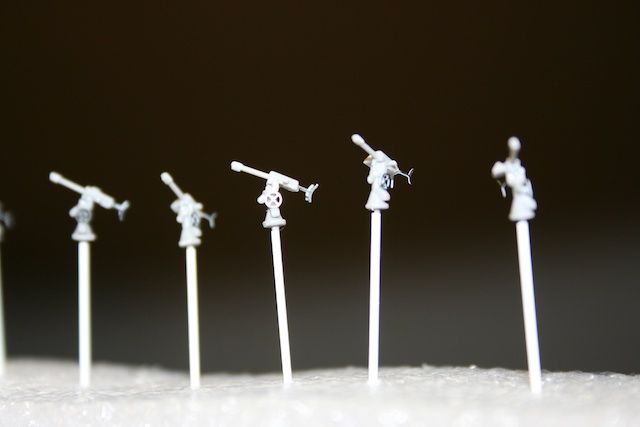
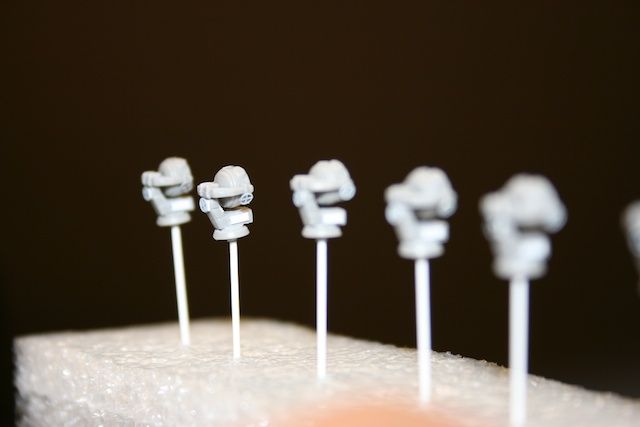
For easier handling (and less risk of damaging the smallest bits) I attached all pieces of small armament to little pins of Styrene. I will snip them off as soon as they are finished. Here is a pic of the light flak (10 pieces), with PE handles and turning wheels. I bent the handles on the point of a cocktailstick. Had to use CA with kicker to get them to stick in the correct position, as they are too thin/small to have enough grip to allow for the curing time of PVA.
Next where the searchlights. Did some minor scratchbuilding, also to cover up some annoying ejector pin marks which where very near other details. Some artistic freedom here, but it works, I think. I Had some spare Eduard PE to make the third turning wheels on the back. After airbrushing them I will touch up the fronts with silver where the clear-parts will go. Hopefully this will add some suggestion of the parabolic reflectors. Will this work in this scale? Any experience with this, anyone?

Here I am working on the PE (seats and struts a.o.) on the medium flak. Very fragile stuff…
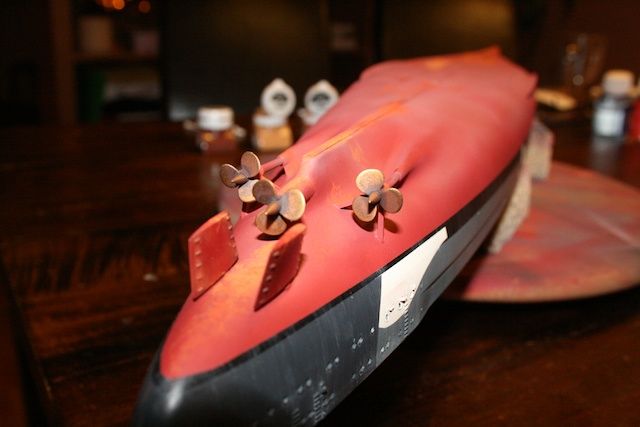
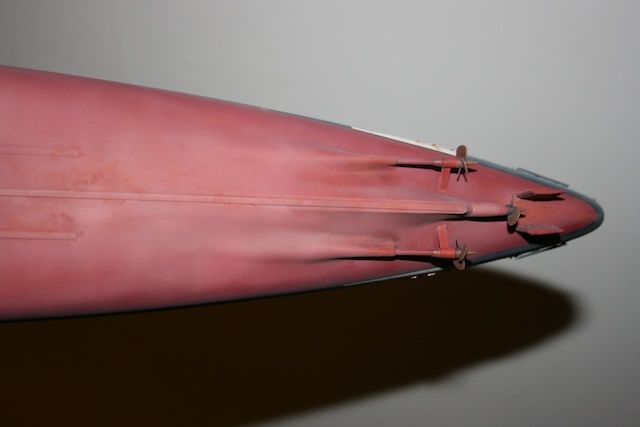
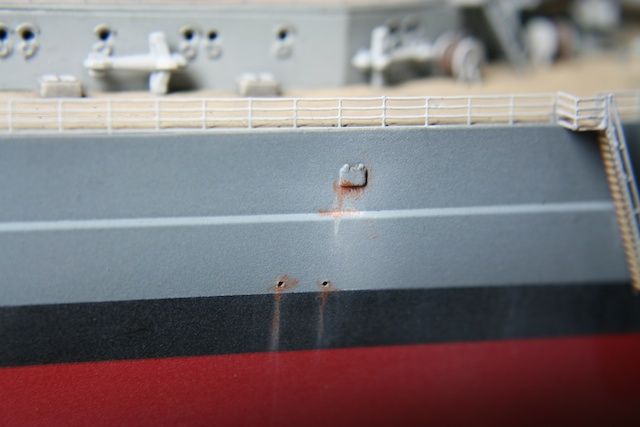
Okay, I already did some weathering of the hull with oils, but wanted to experiment (for the very first time) with fading of the hull, starting with the part that is below the waterline. I dreaded starting this, afraid to mess up the work that I had already done.
I experimented with the right color. Just adding some white to the original color didn’t work: the bottom started to look like a young girls room (way too candy-pink). Added some mud-brown and rust-colors and finally came up with this:
I was pretty pleased with how it turned out. A rather subdued and bleached look. I then experimented with adding some layers of rust on the bottom of the hull, using various MIG-pigments. At first it looked rather strong, but I can tell you that most of it disappeared after a coat of matte varnish. Here are two pics of the results without the clear coat:


Getting a breather from the anxiety (feels like I weathered the storm, not the model), I turned again to the small bits. This is what is ready for first airbrushing:

Here’s a wider shot, with the hull in the finished display case in the back. I used two small liquor glasses as pedestals: ready for a toast when she’s all finished!
Part 10: time for a drink?
In this update a little more on my work on the small armament (e.g. medium- and light flak), some scratch building and weathering of the hull. I found taking pictures of my progress a real pain. I can’t get my Canon EOS 400D to take good pictures. I am in dire need of a tripod, macro lens, adequate lighting and some acceptable photographing skills ;-) At times I resorted to the camera in my iPhone (unfortunately not a 4S).
After update #9 I put some paint on the many pieces of flak, weathered and dry-brushed them (if the delicate PE would allow that). I could not restrain myself to put a few of them onto the deck, just to get an idea of the upcoming final result. I might regret this, as I have to take special care now not to knock them off accidentally. Here’s a picture of the stern where some of the attached flak, railings, stairs, the rear rangefinders and the tubes with the replacement barrels for turrets Caesar and Dora are in view:

I continued to work on the hull. After the fading and weathering of the part below the waterline, I took on the upper part. Here my inexperience becomes painstakingly clear: all the phases of my building process seem to be out of their (chrono-)logical order. My learning curve seems to disallow to work through the build in a more efficient manner. Anyway, I had to do some extensive masking to protect my work during the fading of the upper hull. The fading served not only to give the impression of faded paint, but was also a preparation for the parts that will get a more eroded look (i.e. salt-erosion, water streaking, rust).
I then got out my brushes and oils to do some artistic work. For this I used 502 Abteilung oil paint and Revell Color Mix as a medium. These are the colors I used: Abt165 Faded UN White, Abt060 Light Rust Brown, Abt070 Dark Rust and (just a little) Abt110 Black. Once I got over the fear of spoiling the build, I relaxed and found it one of the nicest things about the work on the hull. Although it was experimental, the model has gained a bit of realism. BTW, the yellow canisters are a special brand of stress solvent; very nice to work with :-p

Here is a shot of the bow with some of the rust- and water streaking effects. I know, I need to improve in the picture-taking-department…

I also attached the anchors, -chains and -spindles to the deck. I weathered the anchors using the same Abteilung colors. I sprayed the chains anthracite and then used a soft (2B) graphite pencil to give a metallic sheen to the chains. Finally I added a dark brown wash to the chains. I also applied some MIG pigment (Old Rust P230) with a cotton bud to weather the deck where the anchor-chains run over it. The picture doesn’t really pick this up.
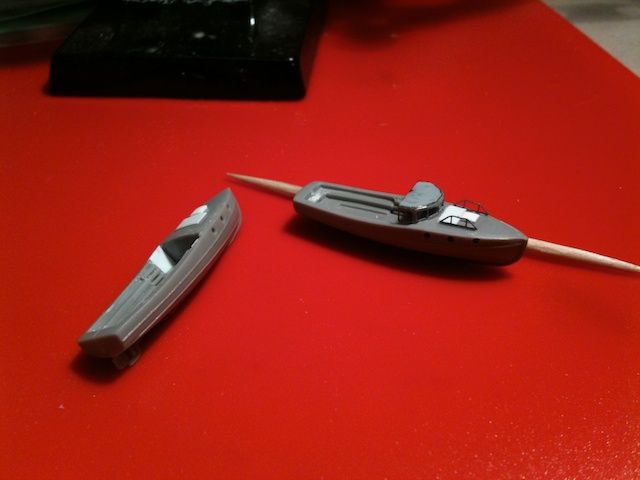
I then continued to work on the smaller lifeboats. After scratchbuilding the ribbing, I sprayed the inside with a sand color (Revell 89), varnish and gave them a dark brown wash. I decided I wanted to add a bit more: the floor boards in the deepest parts of the lifeboats. For this I used some styrene sheet on which I did some scribing to make the individual planks stand out.
I then cut the scribed floor boards to size and spray-painted, varnished them and gave a dark brown wash to bring out the panel lines.

In the picture above you can see a piece of Eduard PE to put on top of the small lifeboats. I found them too thin and too unforgiving to model. So I used the original Revell plastic parts, removed the seating boards, sanded the underside down so that I could fit part of the Eduard PE under them. This gave a far more realistic 3D look. I used a Revell paint jar to bend the PE around: it came out the exact right curve.
After attaching the top to one of the lifeboats using PVA, I switched to using CA with kicker. This enabled a stronger bond, but also gave better results in getting the hull and top part of the lifeboats flush. I then sprayed the hull light grey. I then masked the rim of the top part of the lifeboats with 1mm Tamiya tape hand hand painted it in its wooden color. The picture below is how it came out. It still needs a bit of weathering and dry-brushing to bring it to life. I also need to attach the rudders, and the paddles. I also have some scratch build stuff which will go into them (like small tons for emergency food stock, folded covers etc.).

After all this, I was in need of a drink! So I got the two liquor glasses from under my ship (see update #9) and poured me one (or two). So now I had to get started on the the pedestals.
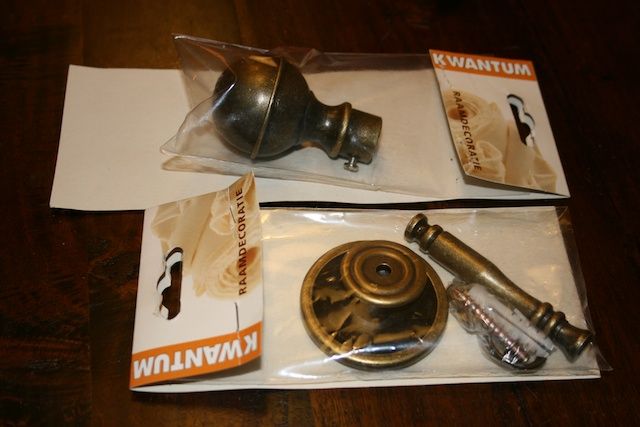
As I didn’t find anything readymade which remotely looked like what I had in mind, I decided to make a pair by myself. For this I used some decorative end-pieces for curtain-rods. These pieces already had a nice worn and antique look, so I didn’t have to do some extra work to make them look right (see below).
I disassembled them and decided which parts to use.

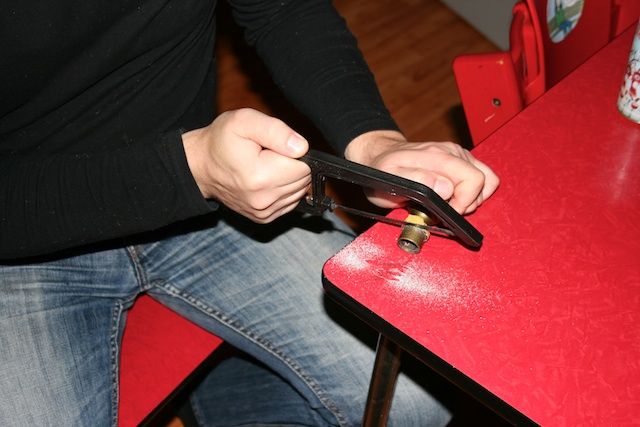
I had to saw off a straight bit of one the pieces. Without a suitable power tool it became a very tedious job. I had only a low quality steel-saw and the material was pretty thick!
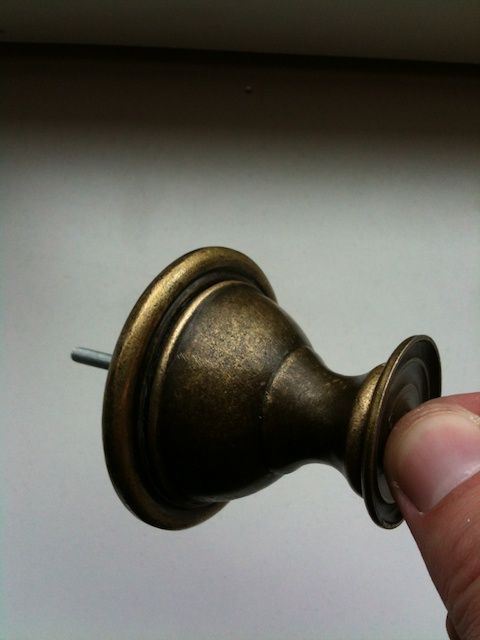
I then glued the parts together, inserted a 4mm threaded rod so that the pedestals can be bolted on the bottom of the display base. The iron rod just makes a snug fit into the hull (with the casting plaster inside), so no bolts are needed there. I test-fitted it and it just looks right for such a battle-worn version of the Bismarck: antique, classy but still rugged and worn. This is how the pedestal came out.
Part 11: Guns blazing
It has been a while since my last update; slow builder, aye? I have been working slowly on my Bismarck, re-doing/repairing some stuff and doing some PE-work that almost got the best of me. Further on, you may understand what I mean.
I reworked the bleaching of the hull, finalized the rust effects and added the vertical anodes on the propeller-struts (scratch-build, there is no PE for this, neither are these details in the Revell kit itself). No use to post pictures of this; it’ll come later.
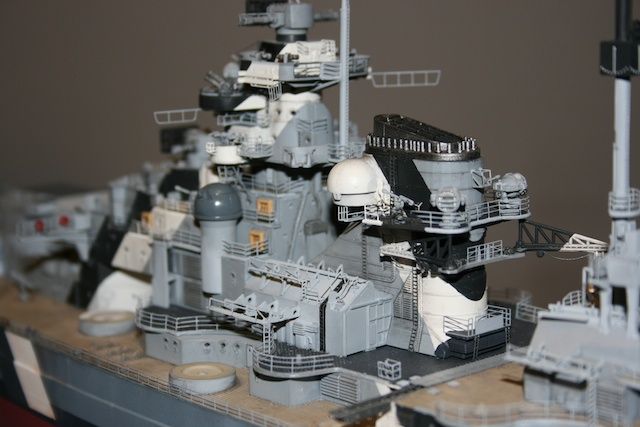
I totally reworked the main turrets. I added all the Eduard-PE: small hand rails, grips etc. Here is a picture of the PE part for the hand rails.
Because these parts are so small AND because they are supposed to be glued only at the small attachment struts, it was really difficult to get them on; I had to build up minuscule blobs of PVA on the contact points and them place them carefully, directly in the right position. These tiny blobs of glue had sometimes cured during the time I was maneuvering the piece for direct placement and then…it wouldn’t stick or just fall off. For some reason it took more than one attempt for every of these rails, of every turret. Here is picture where you can see the rails.
After attaching all of the PE, I pre-shaded the turrets and airbrushed them, also using some colourmodulation. Because I had made some of the latches of the rangefinders in the open position, I hand-painted the open ones flat black to suggest the dark insides of the turrets. Here is a picture of the results (without varnish and weathering).
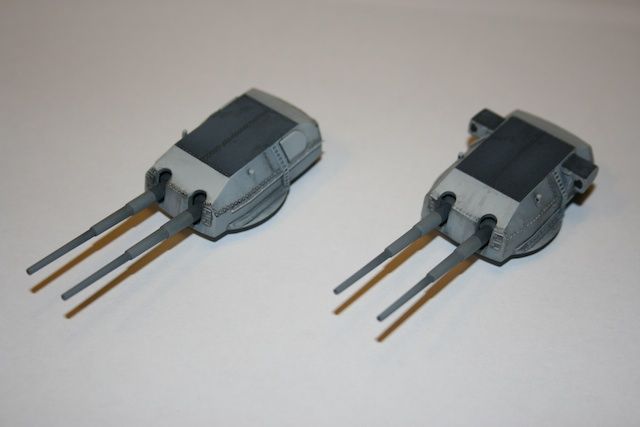
Next step: a gloss coat, dark wash (flat black, brown, Revell color mix), highlighting details with lighter colours and a flat coat to finish. Here are turrets Anton and Bruno…
I then proceeded to the secondary turrets. Remember I wrote that some of the Eduard-PE is ridiculously small and that there was no way that I was going to attempt them? Well, they still are very, very small, but…I made a heroic attempt anyway. Here is a picture of what I was dealing with: hand-grips for climbing the turrets (reminder, this is 1:350 scale)…

It was strenuous, frustrating, difficult, tiring, but in the end I am pleased that I persevered. I also completely repainted the secondary turrets, first of all to correct the tone of the dark grey tops of the turrets, but also to add some fading of the colors, pre-shading and color-modulation to accentuate the geometric shapes of the turrets. Here is a picture of three types of the secondary turrets, still looking a bit artificial with the gloss-coat on…

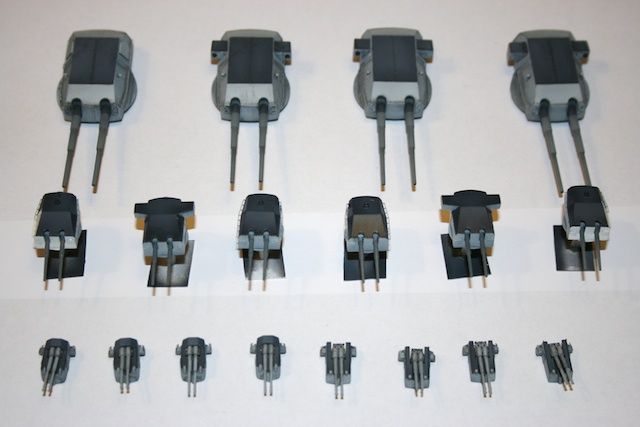
I went through the entire same procedure for the eight pieces of heavy flak. These each have two small boxes with measuring equipment on the sides which have to be folded from PE. Again, industrious work. Here are two pictures of the heavy flak…


So now I have almost completed all of the armament of the Bismarck. Here is a picture…
For my next update I will finish the construction around the main turrets (PE-walkways and air-inlets/exhausts) and as the hull is done now, I can seal it off and start glueing the superstructure on top of it (starting to take form!).
Part 12: end-of-year resolutions…
December was a month in which I tried to finish my build of the Revell Bismarck, but unfortunately I didn’t succeed. Maybe it turns out for the best, as I don’t feel like I have to rush things anymore. At this point I just want to see it completed in its display case (so does my wife!), so I am highly motivated to finish it soon.
I have read some comments on the internet (and this forum also) about the weathering of ships, especially the hull of a ship. As I have progressed beyond the point of no-return as far as redoing the hull is concerned, I wanted to post a picture of the final weathering of the hull beneath the waterline: the model can not be turned over anymore, so this is the only good picture I can provide, even for the final reveal. As described earlier, I faded the hull with lightened hull-colour and used MIG-pigments for the rusting effects. I also used oils (502 Abteilung) for some detailing (also for weathering above the waterline). At the end I put on a good and very dull coat of varnish to blend it all together. Here’s the pic:
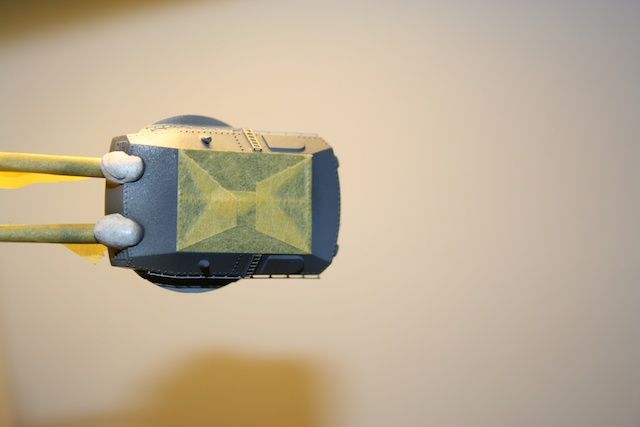
After seeing me work on this model for so many hours, my three-year-old daughter wanted to contribute something to the build. I thought it a nice touch to let her add something which is not directly visible, but we know it’s there! So I let her glue a golden star sticker, which she often uses when painting or drawing, to the underside of turret Anton…

Note: you can also see the detailing and oil-stains that I added to the underside of Turret A.
I started to put all the extra bits together: the tents that are mounted over the deck-hatches, using the Eduard-PE and PVA to make them look a bit lively and less stiff. I left some of the excess PVA to simulate the ‘draping’ of the canvas onto the deck floor. Of course, some dry-brushing and weathering.
I also finished the larger rescue-boats (‘Admiralsboten’) and the smaller life boats (‘Beiboten’) adding the oars (@SteveSutcliffe!), supplies, helms and rudders, and folded canvas covers made from the thinnest plastic (sandwich-bags) that were painted in a variety of colors to get a lively result. I’ll keep the pictures for the final reveal…
I added the PE-hatches for the ventilation systems on the main deck and finished the walkways and ventilation towers around turrets Bruno and Caesar. I also scratch build a set of 11 smoke-cannisters which were kept on the main deck (aft-section, near turret Dora) from polystyrene rods.
As for scratch building…I attempted something ridiculous: the bow- and aft flagstaff have a headpiece consisting of a circle with a swastika inside. I tried to replicate/simulate this by using a slice of hollow polystyrene rod…
Inside this rim, I had to fiddle a cross made from pieces of very thinly stretched sprue. It came out like this:
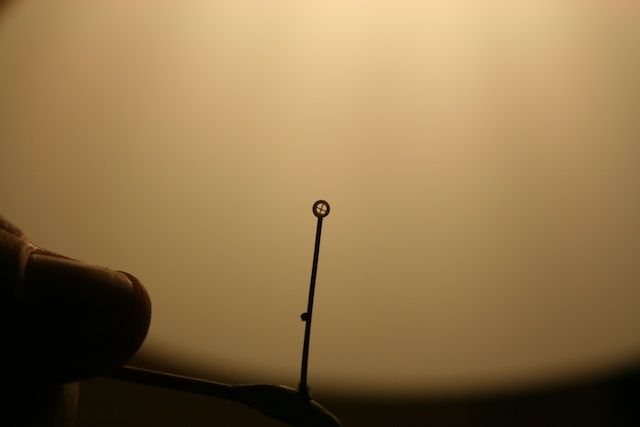
Maybe it is not quite in scale (too large), but I installed it onto the model anyway, just to see how it looks. At this point I still am not sure if I will keep it. Here is a picture of the aft flagstaff. Feedback is welcome: should I keep it?
BTW, in the background you can see the canvas tents and in the front (on the hull) you can see the so called ‘Heckspier’ for which I used part of the original part with some added stretched sprue: the cable of the original part is almost as thick as the pole itself…

Here is another picture of the aft section of the hull with some more scratch building going on (in progress).

The entire port side will be constructed in a sort of ‘docked’ mode (‘Heckspier’ out, lifeboats on board and the Arado-catapult retracted et cetera). The starboard side will be the ‘sea-side’ (with retracted ‘Heckspiere’, extended Arado-catapult and a fully loaded life boat dangling from the starboard ‘Davits’ et cetera).
I sort of finished the PE-work on the superstructure: all sorts of bits and pieces, ladders, stairways, railings, struts, grips and the entire construction that supports the rescue boats. Here are two pictures of where I am at. Please note that some parts are still not weathered or still contain a gloss-coat. The dull-coat will blend things together…

I added the retractable walkways on the forward superstructure (including the lifebuoys with straps) and made the fastening cables from stretched sprue. Here is a top-view:
Here is a view from the front, where you can also see how I detailed the viewers on top of the conning tower with black paint on the tip of a cocktail stick…

The OOB-parts nor the Eduard-PE provide the supports for the Arado-catapults, so I scratch build them from polystyrene. The picture is very poor (sorry!); I will try to come up with better ones for the final reveal. I also added a loosely hanging cable under the catapult, just because it looks nice…for artistic license.
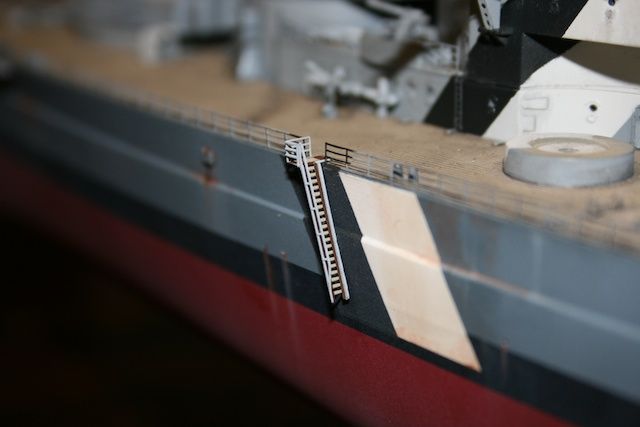
Lastly (for this episode in my WIP) I added the boarding stairs (‘Fallreep’), both in a retracted version and a version hanging from the side of the hull. Here is a pic of the latter.
So this is it for now. I have made progress beyond this point, but I have no pictures yet: I am very disappointed with the quality of my photographing, so I will try to better this. I will get rid of the camera flash, get a tripod and some good natural lighting to achieve better results.
At this moment I am working on the water fences on the stern section of the main deck (a lot of fine PE supports to be added!), rolled-up firehoses and ropes and working steadily on the rigging and antenna’s on the superstructure.
Lastly, a request: does anyone have advice for me how to do the flags? The kit comes with flags on the decal sheet, where I suppose you have to stick the two sides together and attach them to the rigging. But, how do I manipulate them to get them to look like they are hanging with ‘drooping’ folds et cetera.
Part 13: working through the last bits
Thanks to Stefan’s tips I successfully took on the ship’s (signaling) flags, but more about that later on. Although I am on the home stretch, I seem to keep coming up with new details to work out; maybe I don’t want this to end?
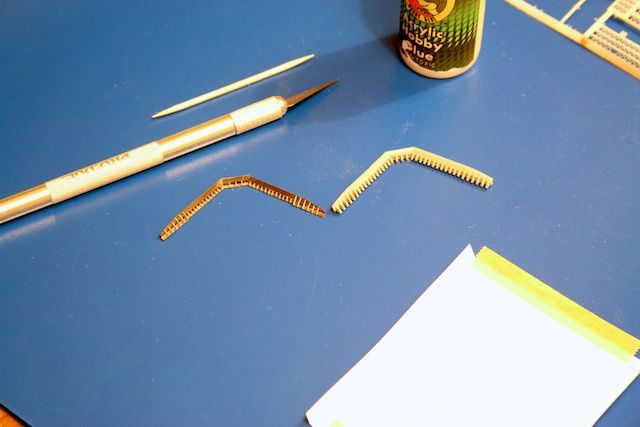
I resumed working on the wave breakers; I broke off working on them when I was still using CA for glueing the PE parts together. Now, with a little more experience, I felt I could take it on. The first wave breaker on the front deck contains of 39 pieces of PE (most of them very, very small); not counting yet the 33 standards that support the wave breakers on the front side. They will be added when the front wave breaker has been placed on to the deck. Here is a picture of the first wave breaker with 8 pieces assembled.

Here, the result with all 39 pieces assembled (without paint). Next to it I put the original plastic piece from the Revell kit. What a difference, I must confess…
Then on to the port- and starboard wave breakers, each consisting of 14 pieces of PE.
Picture below: me working on the port side wave breaker.
For the painting I went through several stages: (1) primer of medium grey, (2) spraying a gradient top coat of light grey (leaving it a little darker where the struts/supporting ribs are attached), (3) hand painting the base of the wave breakers (which are not there in reality) black, pushing the paint up to the vertical parts as to suggest a small band of black at the base, (4) hand painting the base with the deck color, leaving a very narrow line of black at the base of the vertical parts, (5) gloss-coat, (6) black-brown wash and (7) dull-coat.
Here is the final result (as separates, with the original Revell part for reference):
The dark between the ribbing is not the black line as mentioned before; it is just shadow.
Then, I went on to fabricating some more details: I made the night-lights on the mainmast from two 3 mm pieces of stretched clear-sprue, the gripping wires above the lifeboats and the rolls for the ship’s ropes (sorry, I don’t know the English word for these). Pictures will follow later.
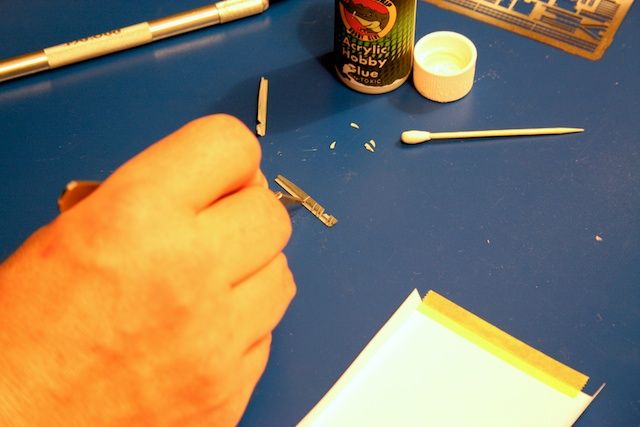
With Stefan’s help I started working on the Bismarck’s (signaling) flags. I brushed a layer of water-thinned PVA on to a few pieces of aluminum kitchen foil. After the PVA coat had dried, I put the decals of the flags on.

I then cut out the separate flags leaving a 1 mm rim of aluminum foil around the decal. I then put the mirror decals on to the other side centering them, trusting that my previous cutting was adequate.
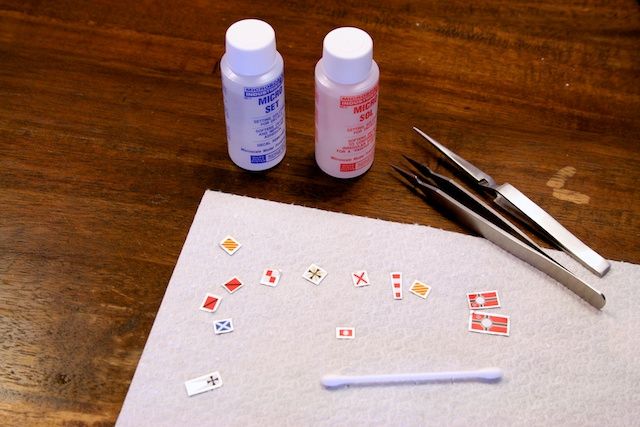
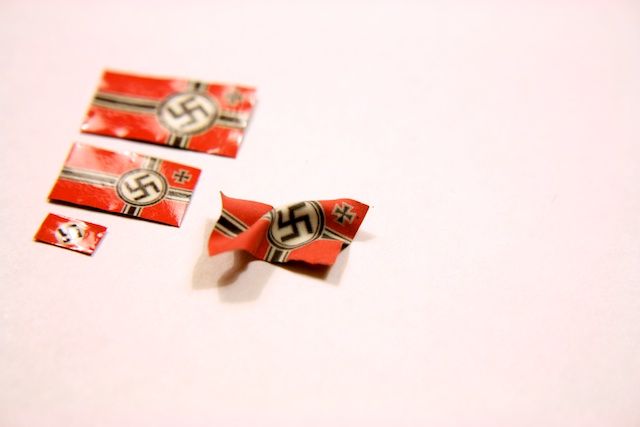
When cutting the excess aluminum off I noticed some ‘whiting’/’silvering’ of the decals at the cutting edge. I suspect there was a problem with the adhesion of the PVA undercoat, the decals and the enamel-based dull coat. Also, when I tried manipulating one of ‘Reichskriegflagge’ as a test, I noticed the same whiting/silvering at bends and creases. I have taken into account that these flags might not work and could be considered a total-loss.
So I tried to make my own decals. This also gave me the opportunity to make flags with the swastika’s as the Revell decals do not have them. I collected High-res images of the Reichskriegflagge and the various signaling flags, resized and made mirror-images for the opposite sides. I bought a few sheets of white-base DIY decalling paper (Experts-Choice™) and printed the prepared images with the highest quality settings. Then I sprayed an acrylic (!) varnish over the applied decals.

I then followed the same procedure as before after the varnished decals had dried off for at least 24 hours. I did a test with one of the larger Reichkriegsflagge, bending it to my liking and it works like a dream. After all this I finally applied the dull-coat. This is how my tester came out.
I am still looking for a more natural look, with some more smaller wrinkles and creases, but this will take some practice, I reckon.
Question: does anyone know if the swastika’s on the flags were printed so that both sides had the exact same image (i.e. with the hooks of the swastika pointing in the same direction )? Or were they woven into the fabric resulting in a flag with a correct side and a mirror image on the other side? My fabricated decals are of the first kind so that either viewed from port or starboard the swastikas look correct. Any feedback would be highly appreciated!
Maybe there will be two more WIP-episodes, or maybe just the one. It depends on the amount of new things I will try to work into this build.
Lastly, here is a picture made with my new equipment: Canon EOS 400D with my standard 18-55 mm lens, but now with the screw-on magnification filters and a sturdy tripod. I have also done some reading about lighting effects and aperture and so on. Hopefully I will have progressed my photographing skills in time for the photoshoot for the final reveal…

Part ?: Murphy’s Law!
It’s been a while since my last WIP-update: busy, busy, busy with anything but modeling. Nevertheless a quick update to keep you up to speed.
The sequential episode number of this WIP is a question mark, because it’s more of an intermezzo. Also ‘Part ?’ could refer to the fact that some parts got lost during the build. At a certain point I was working on the rigging, made a small movement with my hand and heard the slightest of bouncing sounds on my wooden floor. I inspected the model for about half an hour and decided that nothing was missing and that what I heard falling was probably an off-cut or something. How wrong I was! Two days later, I noticed that the front center-anchor was missing! Now I knew what the sound must have been. I searched with flashlights and looking glasses for hours but to no avail: it probably already had travelled to somewhere outside our house, clinging to the soles of our shoes. :-(
Luckily, our friend Stefan Carlsson was able to help me out: he had a spare 1:350 anchor from his magnificent Scharnhorst build and sent it to me by mail. How wonderful this community works and how special it is that true unselfish helpfulness still exist, especially on a medium as remote from everyday (real) life as the Internet! I have thanked him already many times, but it should be known here on the forum also what a great guy he is: thank you Stefan for your help! It really means a lot to me…
Anyways, I have proceeded with my build, arriving at the final stages: detailing bits and pieces and of course the rigging! Well this is no joke but about half an hour ago I was putting on what must have been the third-to-last antenna-line on the ship when disaster struck, or rather I myself…
The space between the mainmast and the front mast behind the main tower has a lot of rigging going on. The aforementioned line was already attached at one point and I was about to cut it to the exact length with my precision scissors. Whilst cutting, one my fingers slipped out of the scissors wreaking havoc among the rigging work I had almost finished: some PE of the mast was spiked and twisted on my scissors, lines where broken and various bits came loose or were deformed…
Brain meltdown! Did someone suddenly turned up the central heating? I could not believe what had just happened! Staring at the mess, hoping that staring at it would somehow undo this unfortunate event. Well it didn’t and I decided to write this down in my WIP to give me some time to cool down.
I’ll have to see how great the damage is and how much this is going to set me back, but a delay is certain. Nevertheless I hope to bring you better news shortly. Maybe I’ll fill up another WIP-episode with some work I was planning to include in the final part, but will post now as a separate item. Well, I’ll keep you all posted.
Part 14: recovery and all strung up…
After last weeks rigging disaster, I have managed to repair all the damage and proceed with the final bits of this build. I still have to do some little things, but the end is near. In redoing some of the rigging I had the chance to improve on my first attempt, having learned from experience. I also decided to do an attempt at the (signaling) lanterns that hang from the antenna poles on the main tower. I drew inspiration from the famous 1:100 model from the Bismarck by Joseph Kaiser; his model puts every other Bismarck model to shame. These lanterns are only a detail, but you hardly see them added on models of this scale (1:350), so there’s the challenge for me. The lanterns hang suspended between two steel cables running from the main tower’s front antenna poles to the railing of the second deck level. There is a third line in the middle - the electrical feed for the lights - but I am leaving that one out.
I made the lanterns from clear sprue, stretching it when slightly melted so that it does not stretch to a thin thread but rather a thicker fibre. I painted the transparant fibre with clear gloss lacquers with a little yellow and red added. I then cut them to length, ca. 1,5 mm (they looked a bit like miniature medicine capsules!).
I then aligned these pieces on a piece of Tamiya tape (after removing some of the tackiness), applied a very small amount of thinned PVA and gently placed a prepainted piece of stretched sprue onto them.

After the PVA had cured, I repeated the process for the opposite side. After cutting them to roughly the right size, I glued them to the antenna poles using PVA. When the PVA was still a bit flexible, I snipped the cables to the exact right size and glued them to the railings just below the mast deck. Here is a picture of the lanterns on the starboard side (the port side has three lanterns instead of two).

Still up on my to do list are the launch racks for the depth charges (aft deck), mounting the Arado 196’s, finishing some of the remaining cable coils on the deck, attach the replacement front-center anchor I got from Stefan Carlsson and add the locking chains for the port- and starboard anchors.
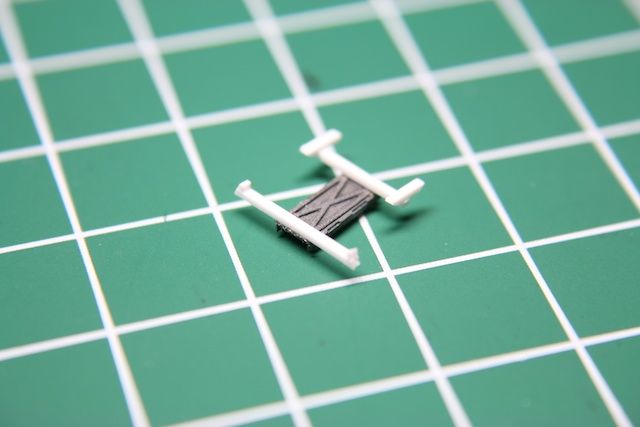
For the Arado 196 that is wheeled out of the hangar (the one with the folded wings) I have scratch build a ‘dolly’ with PE and strips of styrene. I drew from reference photos from the original.
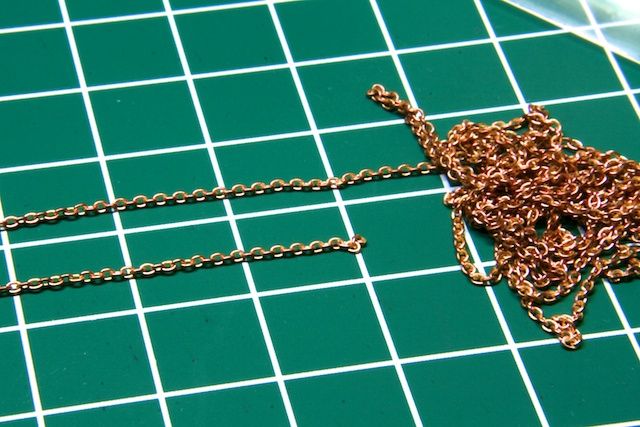
For the locking chains, I have found some excellent modeling chains. I wish I had found them earlier as I would have used them for the main anchor chains as well. Here’s a pic.
Okay, that’s it for now. I will follow this post up with a pictorial of the current state (almost finished) of my build. This will give you the chance to get a more detailed look on some of the finished parts of my Bismarck, as it will give me the opportunity to put some of my photographing experiments up for your constructive criticism. With that, I can prepare for the final reveal.
Part 15: no…pictures please!
As said before, this WIPisode will contain a pictorial of the current (almost finished) state of my Bismarck build. It will give you the opportunity to take a closer look at some of the finished parts of the model and from that I will hopefully get feedback from you how to improve in the photography department. For me it was an exercise in preparation for the fotoshoot for the final reveal. Of course I want to make it look good :-)
Here’s my setup:
- Canon EOS 400D
- Standard 18-55 mm lens with manual zoom
- HOYA close-up filters (+1, +2, +4)
- Velbon DF40 tripod
- Camera remote: Pixel RC-201
- Lightcraft Triple Tube Pro Task Lamp [LC8015]
- For the close-ups I used the all three HOYA filters on top of each other. These let me get real close to the object. Backdraw? All the imperfections and mistakes stand out like a sore thumb! :-(
- Lightcraft Triple Tube Pro Task Lamp [LC8015]
I will go from bow to stern both at hull/deck-level and at the level of the superstructure. Here we go…
Hull and Main Deck Level
(bow, portside)
Note: the rusting effects show up in the pictures a bit more monotonous than they look in reality. Still, I might want to add a little more tonal variation.
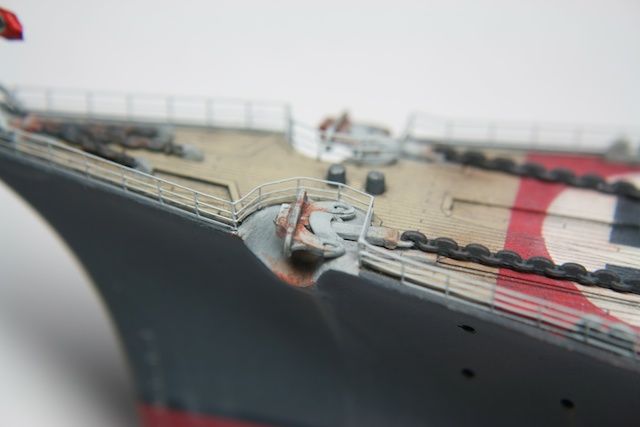
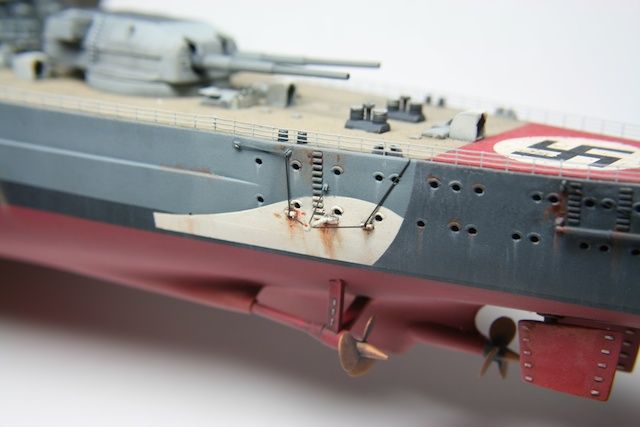
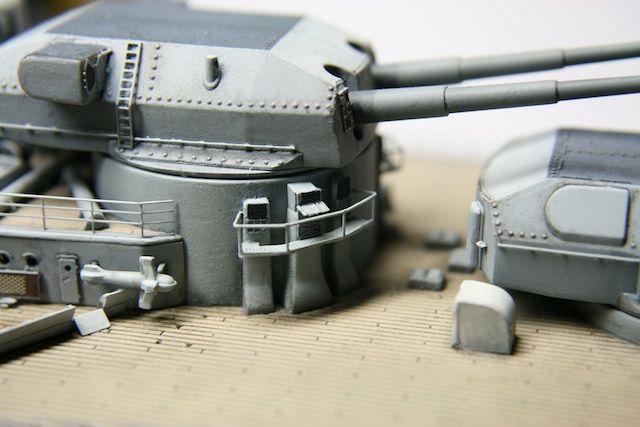
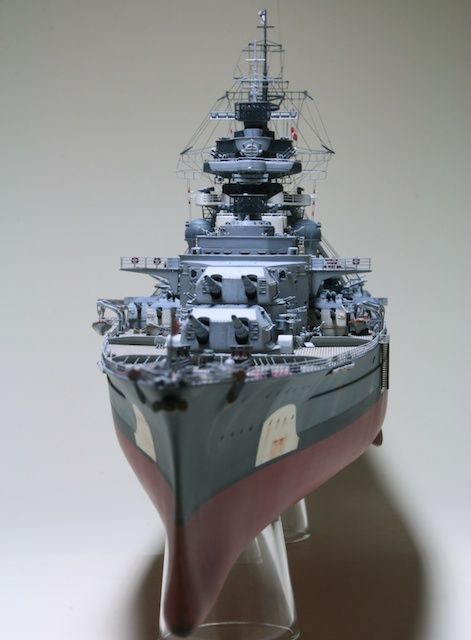
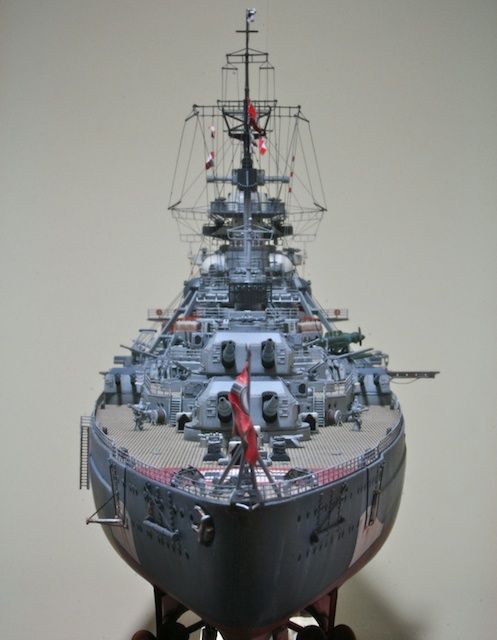
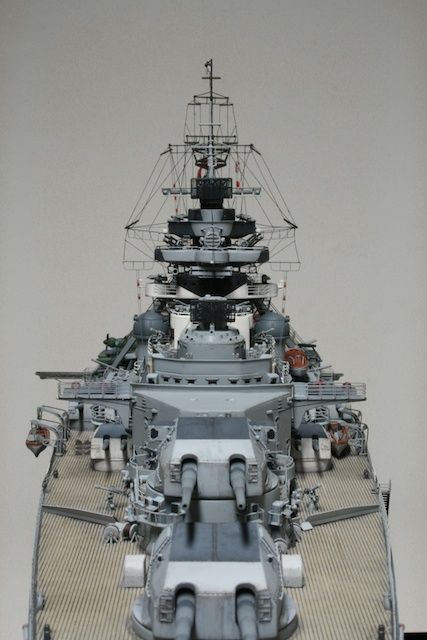
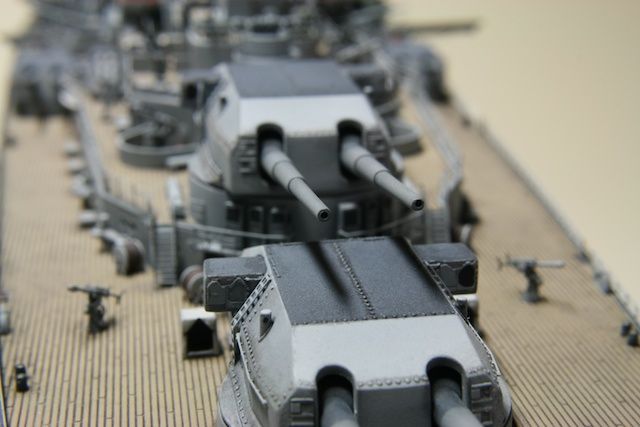
(hull, portside, fake bow-wave, anchor spindles, wave-breaker, 380 mm turret Anton)
(front main deck, starboardview, wavebreaker (in focus), anchor spindles and -chains, ventilation housing, turret ‘Anton’ (out of focus))

(hull, forward section, port side, second wave-breaker, watering outlets)
Note: all watering outlets were drilled out with a 0.3 mm vice. I used Josef Kaiser’s book as a reference.
(hull, mid-section port side, cooling water intakes, watering outlets, aircraft launch rails)
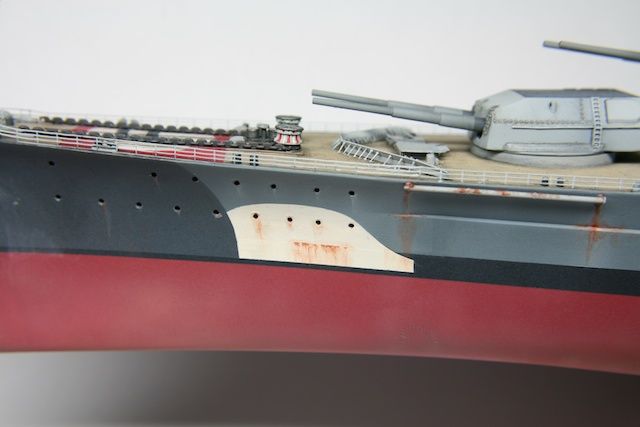
(hull, mid-/aft-section, port side (near turret ‘Caesar’)
(hull, aft, port side, ‘Heckspier’ (extended), turret ‘Dora’ (out of focus))
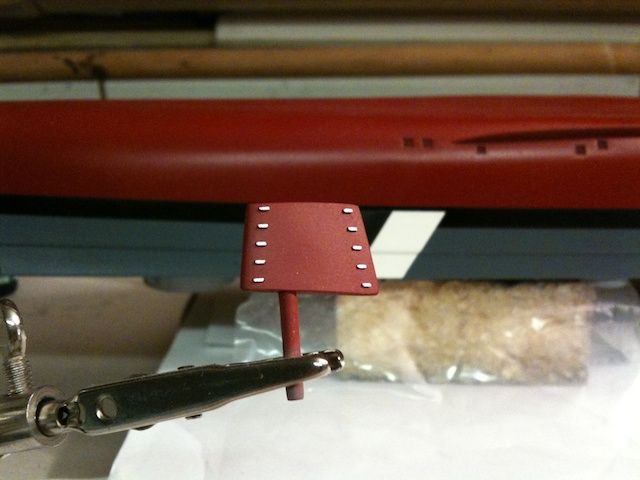
Note: the ‘Heckspier’-cables of the Revell part were as thick as the Heckspier itself. I removed them and made them out of stretched sprue. I also added the connection points and runners from modeled styrene. Same goes for the vertical anodes on the struts for the propeller-axis.
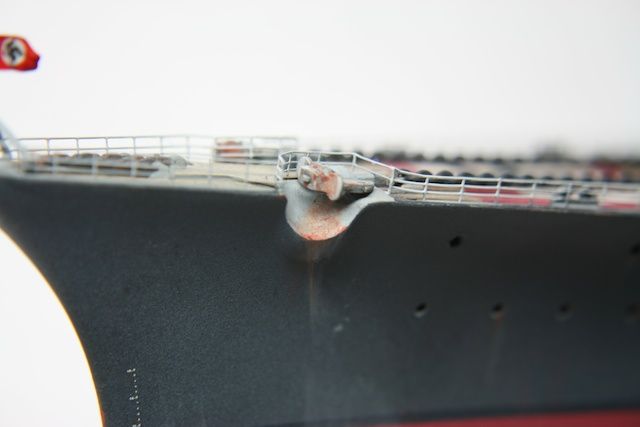
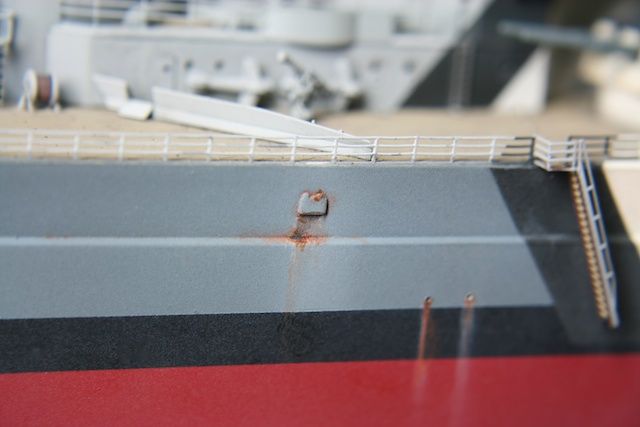
(hull, aft, portside, ‘Heckspiere’, ‘Atlantic’ anchor, rudders)
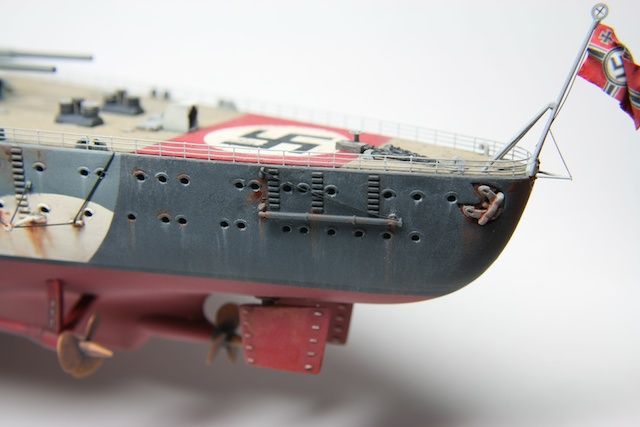
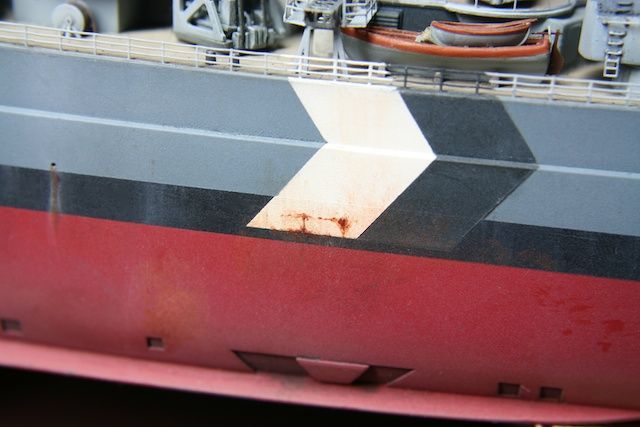
(aft, starboard view, flagpole)
Note: the ‘Reichskriegsflagge is a homemade decal on aluminiumfoil. The V-shaped support and cable (below the flagpole) were made from stretched sprue. Also the U-shaped ventilation shafts and the swastika-emblem on the flagpole were scratch build.

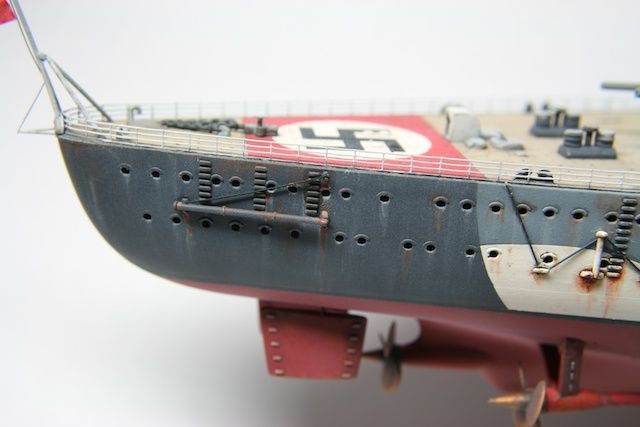
(hull, aft, starboard, Heckspiere (all retracted))
Superstructure and turrets
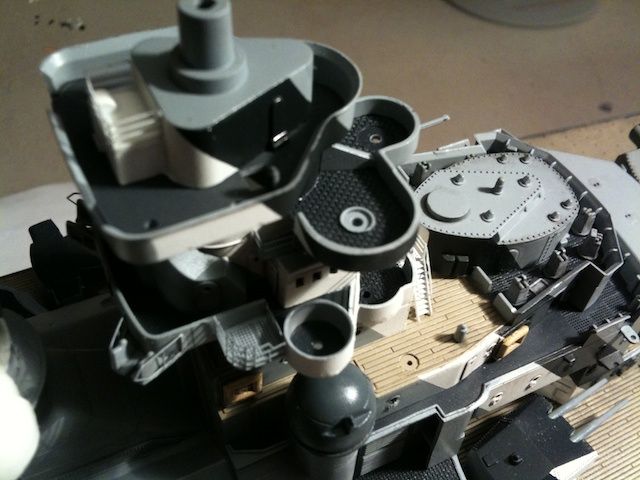
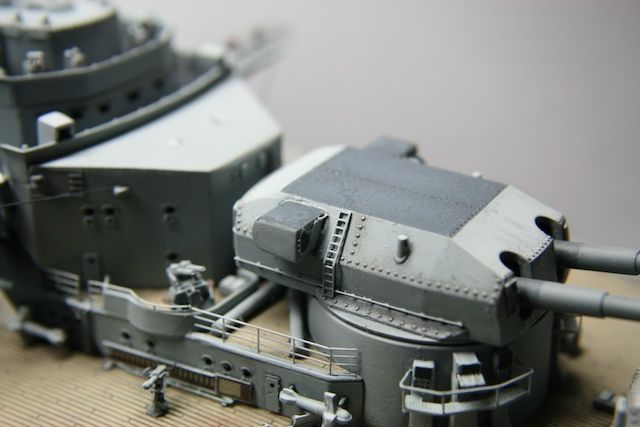
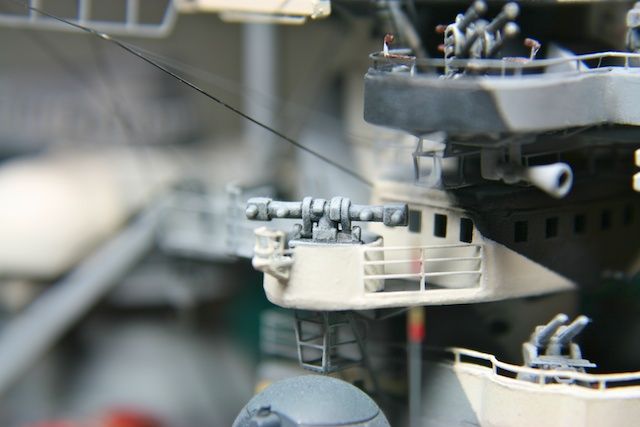
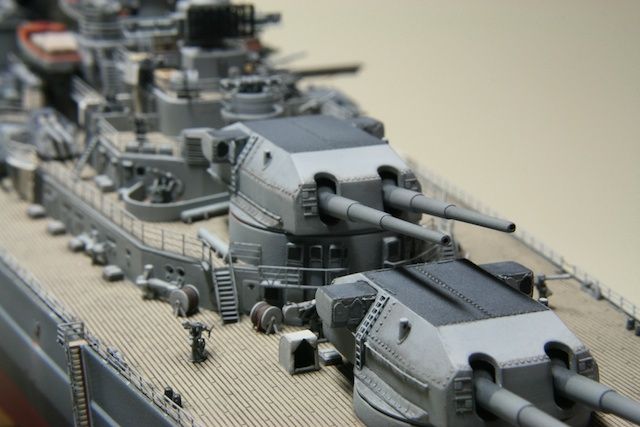
(starboard view, 380 mm turret ‘Bruno’, walkways, ventilation systems et cetera)
Note: a few cable coils still have to be finished and fitted (where the pinholes are).
(starboard view, turret ‘Bruno’, light AA flak, docking ladder)
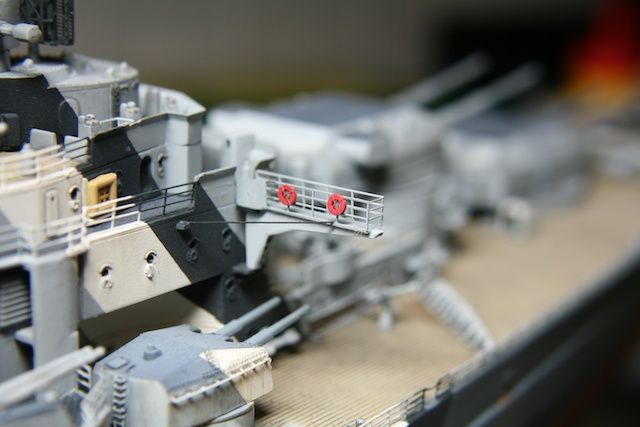
(starboard/port walkways (both extended), lifebuoys, front secondary turrets (150 mm SK C/28)
Note: the lifebuoys were scratch build and the cables were made from stretched sprue.

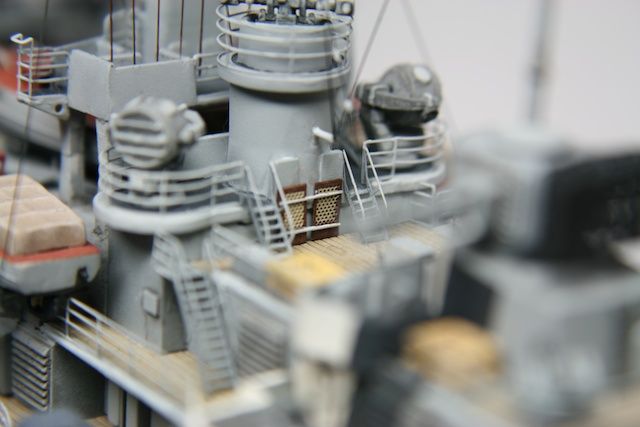
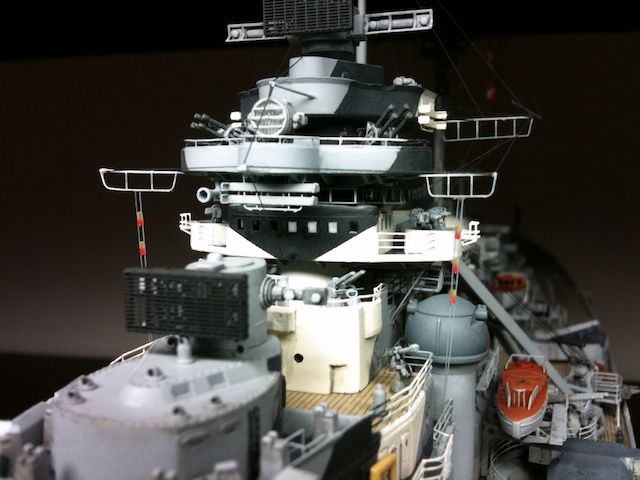
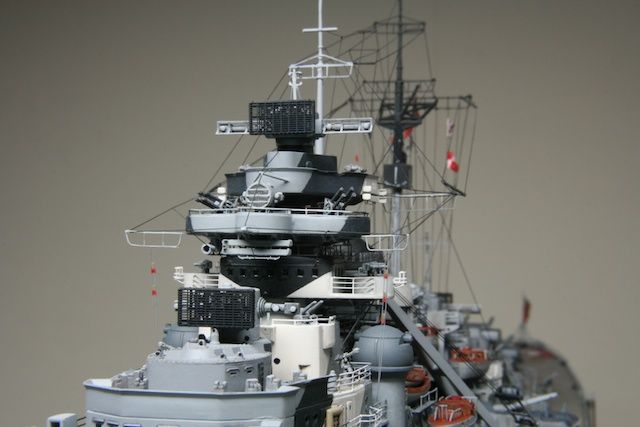
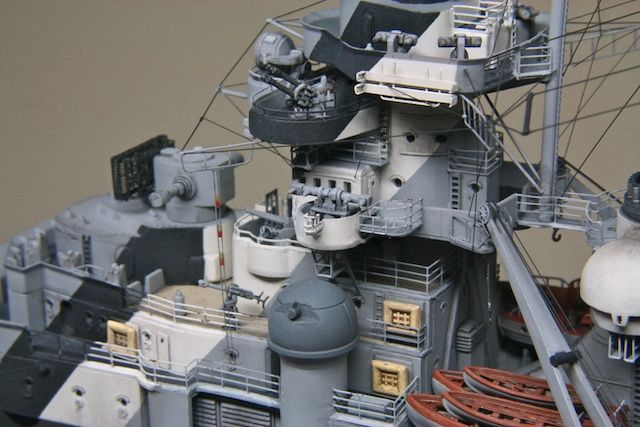
(main tower, port side view, admiral’s bridge, AA-platform, upper deck level)
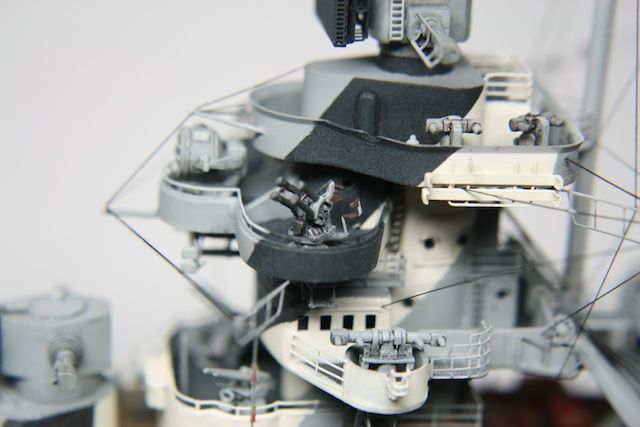
(upper deck level, rangefinder, signaling lanterns, viewers)
Note: the lanterns were scratch build from clear sprue. The V-shaped strut (just above the front searchlight) was also added by me. The upper deck has some blemishes that I could not get repaired. Revell decided in their wisdom to attach the part at its thinnest point to the sprue. This is very easily damaged and for me impossible to repair :-(

(admiral’s bridge, starboard view, manual rangefinder)
(port side view, admiral’s bridge, rangefinder, ‘Flakleitstand’)

(starboard crane, searchlight)
Note: hanging cable was added to the crane (stretched sprue).

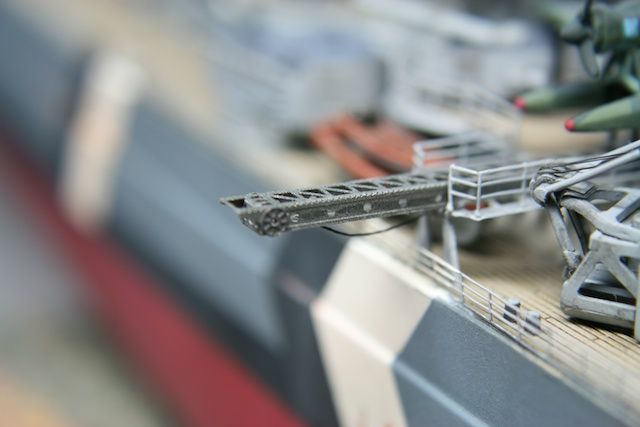
(starboard aircraft launching rails (extended))
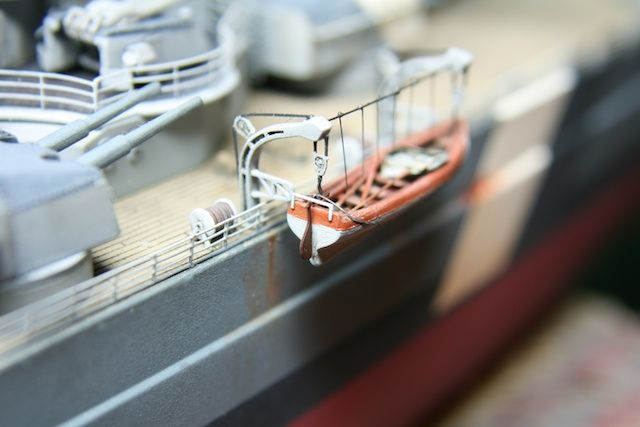
(port side view, smaller lifeboat, davits, front-port secondary turret, heavy flak)
Note: the lifeboat has oars and a rudder (Eduard PE) and folded canvas covers made from plastic sandwich bags sprayed in different tones to get the weathered look. The cable between de Davits and the gripping lines for the crew were added with stretched sprue. The railing at the back of the boat (not in view) was made from PE-leftovers.

(starboard view, smaller lifeboat, davits (extended)
Note: like port side lifeboat.

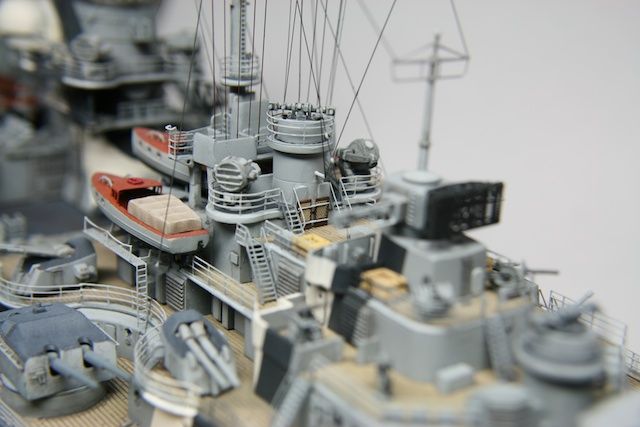
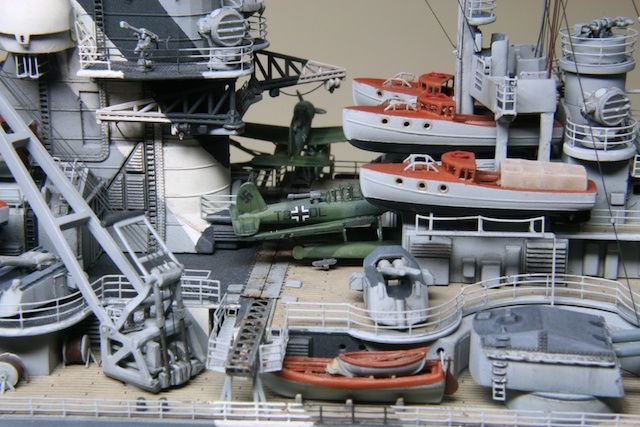
(port side view, signaling deck (a.o.), searchlights, motorized lifeboats, aircraft hangar, rear rangefinder.
Note: on the deck below the searchlights I added grated wooden floor parts which were stored there (see detail). I used bits from my Eduard PE-set and stretched sprue.
(port side view, 380 mm turret ‘Bruno’, walkway, ventilation housing, light AA-flak, cable coils et cetera)
Note: the Revell parts for the cable coils have no cable-detail. I wound very thin stretched sprue onto the coils and tacked with CA.

(starboard view, ventilation systems, 380 mm turret ‘Dora’)
Note: grilled plates and latches are PE by Eduard.

Rigging: cables, antenna’s wiring
(starboard view, main tower, rangefinder (‘Funkmeßgerät’), signaling lanterns, front mast.
Note: all the rigging you see in the back was lost during my little mishap (and then some!). All the cables and wires are made from stretched sprue and in general glued with PVA. The PVA ‘gives’ a little more when manipulating the wires than CA would. I used CA when something had to be tacked instantly. Almost all the wires were painted matt anthracite. Black is way too stark for this and makes the wires bulky. I even have my doubts about the anthracite…

(starboard view, front mast, rear-starboard antenna pole)
Note: the isolators on the antenna wires were made with tiny blobs of PVA and hand painted light grey.

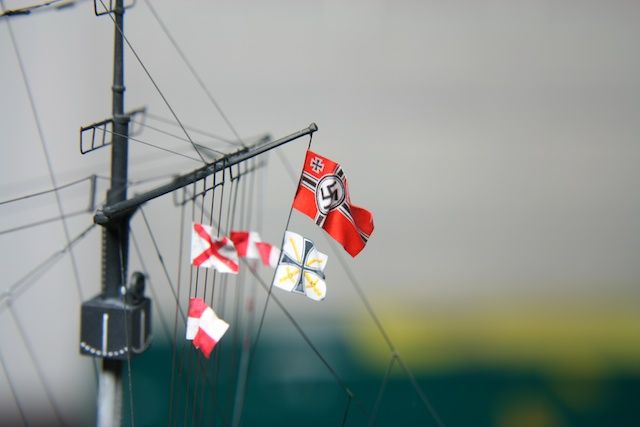
(port side view, main mast, ‘Reichskriegsflagge’, ‘Admiralsflagge’, signaling flags (‘Uniform’, ‘Victor’ and ‘Signalbuch- und Antwortwimpel’)
Note: all flags are decals on alufoil. All Revell, except the Reichkriegsflagge. Still in need of a dull coat misting.
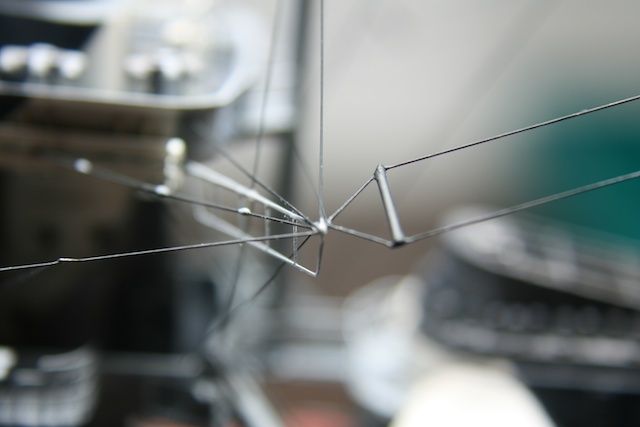
(centre spidering, antennae)

(port side view, rear-port antenna pole)
Note: “dust is thy enemy!”
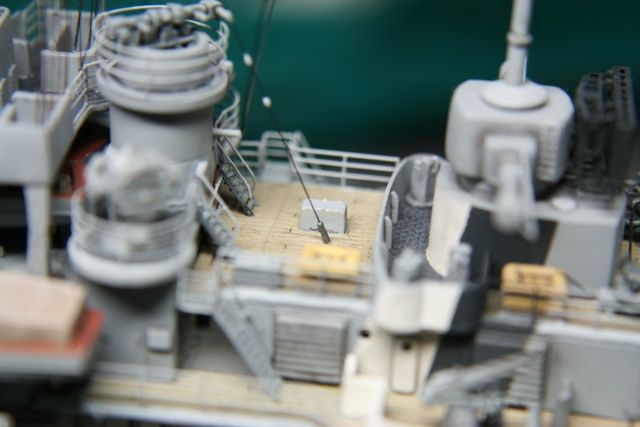
(port side view, aft superstructure)
Note: for the cable attachment to the deck below the signaling deck I used Evergreen 0.75 mm rod.
Note: for the rigging I have learned a few things that might be helpful.
- be well rested before you start your rigging;
- of course, stop when you’re getting tired;
- be well nourished and go easy on the caffeïne;
- have good lighting that you can move around;
- make sure that the background of your workspace is of a plain light color. Remove anything that distracts the eye like pots, tools et cetera. If not, your eyes can have a hard time focussing (like Phil’s camera in close-up shots), especially at joints of cables;
- do not hold tweezers or clamping devices too hard. It deforms the thread;
- have cocktail sticks and white tack at the ready;
- at the first join, glue stretched sprue at a slightly exaggerated angle. When glueing the second join it is easier the get it straight so that it doesn’t look saggy;
- use a FLEXIBLE applicator for your glues!
Note: I made my glue-applicator from a piece of sprue that was stretched to a taper. Depending on what you are glueing you can use a very small tip to apply the glue, and you can get to the really hard parts, nooks and crannies. The flexibility is important, as it is more forgiving when you are applying glue onto an already attached thread. The applicator gives a little when you apply the glue. Very handy, at no cost!
Part 16: icing on the cake.
This is the last episode of my Revell Bismarck WIP. Since the last update I have completed some of the little parts I was reluctant to finish (don’t know why, just boring maybe): the racks for the depth charges, the missing spools/coils/spindles for the ropes/cables (does anyone know the correct naval term for these things?) and the placement of the Arado AR 196’s on the hangar/catapult deck. I also finished off the rigging, because some connection wires and antennae were still missing.
In applying the final matt varnish on the Arado’s I ran into some trouble. For some reason the varnish misted up heavily, leaving the Arado’s somewhat frostbitten. I don’t know how this had happened, as I think the thinning ratio, air pressure was all right and I stirred/shaken the bottle thoroughly. This is how they came out…
I remedied the problem by manually brushing copious amounts of Modelmaster dullcote (straight out of the bottle) onto the mini-Arados. This got back the liveliness of the colors and got rid of the misting effect. What was left of the misting gave the Arado’s a worn look. Still, it was a nasty surprise to get at the finishing stages of my project. Any advice on this matter is much appreciated (although I am switching to acrylics after this).
For some other bits ‘n pieces: I weathered the armored (steel plated) decks, dry-brushing different tones of tank grey and using pigments for some rust depot and grime. I also went around the entire ship sparingly tapping the railings with a semi-dry brush using dark brown for some rust-effects and to break-up the cleanliness of the overall impression.
Inspired by Phil’s tutorial on adding windows using Micro Kristal Klear on his Transall-build. I decided to try this out on the admiral’s bridge, as the Revell kit does not supply clear parts for this. Here’s a snapshot of this (low-res, iPhone):
I did the same with the front windows of the ‘Admiralsbote’…
Again it was very nice to try out a new technique. In that respect a ship gives you ample opportunity to try out a wide variety of techniques, though the one thing that forms a restriction is the sense of scale. My desire to detail gave me some frustrations in this 1:350 build.
Well, anyways, I decided it is finished now. It was a long, interesting, instructive and sometimes frustrating (learning) experience. But I got there in the end. During this build I bought some kits of aircraft to keep me eager for the finish-line, so now I have a variety of kits to choose from:
- Heinkel He-111 P1 (1:32, Revell)
- Junkers Ju-52/3M (1:48, Revell) converted to the fantasy camo as seen in the movie ‘Where Eagles Dare’
- P-51 D Mustang (1:48, Revell)
- Supermarine Spitfire MkIIa (1:48, Airfix)
- CH-47D Chinook (1:72, Trumpeter)
- Fw 190 D-9 (1:48, Eduard)
- Bf 109 E-4 (1:32, Eduard)
I also still have a 1:350 scale kit of Type VII C U-boat (Revell). My plan was to make the U-556, the submarine that was built at the same time at Blohm&Voss and was bonded in ‘brotherhood’ to the Bismarck, promising that it would come to it’s aid in time of need. This could prove to be a good practice kit for my switch to acrylics. Further down the road I might take on a new maritime project and that is the wreck of the Bismarck as filmed by Robert Ballard and James Cameron; lots of scratch-building, rusting, weathering et cetera. Nice!
Here it is, my first naval build ever and my first build after 25 year of absence from the hobby: the Revell 1:350 scale DKM Bismarck.
I started this build quite some time ago, even before joining the Flory Models forum. During this there were a lot of distractions and hurdles that slowed down the progress, especially having my workshop away from home. But now it’s finally done and I must say it’s somewhat of a relieve to have completed this big project. And I’ll tell you who’s relieved…my wife!
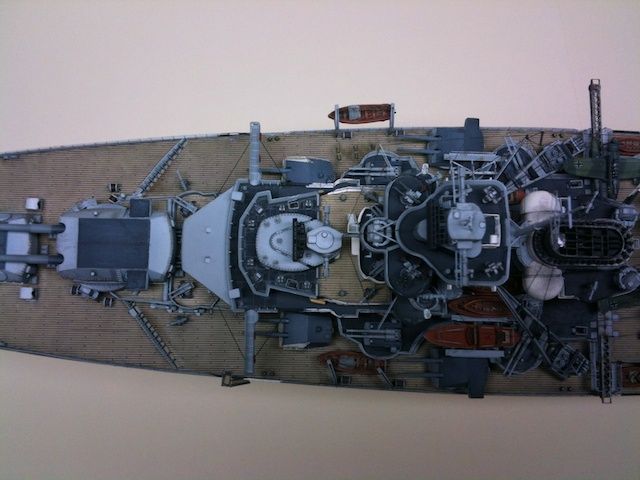
Last challenge was getting good pictures for this gallery. I am a beginner and still learning as a photographer, so it’s not all that, to say the least. Also, I decided to get real close to the model to catch some of the detail using close-up filters. I know, this is like sticking my neck out and tightening the noose, as all my ‘learning experiences’ are clearly visible! In the end I used my Canon EOS 400D (with and without close-up filters) and my iPhone 3GS. I used the latter for the top-view pictures; I couldn’t get my Canon setup correctly without interfering with the lighting.
I used Apple’s Aperture software to get the overall look and ‘color temperature’ of the pictures to look the same. Enough said, here are the pictures…
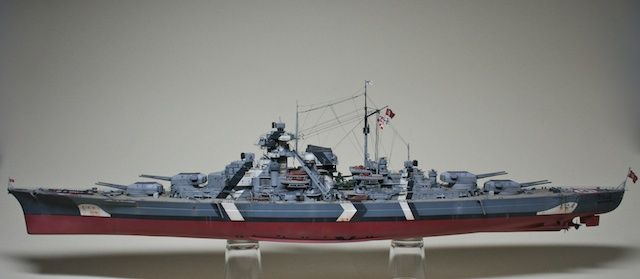
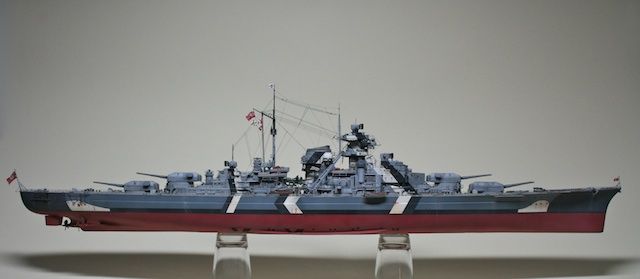


And lastly, a single picture of my Bismarck in its display case…

Note: I know, the model hangs a few degrees to ‘port’, but I’ll fix that later…yeah right!
Okay, a big thanks to everybody for reading and their interest.
Jannem