


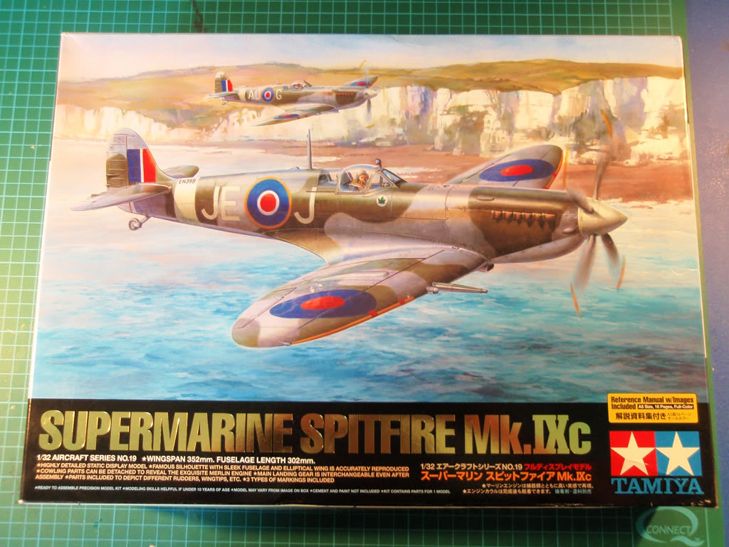
Tamiya 1:32
Spitfire
MKIXc
By Rob Brookes
MKIXc
By Rob Brookes
- Kit:- Tamiya Spitfire MKIXc
- Scale:- 1:32
- Extra's:- Build out of the Box
- Paints:- Tamiya Acrylics, Johnsons Klear for Gloss coat
- Weathering:- Flory Models Black Wash & Black
Oils
Recently I was sat at work
killing time by watching Phil's video build of the 1/32 Spitfire MKIXc by Tamiya
and loved the look of this kit and so we should as I then realised how much the
kit costs. Within a few minutes I found myself on ebay and there was a kit on
there with over 1 day left to run and the price at £50.00 unstarted and all bags
unopened, in a moment of weakness I placed a bid and a day later the kit was
mine for less than £60.00 and in perfect condition. Now that is a deal I am more
than happy with. Especially when the kit turns up at work as if purchased from a
shop and a price tag for £105.00 on the side.
So here we go. I really hope it is everything it has been built up to be in
the reviews I have read.
Many bags of sprues none of which have any flash on them and some amazing detail showing through.
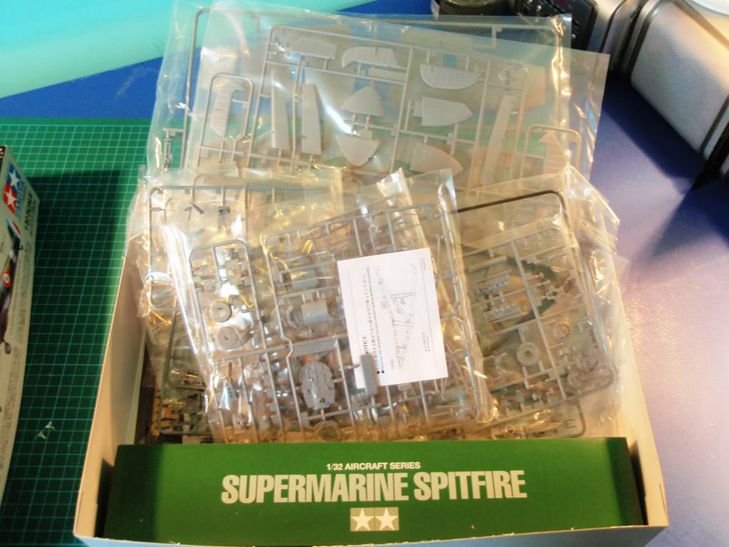
Further down there is a massive instruction manual consisting of some 36 pages. (I think this may take some time) 2 pieces of photo etch, a box of goodies including screws, metal rods, magnets, a mini screw driver and some other parts. Dig a little deeper and there is the full colour painting guide.
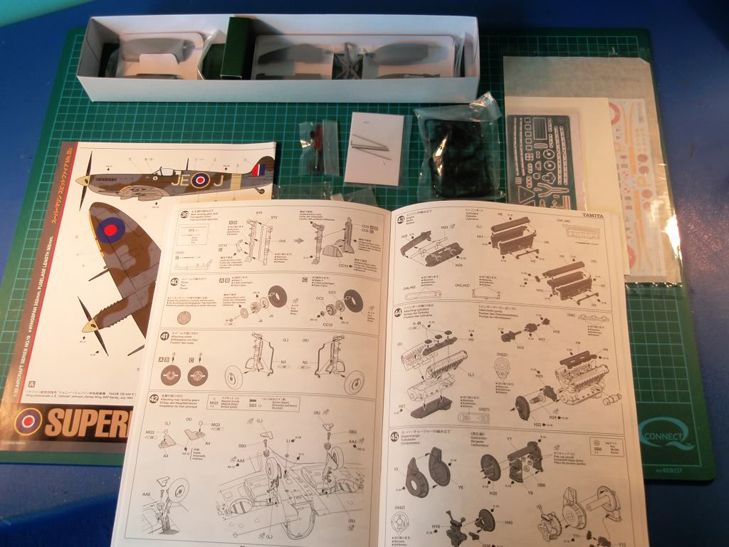
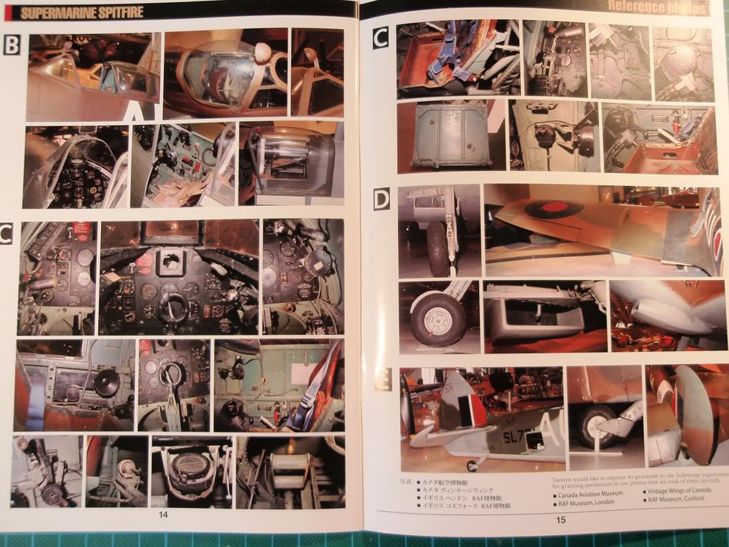
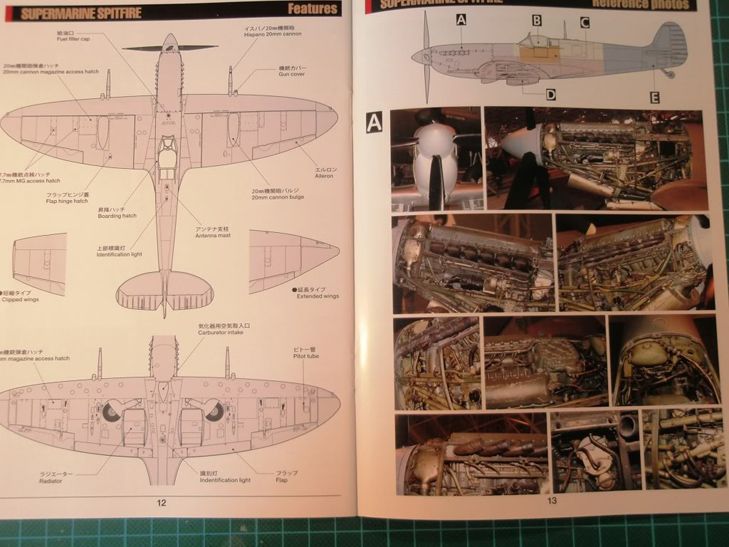
And then there is the reference guide with some really nice pictures.
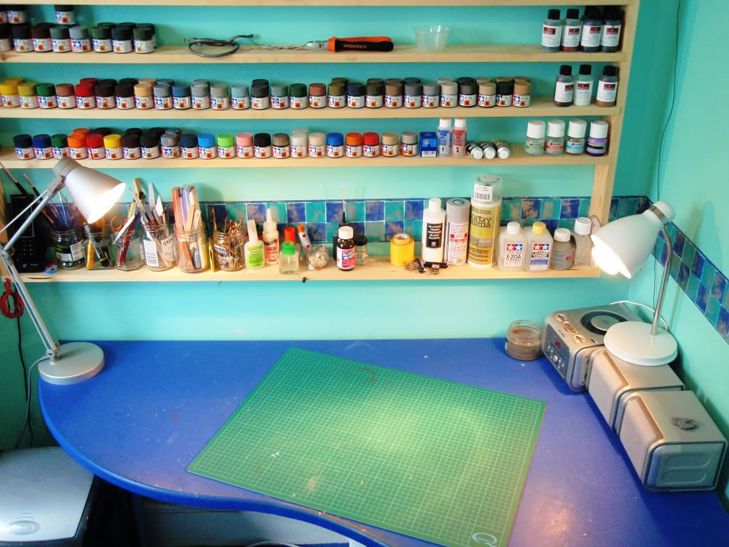
So feeling like a little boy at christmas I have gone through the colour references ordered what I need and of course a few other pieces. Quick clean of the desk and we are ready to go.
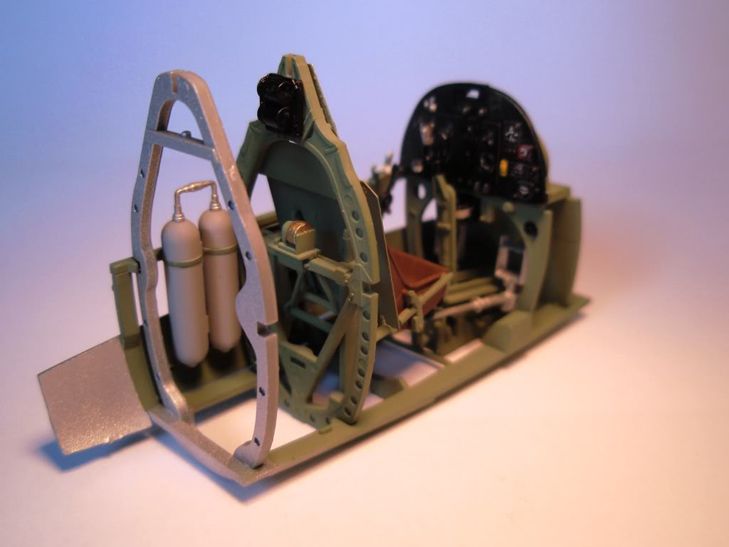
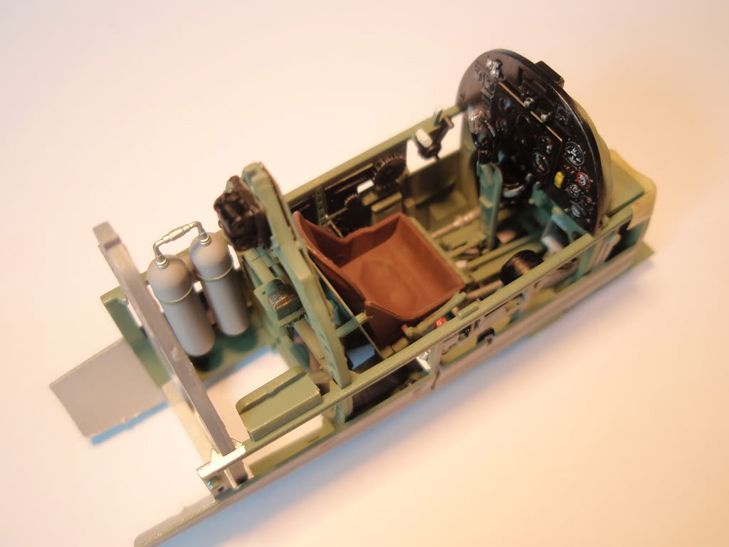
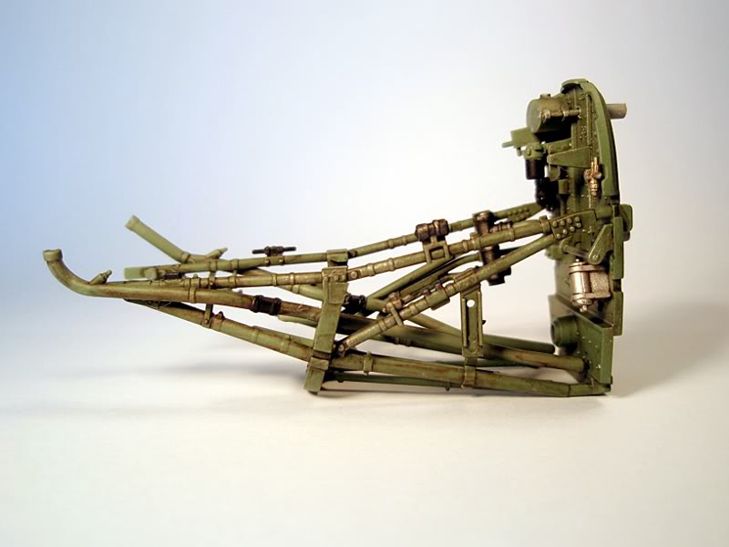
So having sat and watched Phils video build again and again I have made a start on the tub. This kit, so far, is simply stunning. The fit of all the parts is near enough seamless and as you would imagine from Tamiya it simply falls into place. All of the interior parts have been painted according to the call outs in the instructions using Tamiya Acrylics sprayed on wherever possible.
All parts seen below are only dry fitted as the weathering is yet to be
done.
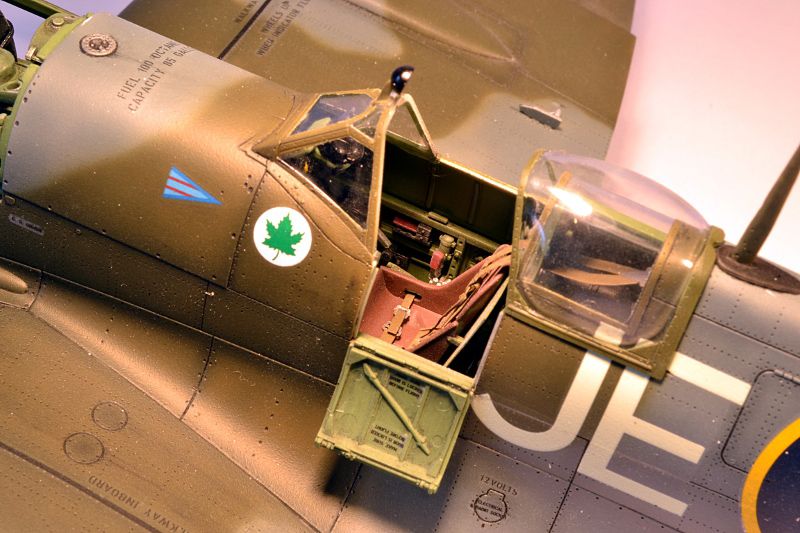
Side walls of the cockpit are full of detail as you can
see.

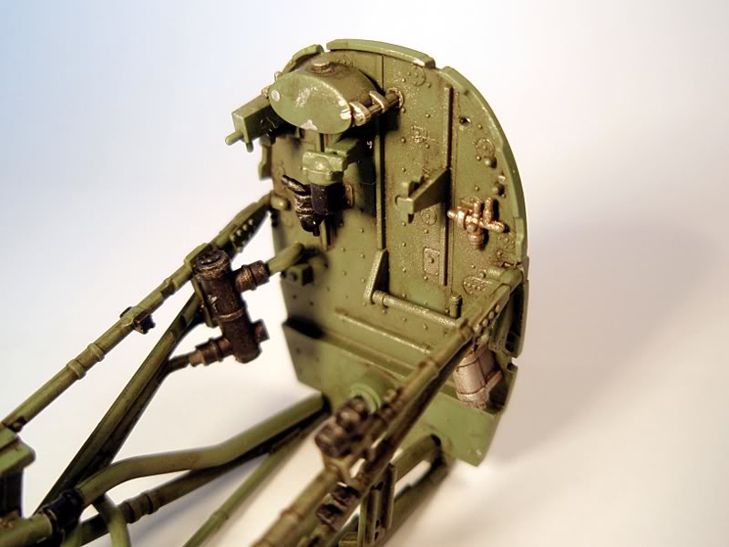
The instrument panel is made up of a clear plastic part which a decal overlays on the back showing the dials through the front. In my rush and I am kicking myself for this, I applied the decal on the wrong side tried to remove it and as I though it broke into pieces. On the upside I have managed to salvage enough to make it look presentable. With the photo etch face glued on and then inserted into the main instrument cluster I am happy enough with the results considering the mistake.


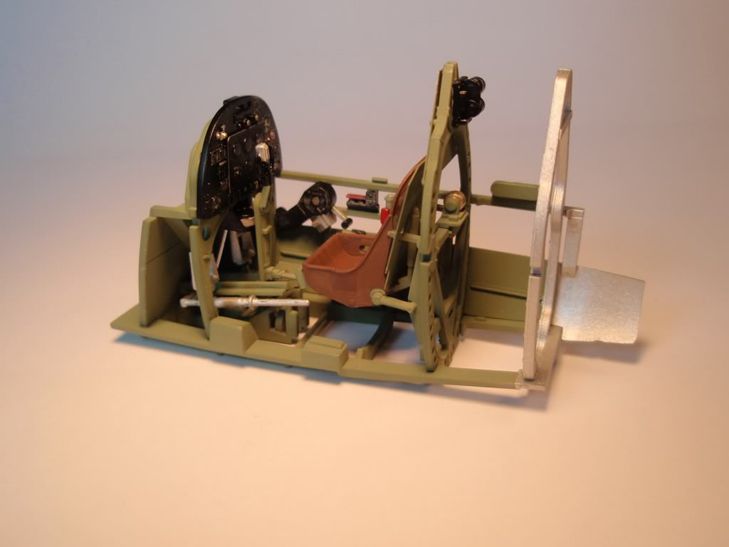
Next up all the parts are dry fitted and I hope it is looking OK.

the next stage will be the weathering the method I will use has not been
decided upon I see 2 options, the first is as Phil does in the video using
highly thinned flat black sprayed on. This is a technique I have not used
before.
The second option is to put a coat of Klear on and then use an oil based
wash of Black with an edge of burnt umber.
Belts will be added after the weathering but before the sides of the tub
are glued in place.
Next up is of another sub assembly I have been working on while the tub has been coated in clear and I am waiting for it to dry ready for weathering. I have now decided this will be an oil wash so I will wait at least a couple of days for the Klear to have the best chance of drying so the thinners do not have any adverse affects.
Next up is of another sub assembly I have been working on while the tub has been coated in clear and I am waiting for it to dry ready for weathering. I have now decided this will be an oil wash so I will wait at least a couple of days for the Klear to have the best chance of drying so the thinners do not have any adverse affects.
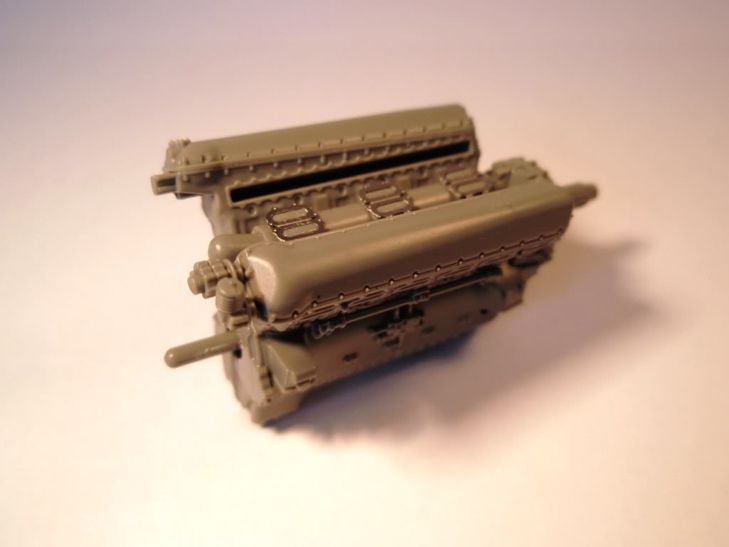
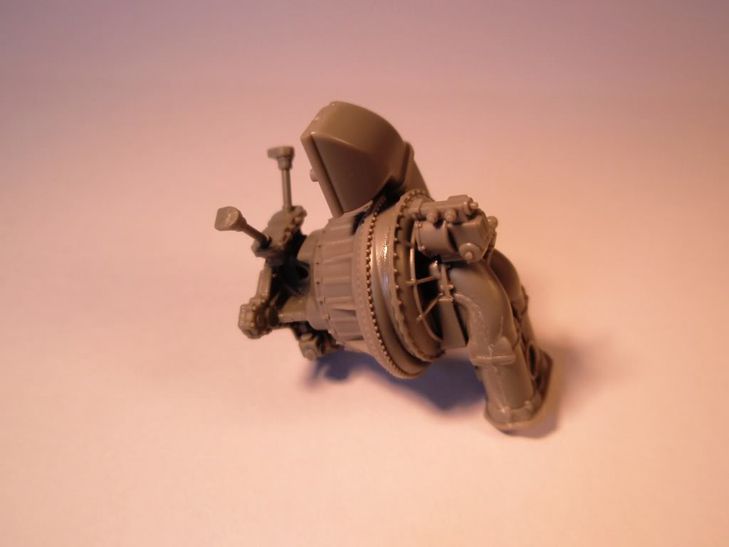
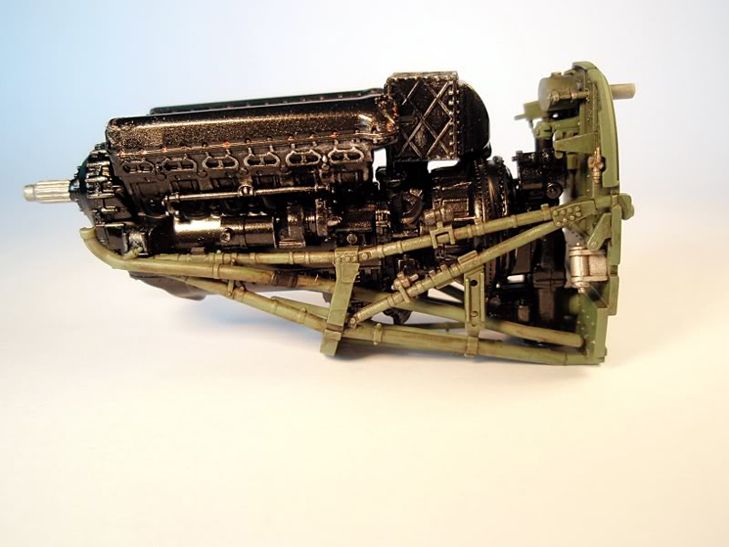
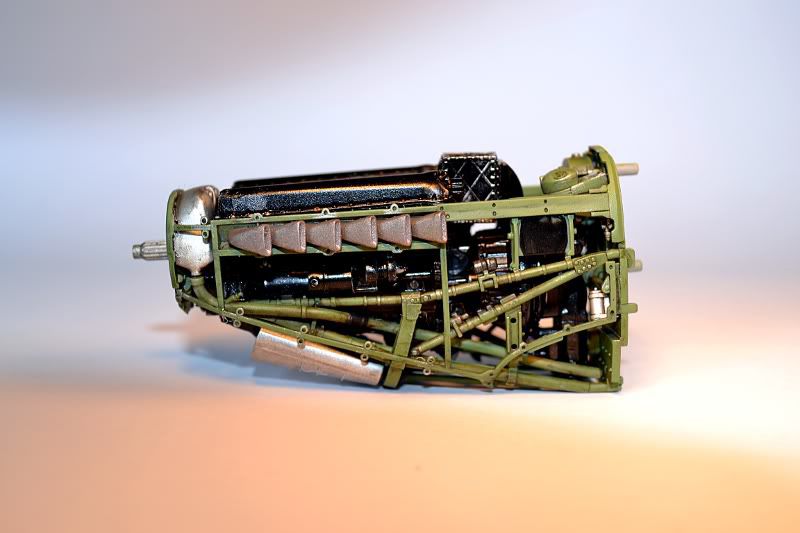
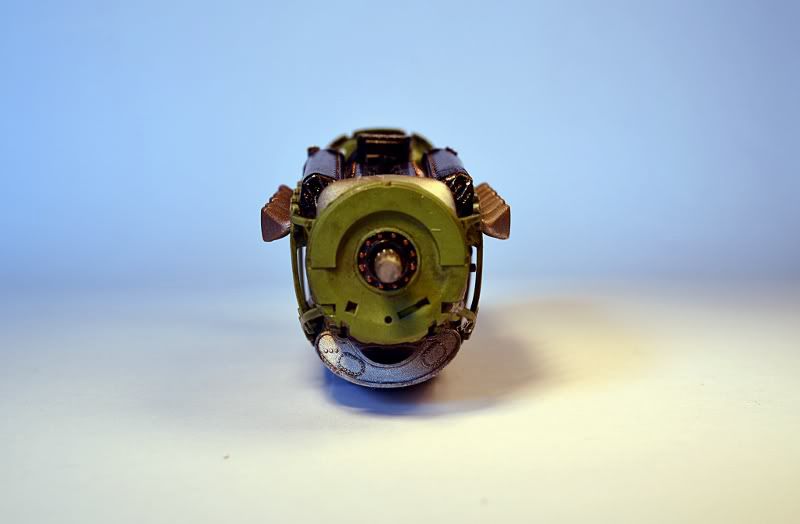
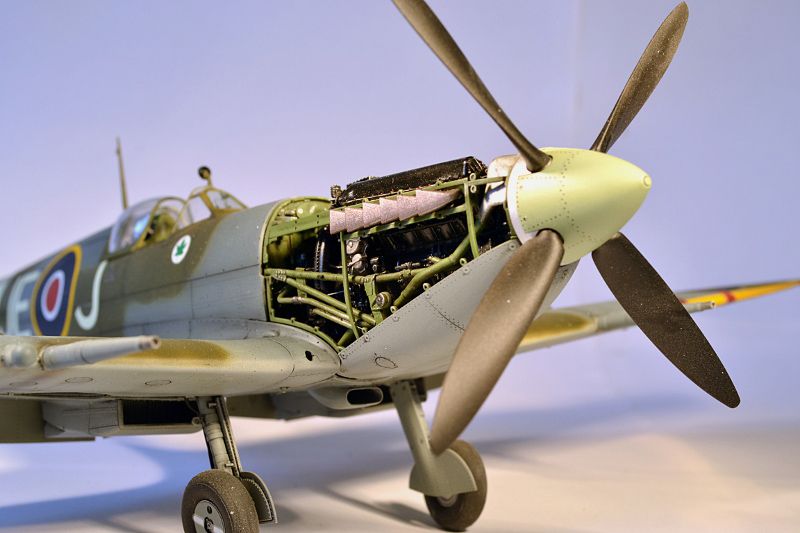
So next up was the fabulous Merlin engine that is made of many sections
that all go together especially well. It is made up of two sections, the main
engine block.
And then the supercharger.
Once all the extras where fitted and the supercharger mated to the the main
engine block everything received a coat of Tamiya semi gloss black as
called out in the instructions and this is what came out.
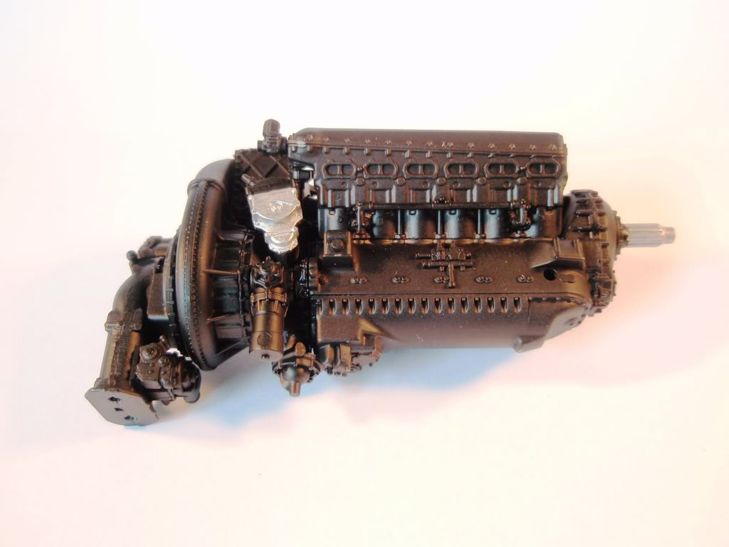
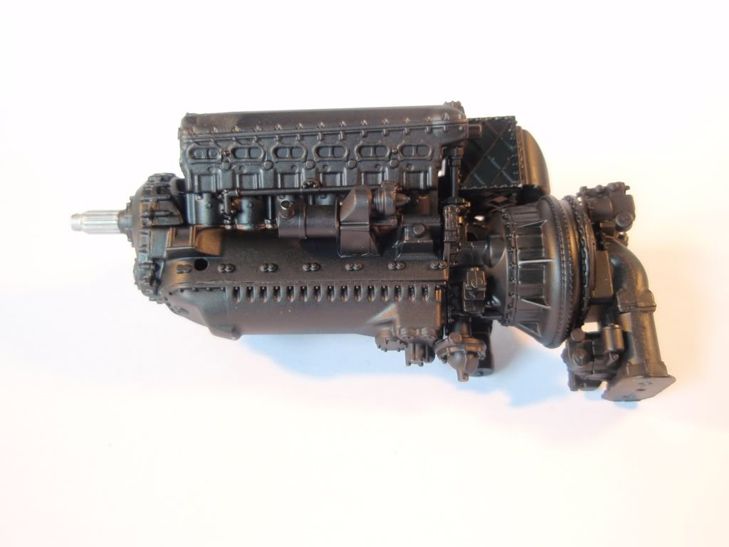
The engine has been dry brushed with flat aluminium to bring out the detail and I have decided to add a Bronze to the major nuts and bolts to give it some definition. these where added by dipping the end of a cocktail stick in the paint and then gently pressing in the spots I wanted.

The Klear on the cockpit parts has now dried as has the oil wash I decided
to use. Having only used an oil wash once before it was a soflty softly
approach. I made the wash using oil based paints of black and burnt umber
heavily thinned with Oil paint thinners. This was then applied to the areas I
wanted to weather and then very gently removed using various shaped cotton buds.
Once this had dried a flat coat was applied.
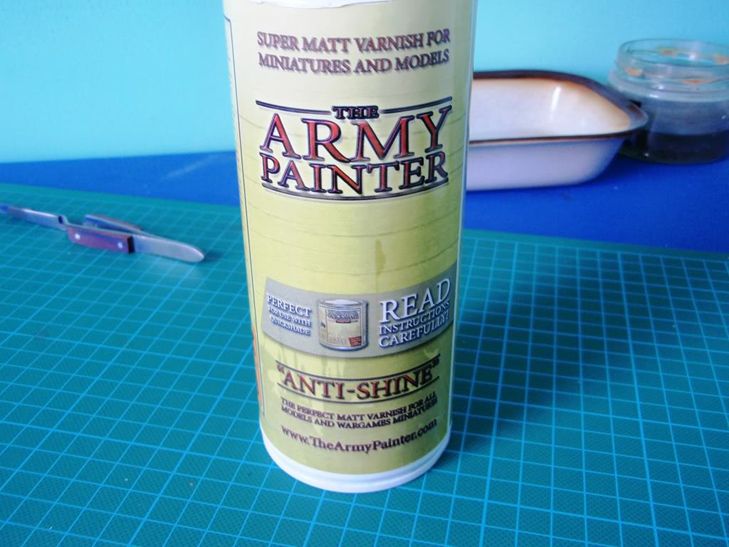
I have not had any success with using Klear in the past to get a flat
finish so I have started using a product I found in a small wargaming shop in
Bristol. I am very impressed with the flat coat as it goes on very easily and
dries quickly to the point where parts can be handled within an hour and no risk
of fingerprints.
This is the product and comes in a big rattle can. Quick passes over the
area seem to work well. As with all rattle cans if you spend to long spraying an
area it can end up pooling.
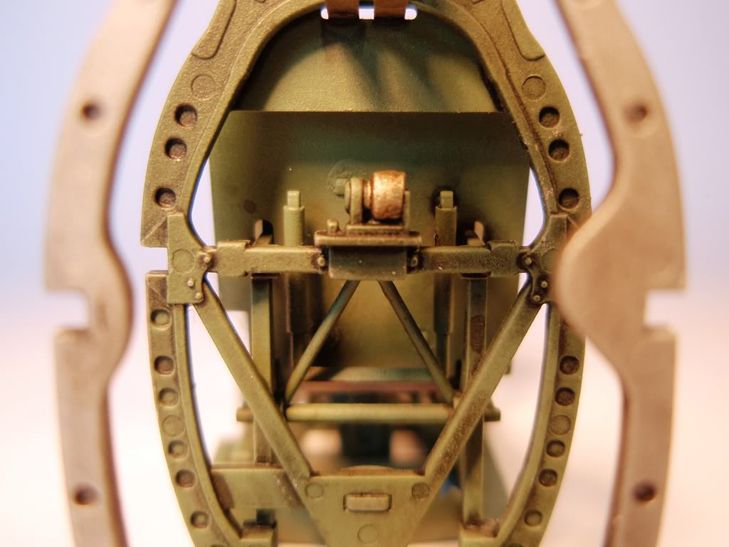
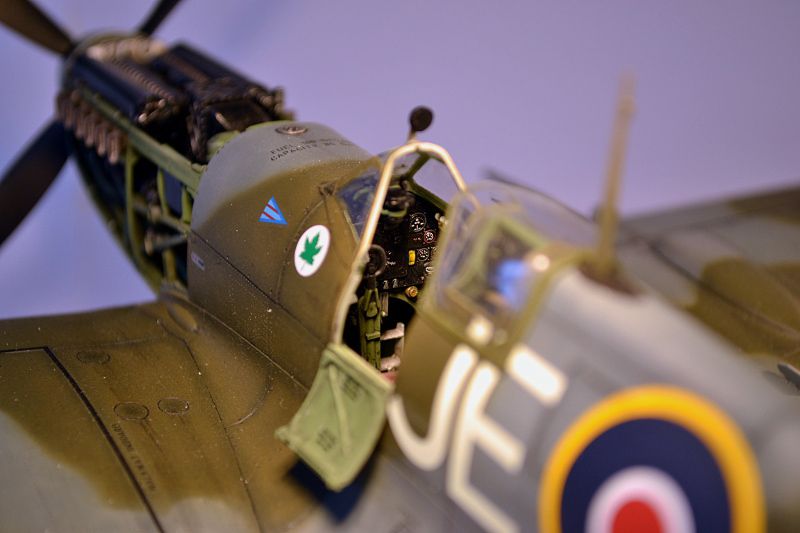
Anyway I digress, here are the pictures of the cockpit as it now stands ready for the fuselage halves to be joined and the realisation of how much detail will never be seen once the fuselage halves have been joined. Any how I am content in the knowledge of what lies inside.


This shot is looking through the back of all the frame work to the back of the pilots seat.

Apologies for the quality of this one as I was leaving the house for work I realised I had none of the tub joined to the fuselage half so took a quick picture using the camera on my phone.

So far I am loving this kit, every time I walk past it shouts at me to do
more unlike any other kit. I can not tell you how good the fit or the detail of
every part is.
It may seem I am jumping around the build somewhat however it is nice to be
able to work on other sub assemblies that will come into play later in the build
while waiting for things to dry etc.
Next up will be joining the fuselage halves and taking care of the seam
lines although test fitting them shows very few if any areas that can pose a
problem. Hopefully that wasn't my final last words.
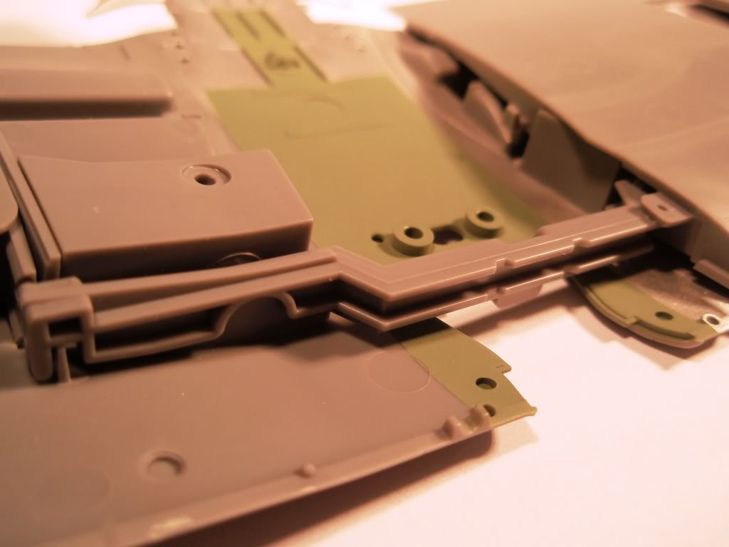
There is a spar running through the centre of the wing assembly and like a
doughnut I have attached it the wrong way round which now means the engine
assembly bulkhead does not fit onto the main section of the fuselage. Hopefully
the following photos will help to explain my problem a little more
clearly.
As the instructions would have you do it.

And how I have done it.

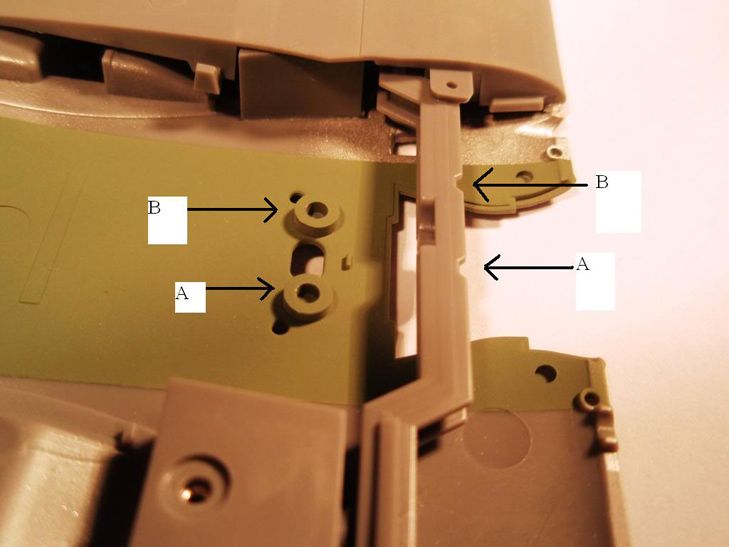
You must excuse the odd labels on the next shot it is not something I
have any knowledge of doing As you can see the Groove on the Spar labelled A
should match up with the hole labelled A and the same for the B
labels.
So to correct this I need to reverse the main spar. The upper wing has been
glued in place so it can not be removed, possibly on the upside if you go back
to the second photo the main spar has not been glued along the main centre
section as it is floating.
So for the next step I am pleased to say the minor removal of the wing spar
seems to have paid off as you will see shortly. I did have a look at spliting
the wing and removing the spar that way but the leading edges of the wings where
so well joined it seemed the wrong thing to do and risk making a great join
rough and ugly requiring more work.
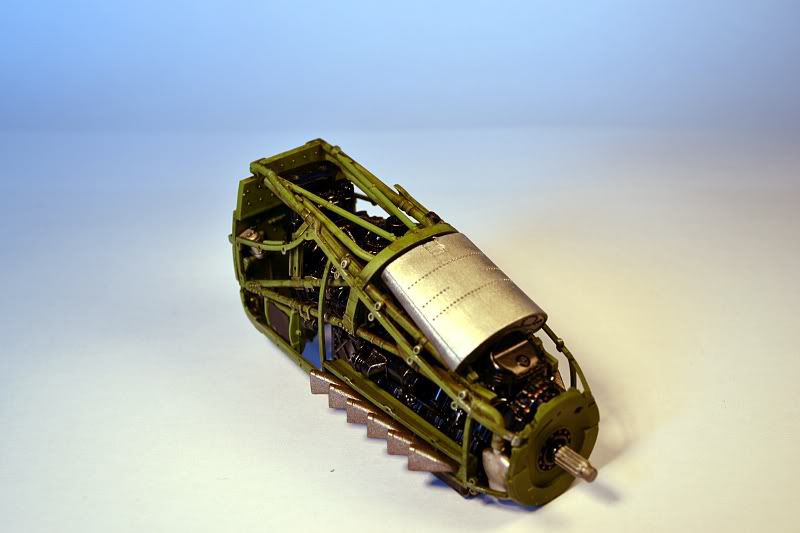
In the meantime I have also been working on the engine frame that will hold
the engine to the front bulkhead. this has been sprayed with XF71 and then the
detail picked out as per the instruction call outs.

This was then sprayed with the obligatory coats of Klear left to dry for 24
hours and then an oil wash applied. This was mixed from Lamp Black and some
burnt umber, hopefully getting close to an oily colour. Yes I know some of you
prefer a pin wash however it was considered and then decided that a wash would
look better in the engine bay. I promise I will try a pin wash on the next
build. Once partially dry some of the wash was removed with a cotton bud dipped
in thinners. The result...

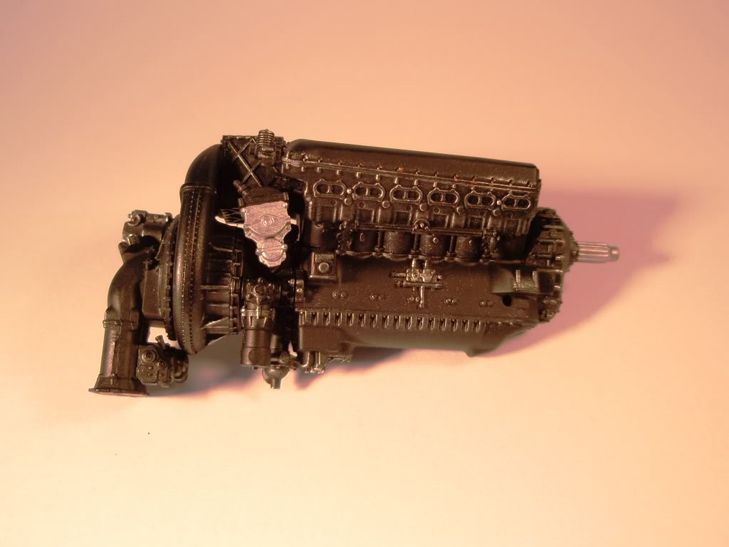
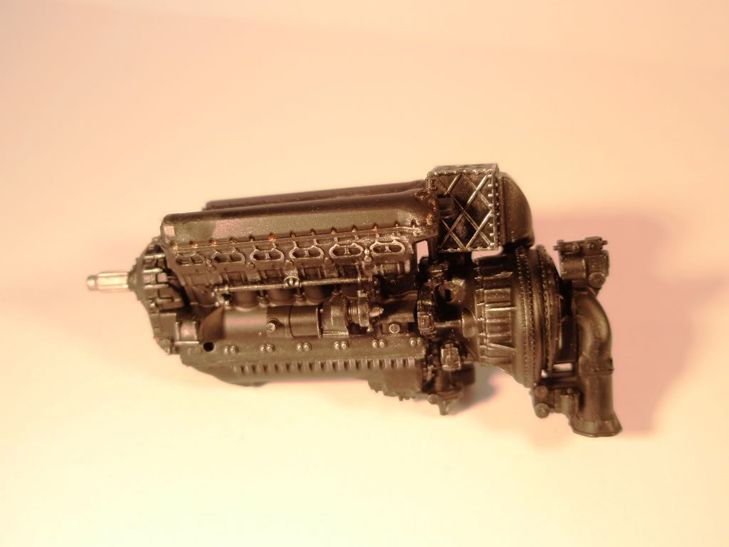
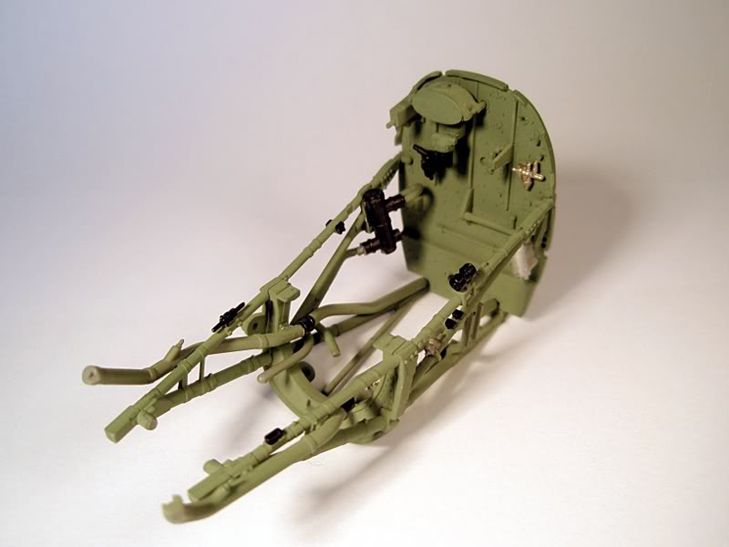
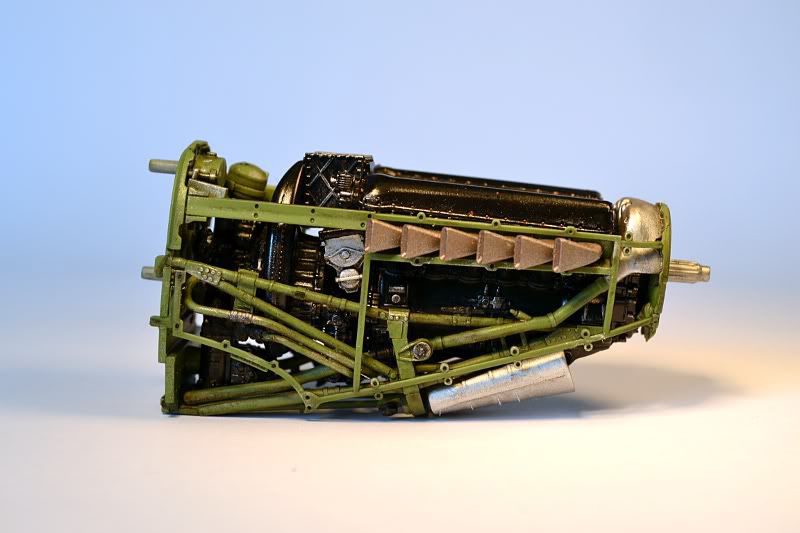
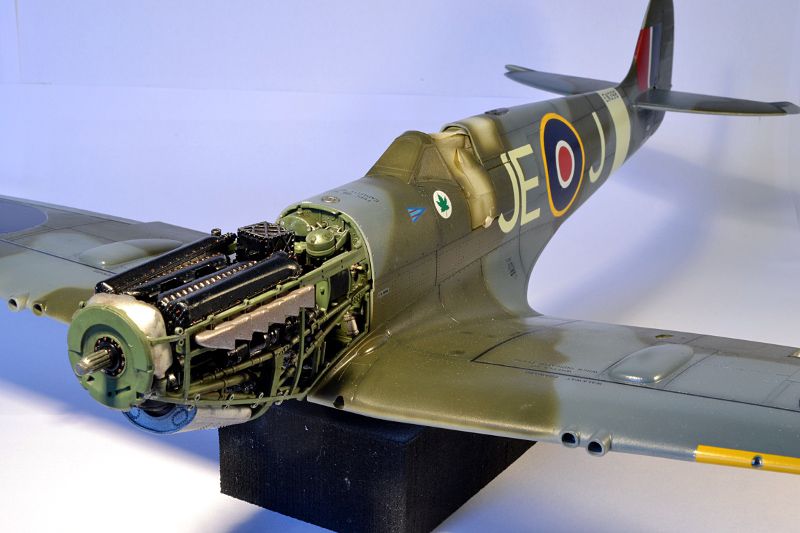
The engine frames have received a flat coat using the product pictured earlier on in the build thread and the engine has been dusted with Klear from a distance to give a satin coat. This was then placed inside the engine frames and is held in place with a simple bot through the back of the bulk head. Currently this is the only thing holding everything in place and will remain that way for now as there are more frames to go around the outside of the engine that hold the exhausts and some other bits. Once these have been washed and dry brushed they shall be fitted in place, for now though this is how it looks.
The main fuselage and wing sections have also been joined and it seems, touch wood, there are no major problems as a result of removing that spar. The wing roots, wing tips and under the fuselage joints have been masked off and then filled with the excess removed by with a cotton bud dipped in lacquer thinner. This was more to tidy up the glue marks than rectify issues with the fit which incidently is fantastic, but then this has come to be expected by now.


So with the engine now complete and ready to be installed it seemed a good excuse to crack open the new camera and post some pics.
Next up will be getting the finer details smoothed out ready for priming. I have decided to attach the glass in order to act as a mask. The plan for the engine and their cowlings, providing the dry fit works, is to wrap the engine in cling film and then attach the outer cowling panels. Hopefully the little magnets will still hold everything in place and make life a little easier for the painting.
Progress so far in this build has now reached the painting stage. All of
the seams have been taken care of in particular those around the machine gun
ports which needed a little work.
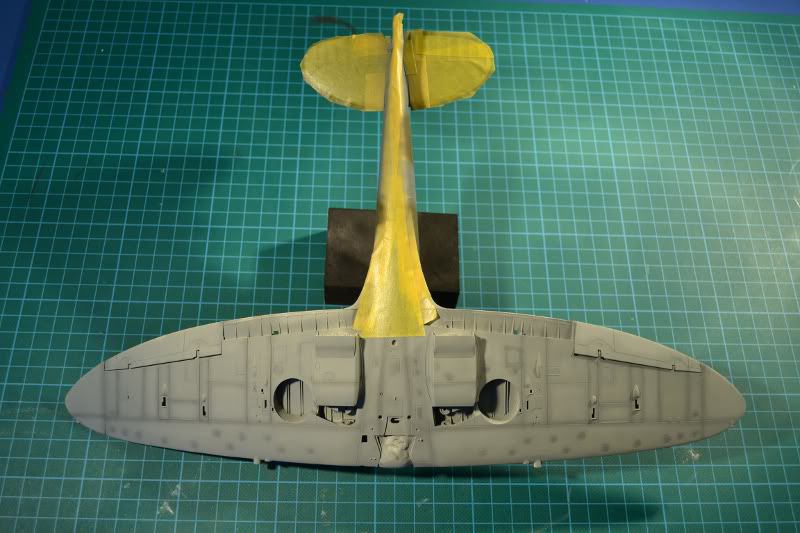
Normally I prime using Tamiya fine white from a rattle can but have decided
this may not be the right option here as I do find it can go on a little thick
and the detail on the panels is so fine I thought it would run the risk of
filling up all the little engraved rivets. Instead I have opted to use Tamiya
sky grey and then pre shaded the panel lines using flat
black.
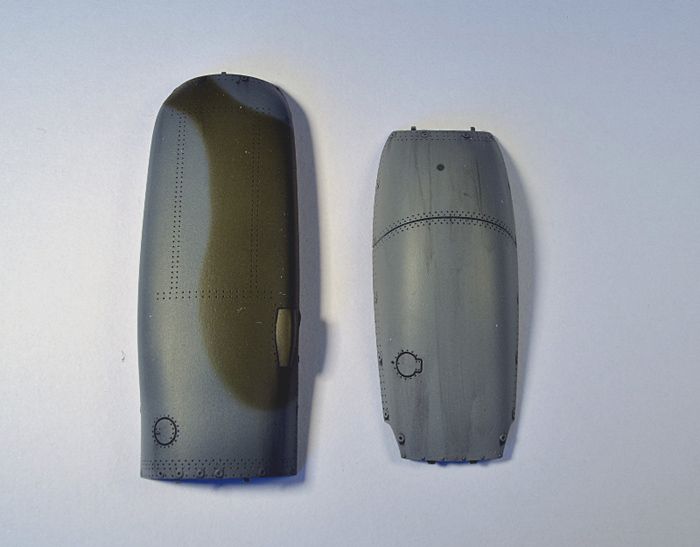
For the keener eyed amongst us you may have noticed I was going to paint with the engine cowlings on. I decided against this as it seemed easier to just mask off the engine bulk head and treat them as separate pieces. Any camo patterns that cross these panels will be carefully lined up before spraying.
To jump back a step I did not have much luck using acrylics as a primer, it
seemed when I gave it a rub down most of the paint came away
as opposed to leaving a nice smooth finish. Quick respray using Tamiya
white fine primer very carefully applied so it did not fill the detail and a rub
down with a very fine cloth and hey presto the smooth finish I was after, back
on with the pre shading and away we go.
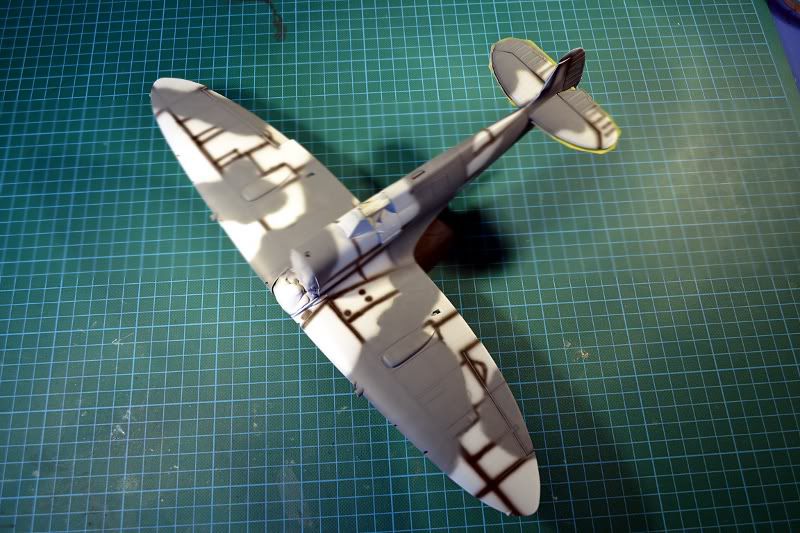
First up was the underside which was post shaded and some of the panel
centres lightened. (Should have taken the picture before the mask was applied
but forgot)
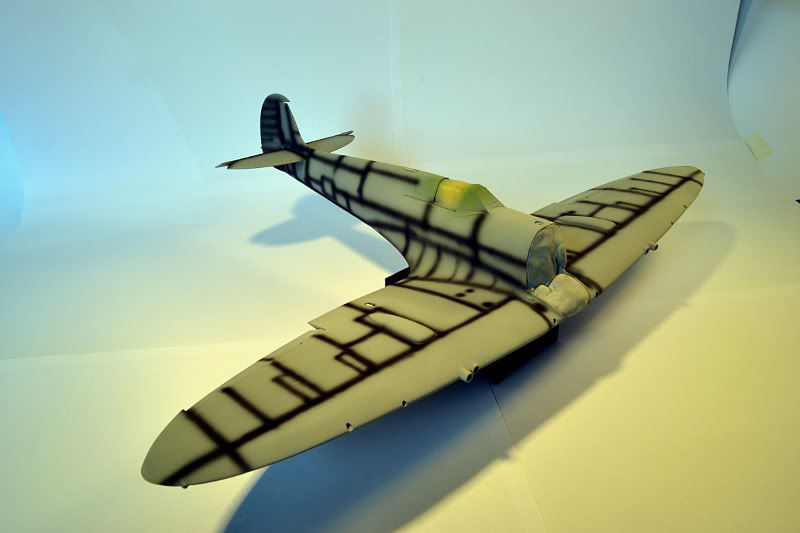
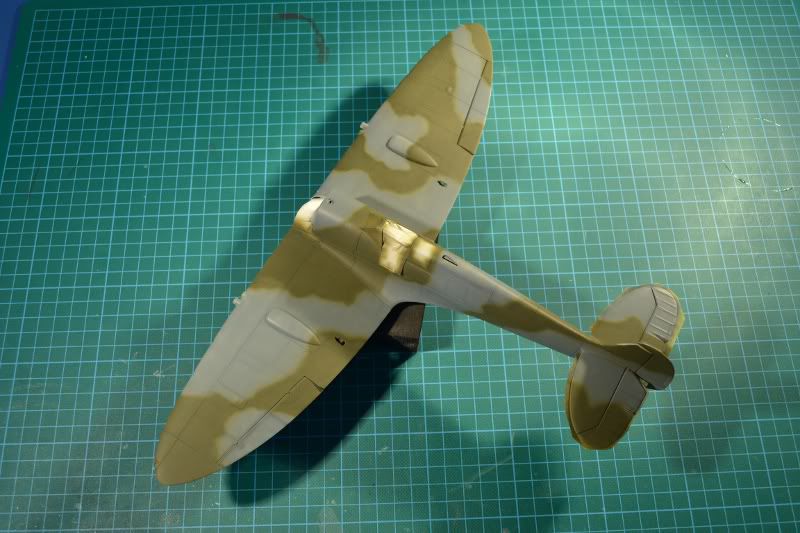
Then it was time for the grey on the upper surfaces. I have decided to give the camo pattern a go free hand.
Then came the darker colours, I should point out at this point I am intending on sharpening up the edges of the camo and filling in any areas that need a little touch up. This will more than likely be after the weekend to give the paint a chance to settle as there has been more than I expected go down and with my wedding only a month away now the boss has a list as long as your arm for the weekend.
I feel like I lost my way or should I say confidence with the build but have managed to get it back, pheww.
I really was not happy with the free hand camo and so decided to clean up
the lines by applying white tack along the edges mask off the rest and really
clean everything up. Finally I felt much more happy with the finished result and
got on with some post shading. This morning the Klear coat has been applied
in preparation for the decals. Hopefully this can be started
late tomorrow afternoon, although I may leave it a little longer and
really give the Klear a good chance to dry fully. Plenty of other bits to be
getting on with in the mean time.
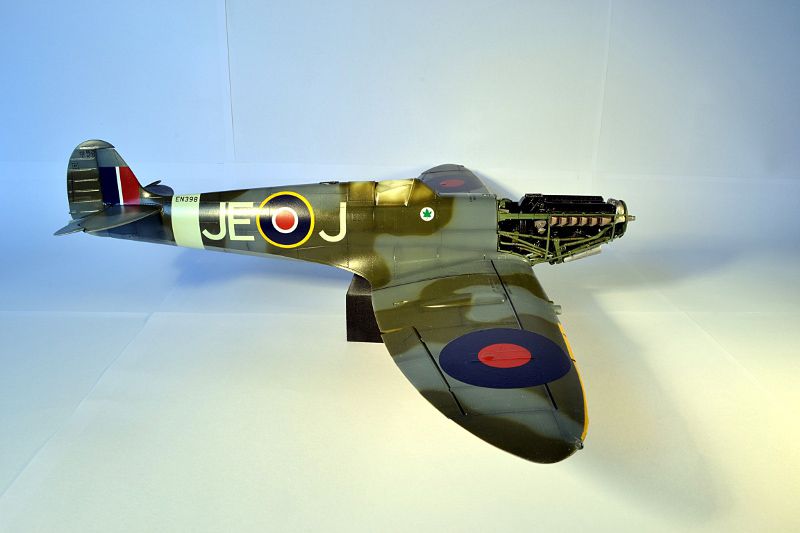
I have been getting the decals on and all the little bits together, this always seems to be a never ending task but I think I am there now. So far the decals have gone down really well and have adhered to the contours really nicely. Unfortunately I have had a bit of a disaster with the roundels (I think this is the name of them) on the underside of the wing. In a moment of stupidity I managed to tear the red centre of the decal and then in an attempt to save it turned it into a small red snot ball, I'm sure we have all been there. A quick search of Relish Models and another set of decals ordered, the left overs can go in the spares box for a later date.

Having just had a perfect wedding and a great honeymoon I can now confirm I
am officially a married man and have come back to earth with an almighty bump
after the shock of going back to work and life returning to normality.
It is nice to get back to the bench and make a little progress on this
build as it gets very close to completion. While I am waiting for the final coat
of klear to dry before the weathering some of the smaller panels have been
washed and matt coated along with the landing gear.

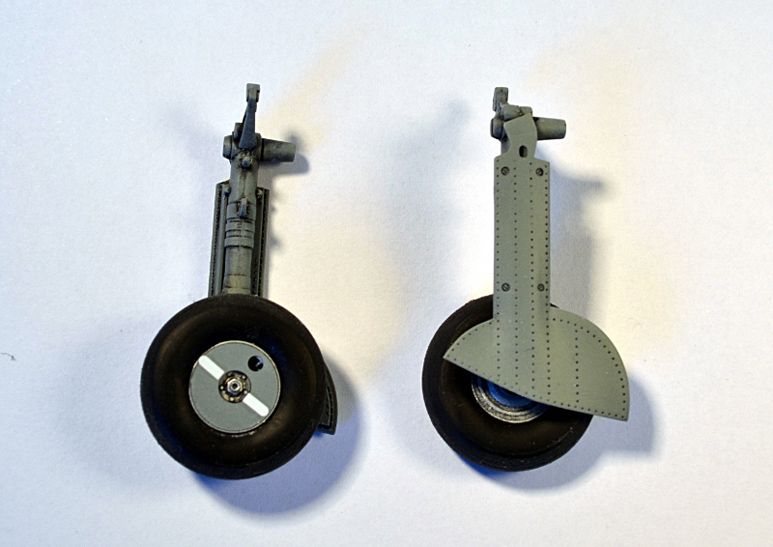
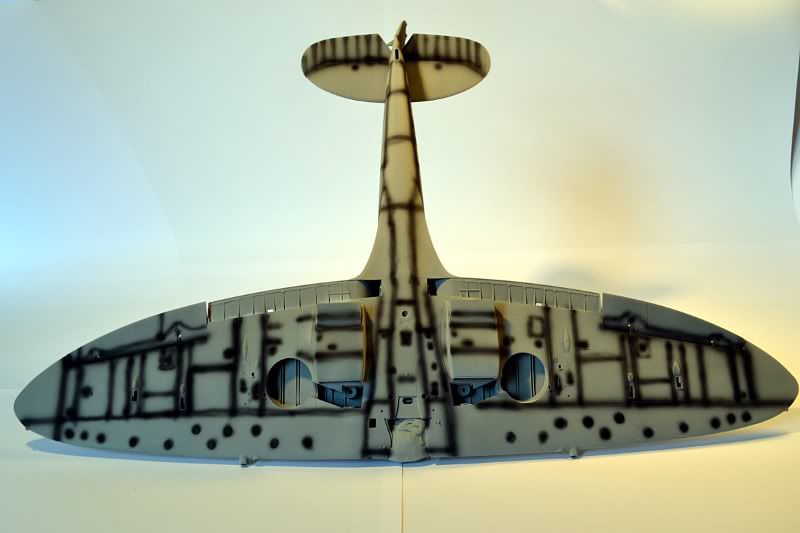
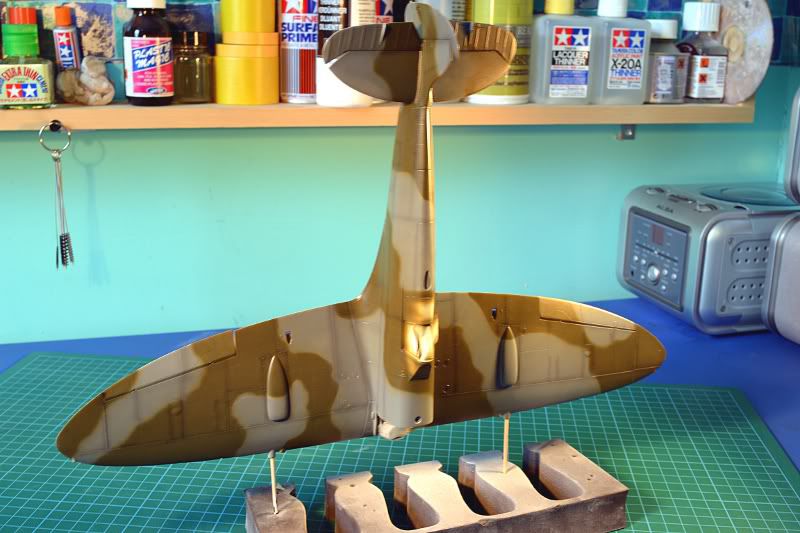
The Weathering has been done using a Black Flory model wash and then some streaking using Black oil paints. Tomorrow morning should be the time for the first of the washes to go on. I all ways enjoy this part where everything comes alive and the end of the build is in sight.
A big thank you to everyone who has offered their encouragement, thoughts,
tips and advice throughout this build as it has all helped in one way or
another. The Kit is, as you would expect, simply stunning and a joy to work
with. If you have it in the stash then I can thoroughly recommend it
sees the bench soon as you will love building it. If it is on the list to buy
and add to the stash do not hesitate in purchasing it as they are worth every
single penny.
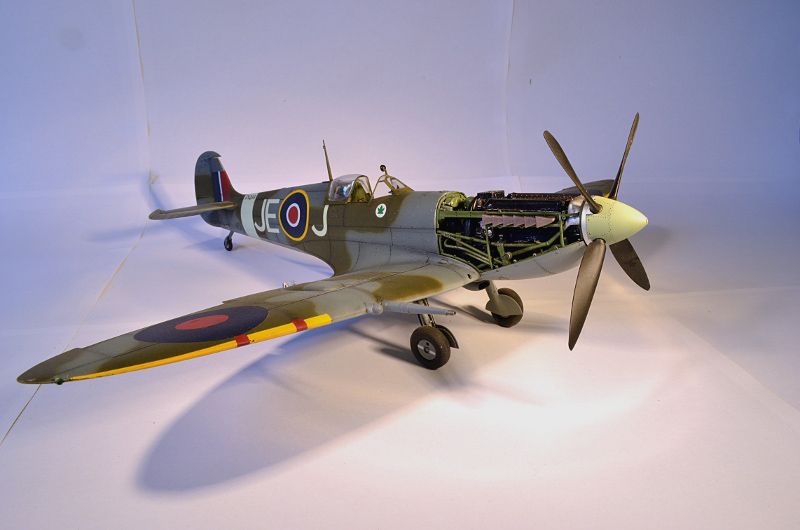
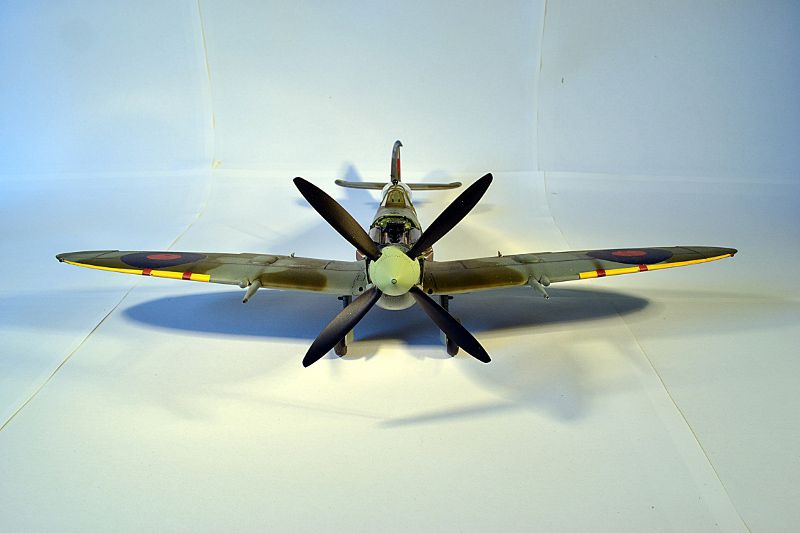
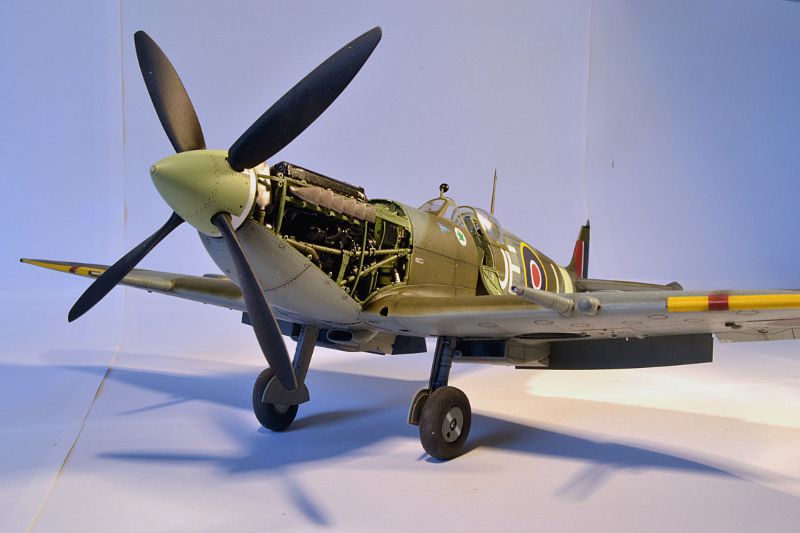
Well here it is Finally completed and what a joy to
build.


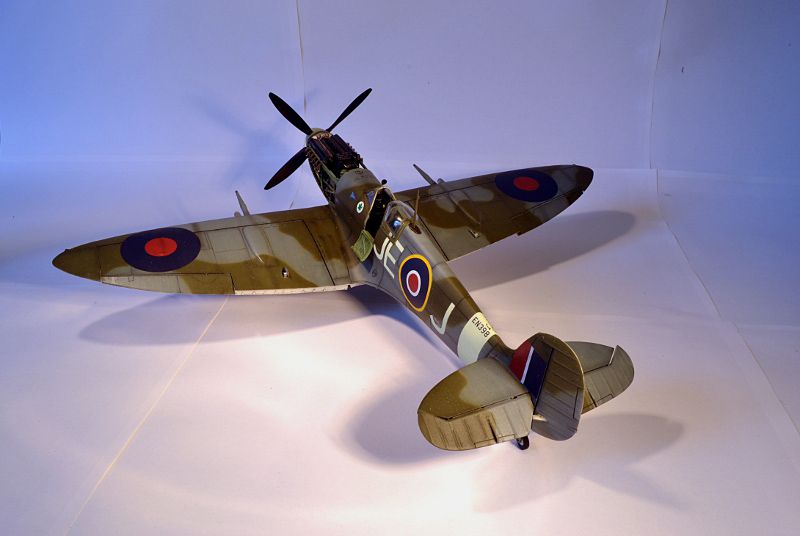

Thanks for the support and encouragement that has been offered. Now its
time to think of the next build, not that it will take to long.
Rob